如何在 Android 中为通知添加振动和声音?
androidapps/applicationsmobile development
此示例演示了如何在 Android 中为通知添加振动和声音。
步骤 1 − 在 Android Studio 中创建一个新项目,转到"文件"->"新建项目",并填写所有必需的详细信息以创建新项目。
步骤 2 − 将以下代码添加到 res/layout/activity_main.xml。
<? xml version= "1.0" encoding= "utf-8" ?>
<android.support.constraint.ConstraintLayout
   xmlns: android = "http://schemas.android.com/apk/res/android"
   xmlns: app = "http://schemas.android.com/apk/res-auto"
   xmlns: tools = "http://schemas.android.com/tools"
   android :layout_width= "match_parent"
   android :layout_height= "match_parent"
   android :padding= "16dp"
   tools :context= ".MainActivity" >
   <Button
      android :id= "@+id/btnCreateNotification"
      android :layout_width= "0dp"
      android :layout_height= "wrap_content"
      android :text= "Create notification"
      app :layout_constraintBottom_toBottomOf= "parent"
      app :layout_constraintEnd_toEndOf= "parent"
      app :layout_constraintStart_toStartOf= "parent"
      app :layout_constraintTop_toTopOf= "parent" />
</android.support.constraint.ConstraintLayout>
步骤 3 − 将以下代码添加到 src/MainActivity.java
package app.tutorialspoint.com.notifyme;
import android.app.NotificationManager;
import android.content.Context;
import android.media.RingtoneManager;
import android.net.Uri;
import android.support.v4.app.NotificationCompat;
import android.support.v7.app.AppCompatActivity;
import android.os.Bundle;
import android.view.View;
import android.widget.Button;
import java.util.Objects;
public class MainActivity extends AppCompatActivity {
   private final static String default_notification_channel_id = "default" ;
   @Override
   protected void onCreate (Bundle savedInstanceState) {
      super .onCreate(savedInstanceState);
      setContentView(R.layout. activity_main );
      Button btnCreateNotification = findViewById(R.id. btnCreateNotification );
      btnCreateNotification.setOnClickListener( new View.OnClickListener() {
         @Override
         public void onClick (View v) {
            Uri alarmSound = RingtoneManager. getDefaultUri (RingtoneManager. TYPE_NOTIFICATION);
            NotificationCompat.Builder mBuilder =
               new NotificationCompat.Builder(MainActivity.this,
               default_notification_channel_id )
               .setSmallIcon(R.drawable. ic_launcher_foreground )
               .setVibrate( new long []{ 1000 , 1000 , 1000 , 1000 , 1000 })
               .setContentTitle( "Test" )
               .setSound(alarmSound)
               .setContentText( "Hello! This is my first push notification" ) ;
            NotificationManager mNotificationManager = (NotificationManager)
               getSystemService(Context.NOTIFICATION_SERVICE);
            mNotificationManager.notify(( int ) System. currentTimeMillis (), mBuilder.build());
         }
      });
   }
}
步骤 4 − 将以下代码添加到 androidManifest.xml
<? xml version= "1.0" encoding= "utf-8" ?>
<manifest xmlns: android = "http://schemas.android.com/apk/res/android"
   package= "app.tutorialspoint.com.notifyme" >
   <uses-permission android :name= "android.permission.VIBRATE" />
   <application
      android :allowBackup= "true"
      android :icon= "@mipmap/ic_launcher"
      android :label= "@string/app_name"
      android :roundIcon= "@mipmap/ic_launcher_round"
      android :supportsRtl= "true"
      android :theme= "@style/AppTheme" >
      <activity android :name= ".MainActivity" >
         <intent-filter>
            <action android :name= "android.intent.action.MAIN" />
            <category android :name= "android.intent.category.LAUNCHER" />
         </intent-filter>
      </activity>
      <service
         android :name= ".MyFirebaseMessagingService"
         android :exported= "false" >
         <intent-filter>
            <action android :name= "com.google.firebase.MESSAGING_EVENT" />
         </intent-filter>
      </service>
   </application>
</manifest>
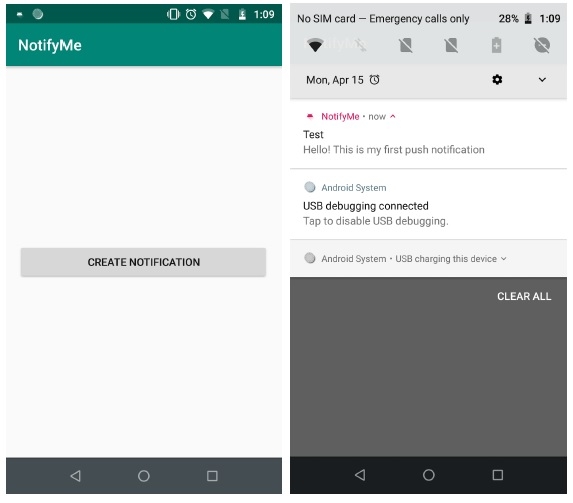
让我们尝试运行您的应用程序。假设您已将实际的 Android 移动设备连接到电脑。要从 Android Studio 运行该应用程序,请打开项目的某个活动文件,然后点击工具栏上的"运行"图标  。选择您的移动设备作为选项,然后勾选将显示默认屏幕的移动设备 –