
如何在 Android 中更改通知背景颜色?
androidapps/applicationsmobile development更新于 2026/2/15 22:52:17
此示例演示了如何在 Android 通知中为文本内容添加字幕。
步骤 1 − 在 Android Studio 中创建一个新项目,前往"文件"->"新建项目",并填写所有必填信息以创建新项目。
步骤 2 − 将以下代码添加到 res/layout/activity_main.xml。
<? xml version = "1.0" encoding = "utf-8" ?>
<RelativeLayout xmlns: android = "http://schemas.android.com/apk/res/android"
   xmlns: tools = "http://schemas.android.com/tools"
   android :layout_width = "match_parent"
   android :layout_height = "match_parent"
   tools :context = ".MainActivity" >
   <Button
      android :layout_width = "match_parent"
      android :layout_height = "wrap_content"
      android :layout_centerInParent = "true"
      android :layout_margin = "16dp"
      android :onClick = "createNotification"
      android :text = "create notification" />
</RelativeLayout>
步骤 3 − 将以下代码添加到 res/layout/custom_notification_layout.xml。
<? xml version = "1.0" encoding = "utf-8" ?>
<RelativeLayout xmlns: android = "http://schemas.android.com/apk/res/android"
   android :id = "@+id/layout"
   android :layout_width = "fill_parent"
   android :layout_height = "64dp"
   android :background = "@color/colorAccent"
   android :padding = "10dp" >
   <ImageView
      android :id = "@+id/image"
      android :layout_width = "wrap_content"
      android :layout_height = "fill_parent"
      android :layout_alignParentStart = "true"
      android :layout_marginEnd = "10dp"
      android :contentDescription = "@string/app_name"
      android :src = "@mipmap/ic_launcher" />
   <TextView
      android :id = "@+id/title"
      android :layout_width = "wrap_content"
      android :layout_height = "wrap_content"
      android :layout_toEndOf = "@id/image"
      android :text = "Testing"
      android :textColor = "#000"
      android :textSize = "13sp" />
   <TextView
      android :id = "@+id/text"
      android :layout_width = "wrap_content"
      android :layout_height = "wrap_content"
      android :layout_below = "@id/title"
      android :layout_toEndOf = "@id/image"
      android :ellipsize = "marquee"
      android :singleLine = "true"
      android :text = "Lorem Ipsum is simply dummy text of the printing and typesetting
         industry. Lorem Ipsum has been the industry's standard dummy text ever since the
         1500s, when an unknown printer took a galley of type and scrambled it to make a type
         specimen book. It has survived not only five centuries, but also the leap into
         electronic typesetting, remaining essentially unchanged. It was popularised in the
         1960s with the release of Letraset sheets containing Lorem Ipsum passages, and more
         recently with desktop publishing software like Aldus PageMaker including versions of
         Lorem Ipsum. "
   android :textColor = "#000"
   android :textSize = "13sp" />
</RelativeLayout>
步骤 4 − 将以下代码添加到 src/MainActivity。
package app.tutorialspoint.com.notifyme ;
import android.app.NotificationChannel ;
import android.app.NotificationManager ;
import android.os.Bundle ;
import android.support.v4.app.NotificationCompat ;
import android.support.v7.app.AppCompatActivity ;
import android.view.View ;
import android.widget.RemoteViews ;
public class MainActivity extends AppCompatActivity {
   public static final String NOTIFICATION_CHANNEL_ID = "10001" ;
   private final static String default_notification_channel_id = "default" ;
   @Override
   protected void onCreate (Bundle savedInstanceState) {
      super .onCreate(savedInstanceState) ;
      setContentView(R.layout. activity_main ) ;
   }
   public void createNotification (View view) {
      RemoteViews contentView = new RemoteViews(getPackageName() , R.layout. custom_notification_layout ) ;
      NotificationManager mNotificationManager = (NotificationManager) getSystemService( NOTIFICATION_SERVICE ) ;
      NotificationCompat.Builder mBuilder = new NotificationCompat.Builder(MainActivity. this, default_notification_channel_id ) ;
      mBuilder.setContent(contentView) ;
      mBuilder.setSmallIcon(R.drawable. ic_launcher_foreground ) ;
      mBuilder.setAutoCancel( true ) ;
      if (android.os.Build.VERSION. SDK_INT > = android.os.Build.VERSION_CODES. O ) {
         int importance = NotificationManager. IMPORTANCE_HIGH ;
         NotificationChannel notificationChannel = new NotificationChannel( NOTIFICATION_CHANNEL_ID , "NOTIFICATION_CHANNEL_NAME" , importance) ;
         mBuilder.setChannelId( NOTIFICATION_CHANNEL_ID ) ;
         assert mNotificationManager != null;
         mNotificationManager.createNotificationChannel(notificationChannel) ;
      }
      assert mNotificationManager != null;
      mNotificationManager.notify(( int ) System. currentTimeMillis () ,
      mBuilder.build()) ;
   }
}
步骤 5 − 将以下代码添加到 AndroidManifest.xml
<? xml version = "1.0" encoding = "utf-8" ?>
<manifest xmlns: android = "http://schemas.android.com/apk/res/android"
   package = "app.tutorialspoint.com.notifyme" >
   <uses-permission android :name = "android.permission.VIBRATE" />
   <application
      android :allowBackup = "true"
      android :icon = "@mipmap/ic_launcher"
      android :label = "@string/app_name"
      android :roundIcon = "@mipmap/ic_launcher_round"
      android :supportsRtl = "true"
      android :theme = "@style/AppTheme" >
      <activity android :name = ".MainActivity" >
         <intent-filter>
            <action android :name = "android.intent.action.MAIN" />
            <category android :name = "android.intent.category.LAUNCHER" />
         </intent-filter>
      </activity>
   </application>
</manifest>
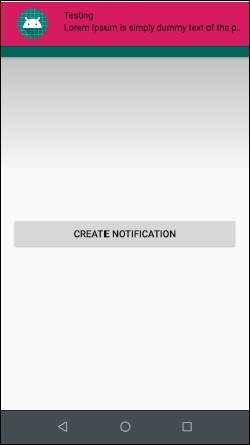
让我们尝试运行您的应用程序。假设您已将实际的 Android 移动设备连接到电脑。要从 Android Studio 运行该应用程序,请打开项目的某个活动文件,然后点击工具栏上的"运行"图标  。选择您的移动设备作为选项,然后勾选将显示默认屏幕 − 的移动设备。
点击此处下载项目代码

