
如何在 Angular 8 中创建自定义指令?
在 Angular 中,指令是最重要的元素之一。指令 就像 Angular 框架中的组件一样,是构建应用程序的基石。指令用于通过更改 DOM 元素的外观、行为或布局来修改 DOM。
指令 用于提供或生成新的基于 HTML 的语法,从而扩展 Angular 应用程序中 UI 的功能。每个指令都必须具有与组件相同的选择器。简而言之,Angular 中的每个组件都是一个带有自定义 HTML 模板的指令。
在 Angular 中,我们可以使用指令来更改 HTML DOM 元素的行为或结构。指令分为三类。
组件型指令
结构型指令,例如 *ngIf、*ngFor、*ngSwitch
属性型指令,例如 *ngStyle、*ngClass
我们也可以创建自定义指令。
我们来看下面的示例。
自定义指令
创建自定义指令类似于创建 Angular 组件。要创建自定义指令,我们需要将 @Component 替换为 @Directive 装饰器。
创建属性型自定义指令
我们以通过设置背景颜色来突出显示选定的 DOM 为例。让我们为其创建自定义指令。
示例
首先,创建一个指令文件。例如,src/app 文件夹中的 show-highlight.directive.ts 文件。
import { Directive, ElementRef } from "@angular/core";
@Directive({
   selector: "[highlightEle]"
})
export class ShowHighlightDirective {
   constructor(private elementRef: ElementRef) {
      this.elementRef.nativeElement.style.color = "green";
   }
}
这里,ElementRef 帮助我们访问 DOM 元素。选择器,即 highlightEle,我们可以在应用程序的任何地方使用它。如果我们应用程序中的任何地方都有相同的高亮功能,我们可以简单地使用这个选择器。
创建指令后,我们需要在 app.module.ts 文件中导入该指令。例如,
import { BrowserModule } from "@angular/platform-browser";
import { NgModule } from "@angular/core";
import { AppComponent } from "./app.component";
import { ShowHighlightDirective } from "./show-highlight.directive";
@NgModule({
   declarations: [AppComponent, ShowHighlightDirective],
   imports: [BrowserModule],
   providers: [],
   bootstrap: [AppComponent]
})
export class AppModule {}
这里,我们将服务类作为提供程序导入。在 @NgModule 中,我们有四个部分。
声明 - 定义导入的组件和指令
导入 - 定义导入的模块
提供程序 - 定义导入的服务
引导程序 - 定义用于显示数据的根组件
现在,让我们在组件中使用 hightlightEle 选择器。
在 app.component.html 文件中
<div>
   <p highlightEle>Custom Attribute directive</p>
</div>
输出
Custom Attribute directive
You have successfully created custom directive
自定义结构型指令
我们有一个结构型指令 *ngIf。现在,它与自定义指令具有相同的功能。我们来看下面的示例
在 src/app 中创建一个名为 custom-if.directive.ts 的指令。
在 custom-if.directive.ts 文件中添加如下代码。例如:
import { Directive, ViewContainerRef, TemplateRef, Input } from "@angular/core";
@Directive({
   selector: "[customIf]"
})
export class customIfDirective {
   customIf: boolean;
   constructor(
   private viewContainer: ViewContainerRef,
   private templateRef: TemplateRef<any>
   ) {}
   @Input()
   set customIf(condition) {
      this.customIf = condition;
      this.updateView();
   }
   updateView() {
      if (this.customIf) {
         this.viewContainer.createEmbeddedView(this.templateRef);
      } else {
         this.viewContainer.clear();
      }
   }
}
这里,我们使用 ViewContainerRef 和 TemplateRef 实例来操作 DOM。我们使用 @Input 装饰器创建了属性绑定。每当点击复选框导致条件发生变化时,setter 函数就会被调用。如果条件成立,则使用 createEmbeddedView 将数据添加到 HTML 模板中,否则清除 HTML 元素。
现在,我们将指令导入到 app.module.ts 中。例如:
import { BrowserModule } from "@angular/platform-browser";
import { NgModule } from "@angular/core";
import { FormsModule } from "@angular/forms";
import { AppComponent } from "./app.component";
import { customIfDirective } from "./custom-if.directive";
@NgModule({
   declarations: [AppComponent, customIfDirective],
   imports: [BrowserModule, FormsModule],
   providers: [],
   bootstrap: [AppComponent]
})
export class AppModule {}
我们在主模块上方添加了指令。让我们在 app.component.html 文件中使用创建的指令选择器。例如:
<h1>Custom structural directive</h1>
Show Me
<input type="checkbox" [(ngModel)]="check" />
<div *customIf="check">
Using the custom directive
</div>
<div *ngIf="check">
Using the ngIf directive
</div>
在 app.component.ts 文件中定义显示值。例如
import { Component } from "@angular/core";
@Component({
   selector: "app-root",
   templateUrl: "./app.component.html",
   styleUrls: ["./app.component.css"]
})
export class AppComponent {
   check = false;
}
输出

当我们点击复选框时,输出将显示如下
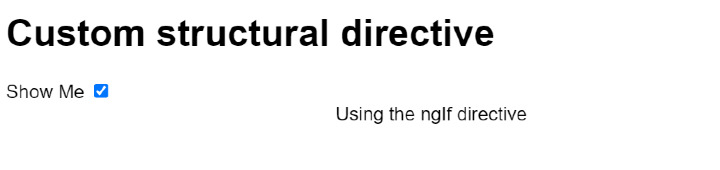
像这样,我们可以创建自己的指令,并在应用程序的任何地方使用。
从上面我们可以看出,指令可以用来在 DOM 元素上实现任何自定义逻辑。指令有助于提高代码的可重用性。Angular 也提供了一些内置指令。我们可以根据需求创建自己的指令。

