如何在 Android WebView 中通过 JavaScript 检测 HTML 按钮的点击?
androidapps/applicationsmobile development更新于 2026/2/15 14:22:17
此示例演示了如何以编程方式锁定 Android 设备。
步骤 1 − 在 Android Studio 中创建一个新项目,前往"文件"->"新建项目",并填写所有必填信息以创建新项目。
步骤 2 − 将以下代码添加到 res/layout/activity_main.xml
<? xml version= "1.0" encoding= "utf-8" ?>
<RelativeLayout xmlns: android = "http://schemas.android.com/apk/res/android"
   xmlns: tools = "http://schemas.android.com/tools"
   android :layout_width= "match_parent"
   android :layout_height= "match_parent"
   android :layout_margin= "16dp"
   tools :context= ".MainActivity" >
   <Button
      android :onClick= "loadPage"
      android :layout_width= "match_parent"
      android :layout_height= "wrap_content"
      android :text= "Load web Page" />
</RelativeLayout>
步骤 3 − 将以下代码添加到 assets/page.html
<html>
   <body>
      First name: <input type= "text" name= "fname" id= "txtfname" ><br>
      Last name: <input type= "text" name= "lname" id= "txtlname" ><br>
      <script>
         function getValues() {
            document.getElementById("btnOK").value =
            document.getElementById("txtfname").value+"
            "+document.getElementById("txtlname").value;
         }
      </script>
      <button type= "button" value= "" id= "btnOK" onclick= " getValues();ok.performClick(this.value); " > OK </button>
   </body>
</html>
步骤 4 − 将以下代码添加到 src/MainActivity
package app.tutorialspoint.com.sample ;
import android.os.Bundle ;
import android.support.v7.app.AppCompatActivity ;
import android.view.View ;
import android.webkit. JavascriptInterface ;
import android.webkit.WebSettings ;
import android.webkit.WebView ;
import android.widget.Toast ;
public class MainActivity extends AppCompatActivity {
   @Override
   protected void onCreate (Bundle savedInstanceState) {
      super .onCreate(savedInstanceState) ;
      setContentView(R.layout. activity_main ) ;
   }
   public void loadPage (View view) {
      WebView browser = new WebView( this ) ;
      browser.getSettings().setJavaScriptEnabled( true ) ;
      browser.loadUrl( "file:///android_asset/page.html" ) ;
      setContentView(browser) ;
      WebSettings ws = browser.getSettings() ;
      ws.setJavaScriptEnabled( true ) ;
      browser.addJavascriptInterface( new Object() {
         @JavascriptInterface // For API 17+
         public void performClick (String strl) {
            Toast. makeText (MainActivity. this, strl , Toast. LENGTH_SHORT ).show() ;
         }
      } , "ok" ) ;
   }
}
步骤 5 − 将以下代码添加到 AndroidManifest.xml
<? xml version= "1.0" encoding= "utf-8" ?>
<manifest xmlns: android = "http://schemas.android.com/apk/res/android"
   package= "app.tutorialspoint.com.sample" >
   <uses-permission android :name= "android.permission.CALL_PHONE" />
   <application
      android :allowBackup= "true"
      android :icon= "@mipmap/ic_launcher"
      android :label= "@string/app_name"
      android :roundIcon= "@mipmap/ic_launcher_round"
      android :supportsRtl= "true"
      android :theme= "@style/AppTheme" >
      <activity android :name= ".MainActivity" >
         <intent-filter>
            <action android :name= "android.intent.action.MAIN" />
            <category android :name= "android.intent.category.LAUNCHER" />
         </intent-filter>
      </activity>
      <receiver
         android :name= ".DeviceAdmin"
         android :description= "@string/app_description"
         android :label= "@string/app_name"
         android :permission= "android.permission.BIND_DEVICE_ADMIN" >
         <meta-data
            android :name= "android.app.device_admin"
            android :resource= "@xml/policies" />
         <intent-filter>
            <action android :name= "android.app.action.DEVICE_ADMIN_ENABLED" />
         </intent-filter>
      </receiver>
   </application>
</manifest>
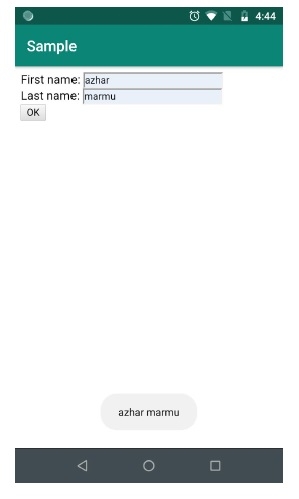
让我们尝试运行您的应用程序。假设您已将实际的 Android 移动设备连接到电脑。要从 Android Studio 运行该应用程序,请打开项目的某个活动文件,然后点击工具栏上的"运行"图标  。选择您的移动设备作为选项,然后勾选将显示默认屏幕的移动设备 –