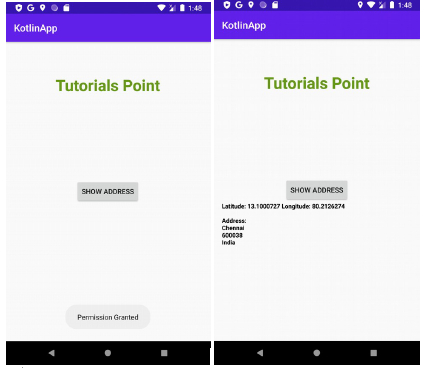
如何在 Android Kotlin 中通过经纬度获取完整地址?
kotlin apps/applicationsmobile developmentandroid更新于 2026/2/10 16:52:17
此示例演示了如何在 Android Kotlin 中通过经纬度获取完整地址?
步骤 1 − 在 Android Studio 中创建一个新项目,前往"文件"->"新建项目",并填写所有必需信息以创建新项目。
步骤 2 − 将以下代码添加到 res/layout/activity_main.xml。
<?xml version="1.0" encoding="utf-8"?>
<RelativeLayout xmlns:android="http://schemas.android.com/apk/res/android"
   xmlns:tools="http://schemas.android.com/tools"
   android:layout_width="match_parent"
   android:layout_height="match_parent"
   android:padding="16sp"
   tools:context=".MainActivity">
   <TextView
      android:layout_width="wrap_content"
      android:layout_height="wrap_content"
      android:layout_centerHorizontal="true"
      android:layout_marginTop="50dp"
      android:text="Tutorials Point"
      android:textAlignment="center"
      android:textColor="@android:color/holo_green_dark"
      android:textSize="32sp"
      android:textStyle="bold" />
   <Button
      android:id="@+id/btnShowAddress"
      android:layout_width="wrap_content"
      android:layout_height="wrap_content"
      android:layout_centerInParent="true"
      android:text="Show Address" />
   <TextView
      android:id="@+id/tvAddress"
      android:layout_width="fill_parent"
      android:layout_height="wrap_content"
      android:layout_below="@id/btnShowAddress"
      android:layout_centerInParent="true"
      android:textColor="@android:color/background_dark"
      android:textSize="12sp"
      android:textStyle="bold" />
</RelativeLayout>
步骤 3 − 将以下代码添加到 src/MainActivity.kt
import android.content.Intent
import android.content.pm.PackageManager
import android.location.Location
import android.location.LocationManager
import android.os.Bundle
import android.os.Handler
import android.os.Message
import android.provider.Settings
import android.widget.Button
import android.widget.TextView
import android.widget.Toast
import androidx.appcompat.app.AlertDialog
import androidx.appcompat.app.AppCompatActivity
import androidx.core.app.ActivityCompat
import androidx.core.content.ContextCompat
class MainActivity : AppCompatActivity() {
   lateinit var btnShowAddress: Button
   lateinit var tvAddress: TextView
   lateinit var location: Location
   lateinit var appLocationService: AppLocationService
   override fun onCreate(savedInstanceState: Bundle?) {
      super.onCreate(savedInstanceState)
      setContentView(R.layout.activity_main)
      title = "KotlinApp"
      tvAddress = findViewById(R.id.tvAddress)
      appLocationService = AppLocationService(this)
      btnShowAddress = findViewById(R.id.btnShowAddress)
      if (ContextCompat.checkSelfPermission(this, Manifest.permission.ACCESS_FINE_LOCATION) != PackageManager.PERMISSION_GRANTED) {
         if (ActivityCompat.shouldShowRequestPermissionRationale(this, Manifest.permission.ACCESS_FINE_LOCATION)) {
            ActivityCompat.requestPermissions(this, arrayOf(Manifest.permission.ACCESS_FINE_LOCATION), 1);
         } else {
            ActivityCompat.requestPermissions(this, arrayOf(Manifest.permission.ACCESS_FINE_LOCATION), 1);
         }
      }
      btnShowAddress.setOnClickListener {
         location = appLocationService.getLocation(LocationManager.GPS_PROVIDER)!!
         val latitude = 13.1000727
         val longitude = 80.2126274
         val locationAddress = LocationAddress()
         locationAddress.getAddressFromLocation(
            latitude, longitude, applicationContext, GeoCodeHandler()
         )
         showSettingsAlert()
      }
   }
   private fun showSettingsAlert() {
      val alertDialog = AlertDialog.Builder(this)
      alertDialog.setTitle("SETTINGS")
      alertDialog.setMessage("Enable Location Provider! Go to settings menu?")
      alertDialog.setPositiveButton("Settings") { _, _ ->
         val intent = Intent(Settings.ACTION_LOCATION_SOURCE_SETTINGS)
         this@MainActivity.startActivity(intent)
      }
      alertDialog.setNegativeButton("Cancel") { dialog, _ -> dialog.cancel() }
      alertDialog.show()
   }
   internal inner class GeoCodeHandler : Handler() {
      override fun handleMessage(message: Message) {
         val locationAddress: String
         locationAddress = when (message.what) {
            1 -> {
               val bundle = message.data
               bundle.getString("address")
            }
            else -> null.toString()
         }
         tvAddress.text = locationAddress
      }
   }
   override fun onRequestPermissionsResult(
      requestCode: Int,
      permissions: Array<out String>,
      grantResults: IntArray
   ) {
      when (requestCode) {
         1 -> {
            if (grantResults.isNotEmpty() && grantResults[0] ===
            PackageManager.PERMISSION_GRANTED) {
               if ((ContextCompat.checkSelfPermission(
                  this@MainActivity,
                  Manifest.permission.ACCESS_FINE_LOCATION
               ) === PackageManager.PERMISSION_GRANTED)
               ) {
                  Toast.makeText(this, "Permission Granted", Toast.LENGTH_SHORT).show()
               }
            } else {
               Toast.makeText(this, "Permission Denied", Toast.LENGTH_SHORT).show()
            }
            return
         }
      }
   }
}
步骤 4 − 创建一个 kotlin 类,并在 AppLocationService.kt 中添加以下代码
示例
import android.annotation.SuppressLint
import android.app.Service
import android.content.Context
import android.content.Intent
import android.location.Location
import android.location.LocationListener
import android.location.LocationManager
import android.os.Bundle
import android.os.IBinder
open class AppLocationService(context: Context) : Service(),
LocationListener {
   private var locationManager: LocationManager? =
   context.getSystemService(Context.LOCATION_SERVICE) as LocationManager
   private lateinit var location: Location
   @SuppressLint("MissingPermission")
   fun getLocation(provider: String?): Location? {
      if (locationManager!!.isProviderEnabled(provider)) {
         locationManager!!.requestLocationUpdates(
         provider,
         MIN_TIME_FOR_UPDATE,
         MIN_DISTANCE_FOR_UPDATE.toFloat(), this
         )
         if (locationManager != null) {
            location = locationManager!!.getLastKnownLocation(provider)
            return location
         }
      }
      return null
   }
   override fun onLocationChanged(location: Location) {}
   override fun onProviderDisabled(provider: String) {}
   override fun onProviderEnabled(provider: String) {}
   override fun onStatusChanged(
   provider: String,
   status: Int,
   extras: Bundle
   ) {
   }
   override fun onBind(arg0: Intent): IBinder? {
      return null
   }
   companion object {
      private const val MIN_DISTANCE_FOR_UPDATE: Long = 10
      private const val MIN_TIME_FOR_UPDATE = 1000 * 60 * 2.toLong()
   }
}
步骤 5 − 创建一个 kotlin 类并在 LocationAddress.kt 中添加以下代码
示例
import android.content.Context
import android.location.Geocoder
import android.os.Bundle
import android.os.Handler
import android.os.Message
import android.util.Log
import java.io.IOException
import java.util.*
class LocationAddress {
   private val tag = "LocationAddress"
   fun getAddressFromLocation(
   latitude: Double,
   longitude: Double, context: Context, handler: Handler
   ) {
      val thread = object : Thread() {
         override fun run() {
            val geoCoder = Geocoder(
            context,
            Locale.getDefault()
            )
            var result: String = null.toString()
            try {
               val addressList = geoCoder.getFromLocation(
               latitude, longitude, 1
               )
               if ((addressList != null && addressList.size > 0)) {
                  val address = addressList.get(0)
                  val sb = StringBuilder()
                  for (i in 0 until address.maxAddressLineIndex) {
                     sb.append(address.getAddressLine(i)).append("
")
                  }
                  sb.append(address.locality).append("
")
                  sb.append(address.postalCode).append("
")
                  sb.append(address.countryName)
                  result = sb.toString()
               }
            } catch (e: IOException) {
               Log.e(tag, "Unable connect to GeoCoder", e)
            } finally {
               val message = Message.obtain()
               message.target = handler
               message.what = 1
               val bundle = Bundle()
               result = ("Latitude: " + latitude + " Longitude: " + longitude +
               "

Address:
" + result)
               bundle.putString("address", result)
               message.data = bundle
               message.sendToTarget()
            }
         }
      }
      thread.start()
   }
}
步骤 6 − 将以下代码添加到 androidManifest.xml
<?xml version="1.0" encoding="utf-8"?>
<manifest xmlns:android="http://schemas.android.com/apk/res/android" package="app.com.q11">
<uses-permission android:name="android.permission.ACCESS_FINE_LOCATION"/>
   <application
      android:allowBackup="true"
      android:icon="@mipmap/ic_launcher"
      android:label="@string/app_name"
      android:roundIcon="@mipmap/ic_launcher_round"
      android:supportsRtl="true"
      android:theme="@style/AppTheme">
      <activity android:name=".MainActivity">
         <intent-filter>
            <action android:name="android.intent.action.MAIN" />
            <category android:name="android.intent.category.LAUNCHER" />
         </intent-filter>
      </activity>
   </application>
</manifest>
让我们尝试运行您的应用程序。假设您已将实际的 Android 移动设备连接到电脑。要从 Android Studio 运行该应用程序,请打开项目的某个活动文件,然后点击工具栏上的"运行"图标 。选择您的移动设备作为选项,然后勾选将显示默认屏幕的移动设备