如何使用 Kotlin 在 Android 上解析 JSON 对象?
androidmobile developmentapps/applicationskotlin
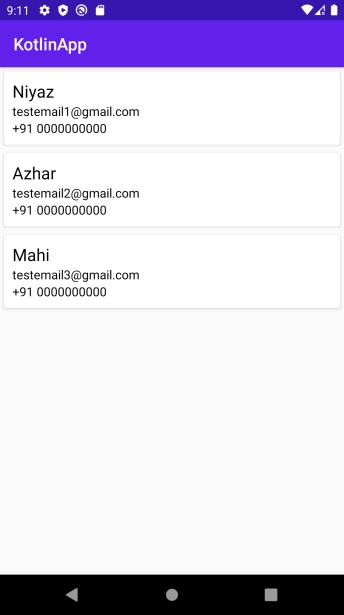
本示例演示如何使用 Kotlin 在 Android 上解析 JSON 对象。
步骤 1 - 在 Android Studio 中创建一个新项目,依次点击"文件">"新建项目",并填写所有必需信息以创建新项目。
步骤 2 - 将以下代码添加到 res/layout/activity_main.xml 文件中。
<?xml version="1.0" encoding="utf-8"?>
<RelativeLayout xmlns:android="http://schemas.android.com/apk/res/android"
   xmlns:tools="http://schemas.android.com/tools"
   android:layout_width="match_parent"
   android:layout_height="match_parent"
   tools:context=".MainActivity">
   <androidx.recyclerview.widget.RecyclerView
      android:id="@+id/recyclerView"
      android:layout_width="match_parent"
      android:layout_height="match_parent" />
</RelativeLayout>
步骤 3 - 创建一个新的资源文件夹,并创建 user_list.json 文件以及以下代码。
{
   "users":[
      {
         "name":"Niyaz",
         "email":"testemail1@gmail.com",
         "contact":{
            "mobile":"+91 0000000000"
         }
      },
      {
         "name":"Azhar",
         "email":"testemail2@gmail.com",
         "contact":{
            "mobile":"+91 0000000000"
         }
      },
      {
         "name":"Mahi",
         "email":"testemail3@gmail.com",
         "contact":{
            "mobile":"+91 0000000000"
         }
      }
   ]
}
步骤 4 − 将以下代码添加到 src/MainActivity.kt
import android.os.Bundle
import androidx.appcompat.app.AppCompatActivity
import androidx.recyclerview.widget.LinearLayoutManager
import androidx.recyclerview.widget.RecyclerView
import org.json.JSONException
import org.json.JSONObject
import java.io.IOException
import java.nio.charset.Charset
class MainActivity : AppCompatActivity() {
   var personName: ArrayList<String> = ArrayList()
   var emailId: ArrayList<String> = ArrayList()
   var mobileNumbers: ArrayList<String> = ArrayList()
   override fun onCreate(savedInstanceState: Bundle?) {
      super.onCreate(savedInstanceState)
      setContentView(R.layout.activity_main)
      title = "KotlinApp"
      val recyclerView = findViewById<RecyclerView>(R.id.recyclerView)
      val linearLayoutManager = LinearLayoutManager(applicationContext)
      recyclerView.layoutManager = linearLayoutManager
      try {
         val obj = JSONObject(loadJSONFromAsset())
         val userArray = obj.getJSONArray("users")
         for (i in 0 until userArray.length()) {
            val userDetail = userArray.getJSONObject(i)
            personName.add(userDetail.getString("name"))
            emailId.add(userDetail.getString("email"))
            val contact = userDetail.getJSONObject("contact")
            mobileNumbers.add(contact.getString("mobile"))
         }
      }
      catch (e: JSONException) {
         e.printStackTrace()
      }
      val customAdapter = CustomAdapter(this@MainActivity, personName, emailId, mobileNumbers)
      recyclerView.adapter = customAdapter
   }
   private fun loadJSONFromAsset(): String {
      val json: String?
      try {
         val inputStream = assets.open("users_list.json")
         val size = inputStream.available()
         val buffer = ByteArray(size)
         val charset: Charset = Charsets.UTF_8
         inputStream.read(buffer)
         inputStream.close()
         json = String(buffer, charset)
      }
      catch (ex: IOException) {
         ex.printStackTrace()
         return ""
      }
      return json
   }
}
步骤 5 创建新的类 CustomAdapter.kt 并添加以下代码
import android.content.Context
import android.view.LayoutInflater
import android.view.View
import android.view.ViewGroup
import android.widget.TextView
import android.widget.Toast
import androidx.recyclerview.widget.RecyclerView
import androidx.recyclerview.widget.RecyclerView.ViewHolder
import java.util.*
class CustomAdapter(
   private var context: Context,
   private var personNames: ArrayList<String>,
   private var emailIds: ArrayList<String>,
   private var mobileNumbers: ArrayList<String>
) :
RecyclerView.Adapter<CustomAdapter.MyViewHolder>() {
   override fun onCreateViewHolder(parent: ViewGroup, viewType: Int): MyViewHolder {
      val v = LayoutInflater.from(parent.context).inflate(R.layout.rowlayout, parent, false)
      return MyViewHolder(v)
   }
   override fun onBindViewHolder(holder: MyViewHolder, position: Int) {
      // 将数据设置到 items 中
      holder.name.text = personNames[position]
      holder.email.text = emailIds[position]
      holder.mobileNo.text = mobileNumbers[position]
      // 在项目视图上实现 setOnClickListener 事件。
      holder.itemView.setOnClickListener { // 点击项目时显示包含人名的提示信息
         Toast.makeText(context, personNames[position], Toast.LENGTH_SHORT).show()
      }
   }
   override fun getItemCount(): Int {
      return personNames.size
   }
   inner class MyViewHolder(itemView: View) : ViewHolder(itemView) {
      var name: TextView = itemView.findViewById<View>(R.id.tvName) as TextView
      var email: TextView = itemView.findViewById<View>(R.id.tvEmail) as TextView
      var mobileNo: TextView = itemView.findViewById<View>(R.id.tvMobile) as TextView
   }
}
步骤 6 - 创建布局资源文件 row.xml 并添加以下代码
<?xml version="1.0" encoding="utf-8"?>
<androidx.cardview.widget.CardView xmlns:android="http://schemas.android.com/apk/res/android"
   android:id="@+id/cardView"
   android:layout_width="match_parent"
   android:layout_margin="5dp"
   android:layout_height="wrap_content">
   <LinearLayout
      android:layout_width="match_parent"
      android:layout_height="wrap_content"
      android:orientation="vertical"
      android:padding="10dp">
      <!--items for a single row of RecyclerView-->
      <TextView
         android:id="@+id/tvName"
         android:layout_width="wrap_content"
         android:layout_height="wrap_content"
         android:text="Name"
         android:textColor="#000"
         android:textSize="20sp" />
      <TextView
         android:id="@+id/tvEmail"
         android:layout_width="wrap_content"
         android:layout_height="wrap_content"
         android:text="email@email.com"
         android:textColor="#000"
         android:textSize="15sp" />
      <TextView
         android:id="@+id/tvMobile"
         android:layout_width="wrap_content"
         android:layout_height="wrap_content"
         android:text="e9999999999"
         android:textColor="#000"
         android:textSize="15sp" />
      </LinearLayout>
</androidx.cardview.widget.CardView>
步骤 7 - 将以下代码添加到 androidManifest.xml 文件中
<?xml version="1.0" encoding="utf-8"?>
<manifest xmlns:android="http://schemas.android.com/apk/res/android"
   package="com.example.q11">
   <application
      android:allowBackup="true"
      android:icon="@mipmap/ic_launcher"
      android:label="@string/app_name"
      android:roundIcon="@mipmap/ic_launcher_round"
      android:supportsRtl="true"
      android:theme="@style/AppTheme">
      <activity android:name=".MainActivity">
         <intent-filter>
            <action android:name="android.intent.action.MAIN" />
            <category android:name="android.intent.category.LAUNCHER" />
         </intent-filter>
      </activity>
   </application>
</manifest>
让我们尝试运行您的应用程序。我假设您已将 Android 移动设备连接到计算机。要从 Android Studio 运行应用程序,请打开项目中的一个 Activity 文件,然后点击工具栏中的"运行"图标。选择您的移动设备作为选项,然后选中您的移动设备,它将显示您的默认屏幕。