Spring - 异常处理示例
以下示例展示了如何使用 Spring MVC 框架编写一个简单的基于 Web 的应用程序,该框架可以处理其控制器内部引发的一个或多个异常。 首先,让我们有一个可以工作的 Eclipse IDE,并按照以下步骤使用 Spring Web 框架开发一个基于动态表单的 Web 应用程序 −
| 步骤 | 描述 |
|---|---|
| 1 | 创建一个名为 HelloWeb 的 Dynamic Web Project 并在创建的项目中的 src 文件夹下创建一个包 com.tutorialspoint。 |
| 2 | 将下面提到的 Spring 和其他库拖放到文件夹 WebContent/WEB-INF/lib 中。 |
| 3 | 在 com.tutorialspoint 包下创建 Java 类 Student、StudentController 和 StringException。 |
| 4 | 在WebContent/WEB-INF文件夹下创建Spring配置文件Web.xml和HelloWeb-servlet.xml。 |
| 5 | 在 WebContent/WEB-INF 文件夹下创建一个名为 jsp 的子文件夹。在 jsp 子文件夹下创建视图文件 student.jsp, result.jsp, error.jsp 和 ExceptionPage.jsp。 |
| 6 | 最后一步是创建所有源文件和配置文件的内容并导出应用程序,如下所述。 |
Following is the content of Student.java file
package com.tutorialspoint;

public class Student {
   private Integer age;
   private String name;
   private Integer id;

   public void setAge(Integer age) {
      this.age = age;
   }
   public Integer getAge() {
      return age;
   }
   public void setName(String name) {
      this.name = name;
   }
   public String getName() {
      return name;
   }
   public void setId(Integer id) {
      this.id = id;
   }
   public Integer getId() {
      return id;
   }
}
以下是 SpringException.java 文件的内容
package com.tutorialspoint;

public class SpringException extends RuntimeException{
   private String exceptionMsg;

   public SpringException(String exceptionMsg) {
      this.exceptionMsg = exceptionMsg;
   }
   public String getExceptionMsg(){
      return this.exceptionMsg;
   }
   public void setExceptionMsg(String exceptionMsg) {
      this.exceptionMsg = exceptionMsg;
   }
}
以下是 StudentController.java 文件的内容。 在这里,您需要使用 @ExceptionHandler 注解服务方法,您可以在其中指定要处理的一个或多个异常。 如果您指定了多个例外,则可以使用逗号分隔值。
package com.tutorialspoint;

import org.springframework.stereotype.Controller;
import org.springframework.web.bind.annotation.ExceptionHandler;
import org.springframework.web.bind.annotation.ModelAttribute;
import org.springframework.web.bind.annotation.RequestMapping;
import org.springframework.web.bind.annotation.RequestMethod;
import org.springframework.web.servlet.ModelAndView;
import org.springframework.ui.ModelMap;

@Controller
public class StudentController {
   @RequestMapping(value = "/student", method = RequestMethod.GET)
   public ModelAndView student() {
      return new ModelAndView("student", "command", new Student());
   }
   @RequestMapping(value = "/addStudent", method = RequestMethod.POST)
   @ExceptionHandler({SpringException.class})
   public String addStudent( @ModelAttribute("HelloWeb")Student student,
      ModelMap model) {

      if(student.getName().length() < 5 ){
         throw new SpringException("Given name is too short");
      } else {
         model.addAttribute("name", student.getName());
      }

      if( student.getAge() < 10 ){
         throw new SpringException("Given age is too low");
      } else {
         model.addAttribute("age", student.getAge());
      }
      model.addAttribute("id", student.getId());
      return "result";
   }
}
以下是Spring Web配置文件web.xml的内容
<web-app id = "WebApp_ID" version = "2.4"
   xmlns = "http://java.sun.com/xml/ns/j2ee"
   xmlns:xsi = "http://www.w3.org/2001/XMLSchema-instance"
   xsi:schemaLocation = "http://java.sun.com/xml/ns/j2ee
   http://java.sun.com/xml/ns/j2ee/web-app_2_4.xsd">

   <display-name>Spring Exception Handling</display-name>

   <servlet>
      <servlet-name>HelloWeb</servlet-name>
      <servlet-class>org.springframework.web.servlet.DispatcherServlet</servlet-class>
      <load-on-startup>1</load-on-startup>
   </servlet>

   <servlet-mapping>
      <servlet-name>HelloWeb</servlet-name>
      <url-pattern>/</url-pattern>
   </servlet-mapping>

</web-app>
以下是另一个 Spring Web 配置文件 HelloWeb-servlet.xml 的内容
<beans xmlns = "http://www.springframework.org/schema/beans"
   xmlns:context = "http://www.springframework.org/schema/context"
   axmlns:xsi = "http://www.w3.org/2001/XMLSchema-instance"
   xsi:schemaLocation = "http://www.springframework.org/schema/beans
   http://www.springframework.org/schema/beans/spring-beans-3.0.xsd
   http://www.springframework.org/schema/context
   http://www.springframework.org/schema/context/spring-context-3.0.xsd">

   <context:component-scan base-package = "com.tutorialspoint" />

   <bean class = "org.springframework.web.servlet.view.InternalResourceViewResolver">
      <property name = "prefix" value = "/WEB-INF/jsp/" />
      <property name = "suffix" value = ".jsp" />
   </bean>

   <bean class = "org.springframework.web.servlet.handler.SimpleMappingExceptionResolver">
      <property name = "exceptionMappings">
         <props>
            <prop key = "com.tutorialspoint.SpringException">
               ExceptionPage
            </prop>
         </props>
      </property>
      <property name = "defaultErrorView" value = "error"/>
   </bean>

</beans>
在这里,您将 ExceptionPage 指定为异常视图,以防 SpringException 发生,如果有任何其他类型的异常,则通用视图 error 将发生。
以下是 Spring 视图文件 student.jsp 的内容
<%@taglib uri = "http://www.springframework.org/tags/form" prefix = "form"%>
<html>
   <head>
      <title>Spring MVC Exception Handling</title>
   </head>

   <body>
      <h2>Student Information</h2>
      <form:form method = "POST" action = "/HelloWeb/addStudent">
         <table>
            <tr>
               <td><form:label path = "name">Name</form:label></td>
               <td><form:input path = "name" /></td>
            </tr>
            <tr>
               <td><form:label path = "age">Age</form:label></td>
               <td><form:input path = "age" /></td>
            </tr>
            <tr>
               <td><form:label path = "id">id</form:label></td>
               <td><form:input path = "id" /></td>
            </tr>
            <tr>
               <td colspan = "2"><input type = "submit" value = "Submit"/></td>
            </tr>
         </table>
      </form:form>
   </body>

</html>
以下是 Spring 视图文件 error.jsp 的内容
<html>
   <head>
      <title>Spring Error Page</title>
   </head>

   <body>
      <p>An error occured, please contact webmaster.</p>
   </body>
</html>
以下是 Spring 视图文件 ExceptionPage.jsp 的内容。 在这里,您将通过 ${exception} 访问异常实例。
<%@taglib uri = "http://www.springframework.org/tags/form" prefix = "form"%>
<html>
   <head>
      <title>Spring MVC Exception Handling</title>
   </head>

   <body>
      <h2>Spring MVC Exception Handling</h2>
      <h3>${exception.exceptionMsg}</h3>
   </body>
</html>
以下是 Spring 视图文件 result.jsp 的内容
<%@taglib uri = "http://www.springframework.org/tags/form" prefix = "form"%>
<html>
   <head>
      <title>Spring MVC Form Handling</title>
   </head>

   <body>
      <h2>Submitted Student Information</h2>

      <table>
         <tr>
            <td>Name</td>
            <td>${name}</td>
         </tr>
         <tr>
            <td>Age</td>
            <td>${age}</td>
         </tr>
         <tr>
            <td>ID</td>
            <td>${id}</td>
         </tr>
      </table>
   </body>

</html>
最后,以下是要包含在您的 Web 应用程序中的 Spring 和其他库的列表。 您只需将这些文件拖放到 WebContent/WEB-INF/lib 文件夹中。
- commons-logging-x.y.z.jar
- org.springframework.asm-x.y.z.jar
- org.springframework.beans-x.y.z.jar
- org.springframework.context-x.y.z.jar
- org.springframework.core-x.y.z.jar
- org.springframework.expression-x.y.z.jar
- org.springframework.web.servlet-x.y.z.jar
- org.springframework.web-x.y.z.jar
- spring-web.jar
创建完源文件和配置文件后,导出您的应用程序。 右键单击您的应用程序并使用 Export > WAR File 选项并将您的 HelloWeb.war 文件保存在 Tomcat 的 webapps 文件夹中。
现在启动您的 Tomcat 服务器并确保您能够使用标准浏览器从 webapps 文件夹访问其他网页。 现在尝试访问 URL http://localhost:8080/HelloWeb/student。 如果您的 Spring Web 应用程序一切正常,您应该会看到以下结果。
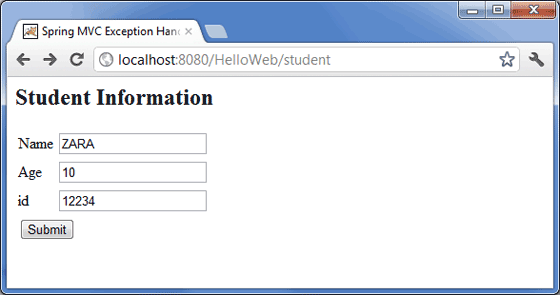
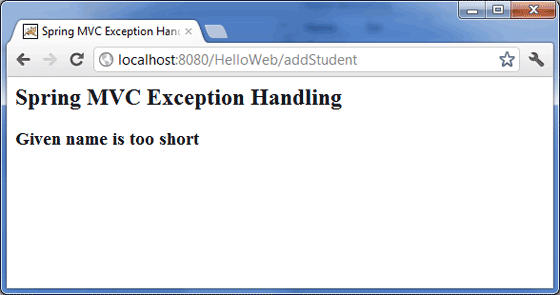
输入如上所示的值,然后单击提交按钮。 如果您的 Spring Web 应用程序一切正常,您应该会看到以下结果。