
Spring MVC Hello World 示例
以下示例展示了如何使用 Spring MVC 框架编写一个简单的基于 Web 的 Hello World 应用程序。 首先,让我们有一个工作的 Eclipse IDE 并采取以下步骤使用 Spring Web 框架开发一个动态 Web 应用程序 −
| 步骤 | 描述 |
|---|---|
| 1 | 创建一个名为 HelloWeb 的 Dynamic Web Project 并在创建的项目中的 src 文件夹下创建一个包 com.tutorialspoint。 |
| 2 | 将下面提到的 Spring 和其他库拖放到文件夹 WebContent/WEB-INF/lib 中。 |
| 3 | 在 com.tutorialspoint 包下创建一个 Java 类 HelloController。 |
| 4 | 在 WebContent/WEB-INF 文件夹下创建 Spring 配置文件 web.xml 和 HelloWeb-servlet.xml 。 |
| 5 | 在 WebContent/WEB-INF 文件夹下创建一个名为 jsp 的子文件夹。 在这个子文件夹下创建一个视图文件 hello.jsp。 |
| 6 | 最后一步是创建所有源文件和配置文件的内容,然后导出应用程序,如下所述。 |
这是 HelloController.java 文件的内容
package com.tutorialspoint;

import org.springframework.stereotype.Controller;
import org.springframework.web.bind.annotation.RequestMapping;
import org.springframework.web.bind.annotation.RequestMethod;
import org.springframework.ui.ModelMap;

@Controller
@RequestMapping("/hello")
public class HelloController {
   @RequestMapping(method = RequestMethod.GET)public String printHello(ModelMap model) {
      model.addAttribute("message", "Hello Spring MVC Framework!");
      return "hello";
   }
}
以下是Spring Web配置文件web.xml的内容
<web-app id = "WebApp_ID" version = "2.4"
   xmlns = "http://java.sun.com/xml/ns/j2ee"
   xmlns:xsi = "http://www.w3.org/2001/XMLSchema-instance"
   xsi:schemaLocation = "http://java.sun.com/xml/ns/j2ee
   http://java.sun.com/xml/ns/j2ee/web-app_2_4.xsd">

   <display-name>Spring MVC Application</display-name>

   <servlet>
      <servlet-name>HelloWeb</servlet-name>
      <servlet-class>
         org.springframework.web.servlet.DispatcherServlet
      </servlet-class>
      <load-on-startup>1</load-on-startup>
   </servlet>

   <servlet-mapping>
      <servlet-name>HelloWeb</servlet-name>
      <url-pattern>/</url-pattern>
   </servlet-mapping>

</web-app>
以下是另一个 Spring Web 配置文件 HelloWeb-servlet.xml 的内容
<beans xmlns = "http://www.springframework.org/schema/beans"
   xmlns:context = "http://www.springframework.org/schema/context"
   xmlns:xsi = "http://www.w3.org/2001/XMLSchema-instance"
   xsi:schemaLocation = "http://www.springframework.org/schema/beans
   http://www.springframework.org/schema/beans/spring-beans-3.0.xsd
   http://www.springframework.org/schema/context
   http://www.springframework.org/schema/context/spring-context-3.0.xsd">

   <context:component-scan base-package = "com.tutorialspoint" />

   <bean class = "org.springframework.web.servlet.view.InternalResourceViewResolver">
      <property name = "prefix" value = "/WEB-INF/jsp/" />
      <property name = "suffix" value = ".jsp" />
   </bean>

</beans>
以下是 Spring 视图文件 hello.jsp 的内容
<%@ page contentType = "text/html; charset = UTF-8" %>
<html>
   <head>
      <title>Hello World</title>
   </head>

   <body>
      <h2>${message}</h2>
   </body>
</html>
最后,以下是您的 Web 应用程序中要包含的 Spring 和其他库的列表。 您只需将这些文件拖放到 WebContent/WEB-INF/lib 文件夹中。
- commons-logging-x.y.z.jar
- org.springframework.asm-x.y.z.jar
- org.springframework.beans-x.y.z.jar
- org.springframework.context-x.y.z.jar
- org.springframework.core-x.y.z.jar
- org.springframework.expression-x.y.z.jar
- org.springframework.web.servlet-x.y.z.jar
- org.springframework.web-x.y.z.jar
- spring-web.jar
创建完源文件和配置文件后,导出您的应用程序。 右键单击您的应用程序并使用 Export > WAR File 选项并将您的 HelloWeb.war 文件保存在 Tomcat 的 webapps 文件夹中。
现在启动您的 Tomcat 服务器并确保您能够使用标准浏览器从 webapps 文件夹访问其他网页。 尝试访问 URL http://localhost:8080/HelloWeb/hello 如果您的 Spring Web 应用程序一切正常,您应该会看到以下结果 −
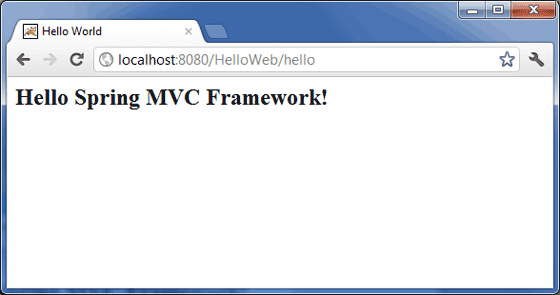
您应该注意,在给定的 URL 中,HelloWeb 是应用程序名称,hello 是我们在控制器中使用 @RequestMapping("/hello") 提到的虚拟子文件夹。您可以在使用 @RequestMapping("/") 映射 URL 时使用直接 root。在这种情况下,您可以使用短 URL http://localhost:8080/HelloWeb/ 访问相同的页面,但建议在不同的文件夹下具有不同的功能。

