
如何在 Android 中创建水平 ListView?
androidapps/applicationsmobile development更新于 2026/1/15 7:07:17
本示例演示了如何在 Android 中创建水平 ListView。
步骤 1 − 在 Android Studio 中创建一个新项目,前往"文件"->"新建项目",并填写所有必需的信息以创建新项目。
步骤 2 − 将以下代码添加到 res/layout/activity_main.xml。
<?xml version="1.0" encoding="utf-8"?>
<LinearLayout xmlns:android="http://schemas.android.com/apk/res/android"
   android:id="@+id/rlMain"
   android:layout_width="match_parent"
   android:layout_height="match_parent"
   android:layout_margin="16dp"
   android:orientation="vertical>
   <androidx.recyclerview.widget.RecyclerView
      android:id="@+id/recyclerView"
      android:layout_width="match_parent"
      android:layout_height="match_parent" />
</LinearLayout>
步骤 3 − 将以下代码添加到 src/MainActivity.java
package app.com.sample;
import android.os.Bundle;
import androidx.appcompat.app.AppCompatActivity;
import androidx.recyclerview.widget.DefaultItemAnimator;
import androidx.recyclerview.widget.LinearLayoutManager;
import androidx.recyclerview.widget.RecyclerView;
import java.util.ArrayList;
import java.util.List;
public class MainActivity extends AppCompatActivity {
   private List<MovieModel> movieList = new ArrayList<>();
   private MoviesAdapter mAdapter;
   @Override
   protected void onCreate(Bundle savedInstanceState) {
      super.onCreate(savedInstanceState);
      setContentView(R.layout.activity_main);
      RecyclerView recyclerView = findViewById(R.id.recyclerView);
      mAdapter = new MoviesAdapter(movieList);
      LinearLayoutManager mLayoutManager = new LinearLayoutManager(getApplicationContext());
      mLayoutManager.setOrientation(LinearLayoutManager.HORIZONTAL);
      recyclerView.setLayoutManager(mLayoutManager);
      recyclerView.setItemAnimator(new DefaultItemAnimator());
      recyclerView.setAdapter(mAdapter);
      prepareMovieData();
   }
   private void prepareMovieData() {
      MovieModel movie = new MovieModel("Mad Max: Fury Road", "Action & Adventure", "2015");
      movieList.add(movie);
      movie = new MovieModel("Inside Out", "Animation, Kids & Family", "2015");
      movieList.add(movie);
      movie = new MovieModel("Star Wars: Episode VII - The Force Awakens", "Action", "2015");
      movieList.add(movie);
      movie = new MovieModel("Shaun the Sheep", "Animation", "2015");
      movieList.add(movie);
      movie = new MovieModel("The Martian", "Science Fiction & Fantasy", "2015");
      movieList.add(movie);
      movie = new MovieModel("Mission: Impossible Rogue Nation", "Action", "2015");
      movieList.add(movie);
      movie = new MovieModel("Up", "Animation", "2009");
      movieList.add(movie);
      movie = new MovieModel("Star Trek", "Science Fiction", "2009");
      movieList.add(movie);
      movie = new MovieModel("The LEGO MovieModel", "Animation", "2014");
      movieList.add(movie);
      movie = new MovieModel("Iron Man", "Action & Adventure", "2008");
      movieList.add(movie);
      movie = new MovieModel("Aliens", "Science Fiction", "1986");
      movieList.add(movie);
      movie = new MovieModel("Chicken Run", "Animation", "2000");
      movieList.add(movie);
      movie = new MovieModel("Back to the Future", "Science Fiction", "1985");
      movieList.add(movie);
      movie = new MovieModel("Raiders of the Lost Ark", "Action & Adventure", "1981");
      movieList.add(movie);
      movie = new MovieModel("Goldfinger", "Action & Adventure", "1965");
      movieList.add(movie);
      movie = new MovieModel("Guardians of the Galaxy", "Science Fiction & Fantasy", "2014");
      movieList.add(movie);
      mAdapter.notifyDataSetChanged();
   }
}
步骤 4 − 将以下代码添加到 src/MovieModel.java
package app.com.sample;
public class MovieModel {
   private String title, genre, year;
   public MovieModel() {
   }
   public MovieModel(String title, String genre, String year) {
      this.title = title;
      this.genre = genre;
      this.year = year;
   }
   public String getTitle() {
      return title;
   }
   public void setTitle(String name) {
      this.title = name;
   }
   public String getYear() {
      return year;
   }
   public void setYear(String year) {
      this.year = year;
   }
   public String getGenre() {
      return genre;
   }
   public void setGenre(String genre) {
      this.genre = genre;
   }
}
步骤 5 − 将以下代码添加到 res/layout/movies_list.xml。
<?xml version="1.0" encoding="utf-8"?>
<androidx.cardview.widget.CardView xmlns:android="http://schemas.android.com/apk/res/android"
   android:layout_width="250dp"
   android:layout_height="100dp"
   android:layout_margin="8dp">
   <RelativeLayout
      android:layout_width="match_parent"
      android:layout_height="match_parent"
      android:padding="8dp">
      <TextView
         android:id="@+id/title"
         android:layout_width="match_parent"
         android:layout_height="wrap_content"
         android:layout_alignParentStart="true"
         android:layout_toStartOf="@+id/year"
         android:textColor="#222222"
         android:textSize="16sp"
         android:textStyle="bold" />
      <TextView
         android:id="@+id/year"
         android:layout_width="wrap_content"
         android:layout_height="wrap_content"
         android:layout_alignParentEnd="true"
         android:textColor="#999999" />
      <TextView
         android:id="@+id/genre"
         android:layout_width="match_parent"
         android:layout_height="wrap_content"
         android:layout_alignParentBottom="true" />
   </RelativeLayout>
</androidx.cardview.widget.CardView>
步骤 6 − 将以下代码添加到 src/MoviesAdapter.java
package app.com.sample;
import android.view.LayoutInflater;
import android.view.View;
import android.view.ViewGroup;
import android.widget.TextView;
import androidx.annotation.NonNull;
import androidx.recyclerview.widget.RecyclerView;
import java.util.List;
public class MoviesAdapter extends RecyclerView.Adapter<MoviesAdapter.MyViewHolder> {
   private List<MovieModel> moviesList;
   class MyViewHolder extends RecyclerView.ViewHolder {
      TextView title, year, genre;
      MyViewHolder(View view) {
         super(view);
         title = view.findViewById(R.id.title);
         genre = view.findViewById(R.id.genre);
         year = view.findViewById(R.id.year);
      }
   }
   public MoviesAdapter(List<MovieModel> moviesList) {
      this.moviesList = moviesList;
   }
   @NonNull
   @Override
   public MyViewHolder onCreateViewHolder(ViewGroup parent, int viewType) {
      View itemView = LayoutInflater.from(parent.getContext())
      .inflate(R.layout.movie_list, parent, false);
      return new MyViewHolder(itemView);
   }
   @Override
   public void onBindViewHolder(MyViewHolder holder, int position) {
      MovieModel movie = moviesList.get(position);
      holder.title.setText(movie.getTitle());
      holder.genre.setText(movie.getGenre());
      holder.year.setText(movie.getYear());
   }
   @Override
   public int getItemCount() {
      return moviesList.size();
   }
}
步骤 7 − 将以下代码添加到 androidManifest.xml
<?xml version="1.0" encoding="utf-8"?>
<manifest xmlns:android="http://schemas.android.com/apk/res/android"
   package="app.com.sample">
   <application
      android:allowBackup="true"
      android:icon="@mipmap/ic_launcher"
      android:label="@string/app_name"
      android:roundIcon="@mipmap/ic_launcher_round"
      android:supportsRtl="true"
      android:theme="@style/AppTheme">
      <activity android:name=".MainActivity">
         <intent-filter>
            <action android:name="android.intent.action.MAIN" />
            <category android:name="android.intent.category.LAUNCHER" />
         </intent-filter>
      </activity>
   </application>
</manifest>
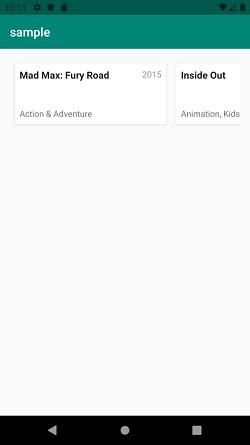
让我们尝试运行您的应用程序。假设您已将实际的 Android 移动设备连接到电脑。要从 Android Studio 运行该应用程序,请打开项目的某个活动文件,然后点击工具栏上的"运行" 图标。选择您的移动设备作为选项,然后检查将显示默认屏幕的移动设备 –
点击此处下载项目代码。

