
如何在 ReactJS 中创建日历?
在某些 Web 应用中,我们需要用户输入日期。例如,我们需要输入用户的出生日期或其他特定日期。在这种情况下,最好向用户显示日历并要求他们选择日期,而不是将日期输入为字符串,因为用户在输入字符串时可能会出错。
在本教程中,我们将学习如何使用内置的 React.js 库添加日历组件,或者从头开始创建日历组件。
使用 React-calendar 库在 ReactJS 中创建日历
"react-calendar"是一个内置的 React 库,允许我们将日历组件嵌入到 ReactJS 中。此外,它还接收 props 参数,以便根据我们的需求自定义日历。
程序员可以在终端中执行以下命令,在项目目录中安装"react-calendar"。
npm i react-calendar
语法
用户可以按照以下语法使用"react-calendar"库中的日历组件。
<Calendar value = {date} />
在上述语法中,我们将"date"变量的值作为 prop 传递,以显示所选日期。但是,我们也可以传递"react-calendar"库文档中提供的其他属性。
示例
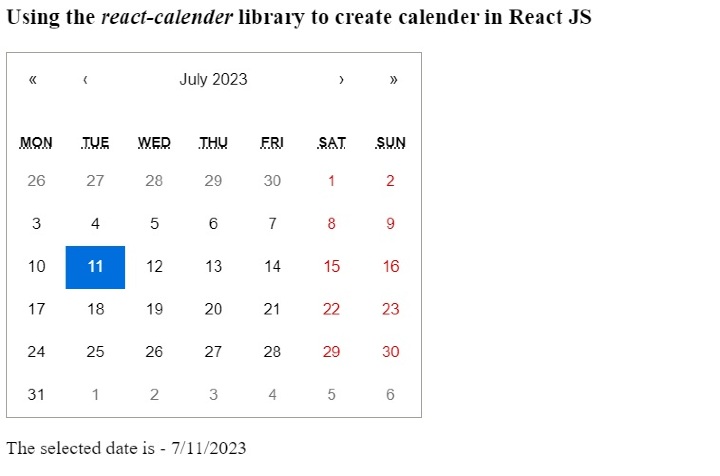
在下面的示例中,我们从"react-calendar"库导入了"Calendar"组件。之后,我们定义了名为"date"的状态变量来存储所选日期。此外,我们使用"calendar"组件来显示日历,并将"date"和"changeValue"函数作为属性传递。"changeValue"函数用于更改所选日期的值。
在输出中,用户可以选择日期、月份、年份等。
import React, { useState } from "react";
import Calendar from "react-calendar";
import "react-calendar/dist/Calendar.css";

function App() {
   const [date, changeDate] = useState(new Date());

   function changeValue(val) {
      changeDate(val);
   }

   return (
      <div>
         <h3>
            {" "} Using the <i> react-calender </i> library to create calender in React JS{" "}
         </h3>
         <Calendar onChange = {changeValue} value = {date} />
         <p>The selected date is - {date.toLocaleDateString()}</p>
      </div>
   );
}
export default App;
输出
示例
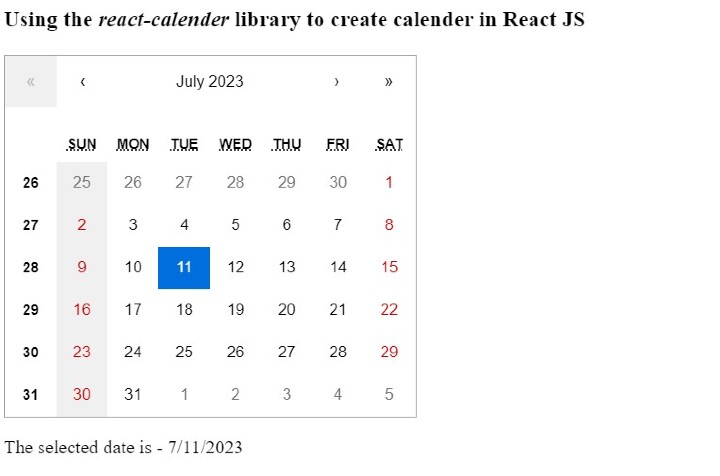
在下面的示例中,我们在"Calendar"组件中使用了更多 props。"minDate"和"maxDate"分别用于设置日期选择范围的最小值和最大值。
"showWeekNumbers"根据日期选择范围显示周数,"calenderType"用于根据语言环境更改日历类型。"tileDisabled" prop 用于禁用"星期日"的选择。
import React, { useState } from "react";
import Calendar from "react-calendar";
import "react-calendar/dist/Calendar.css";

function App() {
   const [date, changeDate] = useState(new Date());

   function changeValue(val) {
      changeDate(val);
   }

   return (
      <div>
         <h3>
            {" "}
            Using the <i> react-calender </i> library to create calender in React
            JS{" "}
         </h3>
         <Calendar
            onChange = {changeValue}
            value = {date}
            minDate = {new Date(2022, 8, 21)} // To set minimum date
            maxDate = {new Date(2025, 12, 22)} // To set maximum date
            showWeekNumbers = {true} // TO show week numbers
            showNeighboringMonth = {true}
            calendarType = "US" // Changing the calender type
            tileDisabled = {({ date }) => date.getDay() === 0} // Disabaling the sunday
         />

         <p>The selected date is - {date.toLocaleDateString()}</p>
      </div>
   );
}

export default App;
输出
从头创建日历组件
当我们需要更加自定义的日历时,从头创建日历组件是必要的。在本节中,我们将使用 React 的基本功能创建日历组件,并使用 CSS 设置其样式。
示例
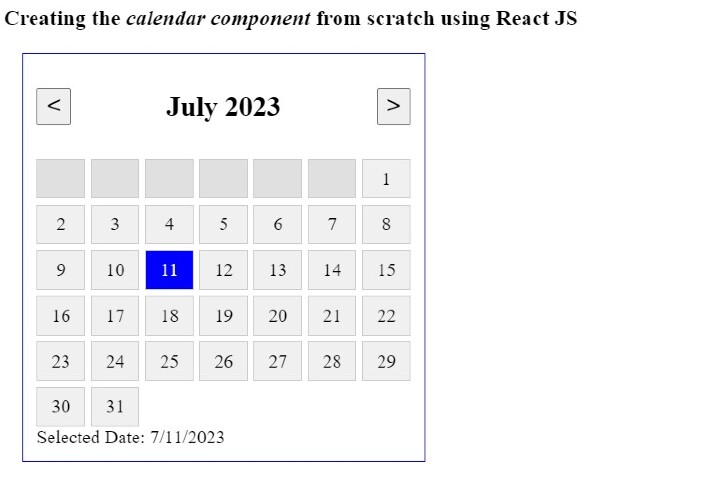
在下面的示例中,我们创建了日历组件,它允许我们选择特定的日期。此外,日历组件还包含"上一月"和"下一月"按钮,分别用于移动到上一个月和下一个月。
此外,我们在 App.CSS 文件中编写了一些 CSS 来设置日历组件的样式。用户可以按照以下步骤理解示例代码。
步骤 1 − 创建"sDate"状态变量来存储所选日期。
步骤 2 − 创建 findMonthDays() 函数,使用 getDate() 方法查找当前月份的总天数。
步骤 3 − 创建 findFirstDay() 函数,使用 getDay() 方法查找当前月份的第一天。
步骤 4 − 定义 changeToPrevMonth() 函数,将月份更改为上个月。它将所选日期值设置为上个月的 1日。同样,定义 changeToNextMonth() 函数将月份更改为下个月。
步骤 5− 定义 handleDateClick() 函数,以便在用户点击任意日期时更改所选日期。
步骤 6 − 现在,定义 showCalendar() 函数来显示日历组件。
步骤 6.1 - 在 showCalendar() 函数中,获取年份、月份、月份总天数以及所选日期的第一天。
步骤 6.2 - 定义 allDays[] 数组,将所有日期存储到其中。
步骤 6.3 - 使迭代次数等于"fDay",初始显示一个空框。
步骤 6.4 - 然后,使总迭代次数等于月份天数,将天数组件存储到"allDays"数组中。接下来,使用当前日期、月份和年份创建一个新日期,并将其推送到数组中。如果选择了日期,则将"selected"类名组件添加到该日期。
步骤 6.5 - 返回 allDays[] 数组。
步骤 7 - 编写 HTML 部分以显示日历组件。首先,显示上一个和下一个按钮,并在中间显示月份和年份。
步骤 8 - 然后,执行 showCalendar() 函数以显示日历网格。
步骤 9 - 最后,显示选定的日期。同时,编写所需的 CSS 代码。
文件名 - App.js
import React, { useState } from "react";
import "./App.css";

function App() {
   const [sDate, setsDate] = useState(new Date());

   const findMonthDays = (y, m) => {
      return new Date(y, m + 1, 0).getDate();
   };

   const findFirstDay = (y, m) => {
      return new Date(y, m, 1).getDay();
   };

   const changeToPrevMonth = () => {
      setsDate((pDate) => {
         const pMonth = pDate.getMonth() - 1;
         const pYear = pDate.getFullYear();
         return new Date(pYear, pMonth);
      });
   };

   const changeToNextMonth = () => {
      setsDate((pDate) => {
         const nMonth = pDate.getMonth() + 1;
         const nYear = pDate.getFullYear();
         return new Date(nYear, nMonth);
      });
   };

   const handleDateClick = (date) => {
      setsDate(date);
   };

   const showCalendar = () => {
      const currDate = new Date();
      const y = sDate.getFullYear();
      const m = sDate.getMonth();
      const mDays = findMonthDays(y, m);
      const fDay = findFirstDay(y, m);

      const allDays = [];

      // For empty cells
      for (let p = 0; p < fDay; p++) {
         allDays.push(<div key = {`em-${p}`} className = "box empty"></div>);
      }

      // Show actual days
      for (let d = 1; d <= mDays; d++) {
         const date = new Date(y, m, d);
         const isSelected = sDate && date.toDateString() === sDate.toDateString();

         allDays.push(
            <div
               key = {`d-${d}`}
               className = {`box ${isSelected ? "selected" : ""}`}
               onClick = {() => handleDateClick(date)}
               >
               {d}
            </div>
         );
      }

      return allDays;
   };

   return (
      <div>
      <h3>
         Creating the <i> calendar component </i> from scratch using React JS
      </h3>
      <div className = "main">
         <div className = "header">
            <button onClick = {changeToPrevMonth}> < </button>
            <h2>
               {sDate.toLocaleString("default", {
                  month: "long",
                  year: "numeric",
               })}
            </h2>
            <button onClick = {changeToNextMonth}> > </button>
         </div>
         <div className = "body">{showCalendar()} </div>
            {sDate && (
               <div className = "selected-date">
                  Selected Date: {sDate.toLocaleDateString()}
               </div>
            )}
         </div>
      </div>
   );
}

export default App;
文件名 –App.css
.main {
   width: 20rem;
   padding: 0.7rem;
   margin-left: 1rem;
   border: 1px solid blue;
}
.header {
   display: flex;
   margin-bottom: 0.7rem;
   justify-content: space-between;
   align-items: center;
}
.header button {
   font-size: 1.4rem;
   cursor: pointer;
}
.body {
   display: grid;
   grid-template-columns: repeat(7, 1fr);
   gap: 5px;
}
.box {
   height: 2rem;
   background-color: #f0f0f0;
   border: 1px solid #ccc;
   display: flex;
   justify-content: center;
   align-items: center;
   cursor: pointer;
}
.box.empty {
   background-color: #e0e0e0;
   cursor: default;
}
.box.selected {
   background-color: blue;
   color: white;
}
输出
我们学习了如何使用"react-calendar"库将日历添加到 Web 应用程序中。此外,我们还学习了如何从零开始创建日历组件。虽然它只包含日历的基本功能,但程序员可以根据需求添加。

