
如何在 Android 系统中检测 Google 地图上的触摸事件及其位置?
androidapps/applicationsmobile development
本示例演示了如何在 Android 系统中检测 Google 地图上的触摸事件及其位置。
步骤 1 − 在 Android Studio 中创建一个新项目,前往"文件"->"新建 Google 地图项目",并填写所有必需信息以创建新项目。
步骤 2 − 将以下代码添加到 res/layout/activity_main.xml。
<?xml version="1.0" encoding="utf-8"?>
<fragment xmlns:android="http://schemas.android.com/apk/res/android"
   xmlns:tools="http://schemas.android.com/tools"
   android:id="@+id/map"
   android:name="com.google.android.gms.maps.SupportMapFragment"
   android:layout_width="match_parent"
   android:layout_height="match_parent"
   tools:context=".MapsActivity" />
步骤 3 − 将以下代码添加到 src/MainActivity.java
import androidx.fragment.app.FragmentActivity;
import android.os.Bundle;
import android.widget.Toast;
import com.google.android.gms.maps.CameraUpdateFactory;
import com.google.android.gms.maps.GoogleMap;
import com.google.android.gms.maps.OnMapReadyCallback;
import com.google.android.gms.maps.SupportMapFragment;
import com.google.android.gms.maps.model.LatLng;
import com.google.android.gms.maps.model.MarkerOptions;
public class MapsActivity extends FragmentActivity implements
OnMapReadyCallback, GoogleMap.OnCameraMoveStartedListener,
   GoogleMap.OnCameraMoveListener,
   GoogleMap.OnCameraMoveCanceledListener,
   GoogleMap.OnCameraIdleListener {

   private GoogleMap mMap;
   @Override
   protected void onCreate(Bundle savedInstanceState) {
      super.onCreate(savedInstanceState);
      setContentView(R.layout.activity_maps);
      // 获取 SupportMapFragment 并在地图准备就绪时收到通知。
      SupportMapFragment mapFragment = (SupportMapFragment)
         getSupportFragmentManager().findFragmentById(R.id.map);
      mapFragment.getMapAsync(this);
   }
   @Override
   public void onMapReady(GoogleMap googleMap) {
      mMap = googleMap;
      // 在悉尼添加一个标记并移动相机 LatLng sydney = new LatLng(-34, 151);
      mMap.addMarker(new MarkerOptions().position(sydney).title("Marker in Sydney"));
      mMap.moveCamera(CameraUpdateFactory.newLatLng(sydney));
      mMap.setOnCameraIdleListener(this);
      mMap.setOnCameraMoveStartedListener(this);
      mMap.setOnCameraMoveListener(this);
      mMap.setOnCameraMoveCanceledListener(this);
   }
   @Override
   public void onCameraMoveStarted(int reason) {
      if (reason == GoogleMap.OnCameraMoveStartedListener.REASON_GESTURE) {
         Toast.makeText(this, "The user gestured on the map.", Toast.LENGTH_SHORT).show();
      }
      else if (reason == GoogleMap.OnCameraMoveStartedListener.REASON_API_ANIMATION) {
         Toast.makeText(this, "The user tapped something on the map.", Toast.LENGTH_SHORT).show();
      }
      else if (reason == GoogleMap.OnCameraMoveStartedListener.REASON_DEVELOPER_ANIMATION) {
         Toast.makeText(this, "The app moved the camera.", Toast.LENGTH_SHORT).show();
      }
   }
   @Override
   public void onCameraMove() {
      Toast.makeText(this, "The camera is moving.", Toast.LENGTH_SHORT).show();
   }
   @Override
   public void onCameraMoveCanceled() {
      Toast.makeText(this, "Camera movement canceled.", Toast.LENGTH_SHORT).show();
   }
   @Override
   public void onCameraIdle() {
      Toast.makeText(this, "The camera has stopped moving.", Toast.LENGTH_SHORT).show();
   }
}
步骤 4 − 在 google_maps_api.xml 中添加 ma 键
<resources>
   <string name="google_maps_key" templateMergeStrategy="preserve" translatable="false">YOUR MAP KEY</string>
</resources>
步骤 5 − 将以下代码添加到 AndroidManifest.xml
<?xml version="1.0" encoding="utf-8"?>
<manifest xmlns:android="http://schemas.android.com/apk/res/android" package="app.com.myapplication">
   <application
      android:allowBackup="true"
      android:icon="@mipmap/ic_launcher"
      android:label="@string/app_name"
      android:roundIcon="@mipmap/ic_launcher_round"
      android:supportsRtl="true"
      android:theme="@style/AppTheme">
      <activity
         android:name=".MapsActivity"
         android:label="@string/title_activity_maps">
         <intent-filter>
            <action android:name="android.intent.action.MAIN" />
            <category android:name="android.intent.category.LAUNCHER" />
         </intent-filter>
      </activity>
      <meta-data
         android:name="com.google.android.geo.API_KEY"
         android:value="@string/google_maps_key" />
   </application>
   <uses-permission android:name="android.permission.ACCESS_FINE_LOCATION" />
</manifest>
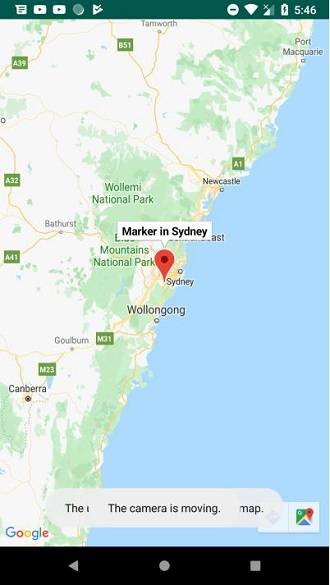
让我们尝试运行您的应用程序。假设您已将实际的 Android 移动设备连接到电脑。要从 Android Studio 运行该应用程序,请打开项目的某个 Activity 文件,然后点击工具栏上的"运行" 图标。选择您的移动设备作为选项,然后检查您的移动设备是否显示您的默认屏幕 −
点击此处下载项目代码。

