
如何安装 PowerShell 模块?
安装 PowerShell 模块有两种方法:在线安装和离线安装。
在线安装方法
这种方法就像在 Unix 系统中通过 Yum 下载在线软件包一样。
首先,我们需要使用 `Find-Module` 命令在互联网上搜索可用的软件包。如果您不知道完整的模块名称,可以使用通配符。所有软件包都从 PowerShell Gallery (https://www.powershellgallery.com/) 下载。
例如,如果您想要安装 `VMware PowerCLI` 模块,但不知道完整的模块名称,那么只需使用通配符 (*) 内的名称部分即可。
Find-Module *vmware* | Select Name, Version, Repository
Name                            Version          Repository
----                            -------          ----------
VMware.VimAutomation.Sdk       12.0.0.15939651    PSGallery
VMware.VimAutomation.Core      12.0.0.15939655    PSGallery
VMware.VimAutomation.Common    12.0.0.15939652    PSGallery
VMware.VimAutomation.Cis.Core  12.0.0.15939657    PSGallery
VMware.Vim                     7.0.0.15939650     PSGallery
VMware.VimAutomation.Vds       12.0.0.15940185    PSGallery
VMware.VimAutomation.Srm       11.5.0.14899557    PSGallery
VMware.VimAutomation.License   12.0.0.15939670    PSGallery
VMware.VimAutomation.vROps     12.0.0.15940184    PSGallery
VMware.VimAutomation.Cloud     12.0.0.15940183    PSGallery
VMware.ImageBuilder            7.0.0.15902843     PSGallery
VMware.VimAutomation.Nsxt      12.0.0.15939671    PSGallery
VMware.PowerCLI                12.0.0.15947286    PSGallery
VMware.VimAutomation.Horiz...  7.12.0.15718406    PSGallery
VMware.VimAutomation.Storage   12.0.0.15939648    PSGallery
VMware.DeployAutomation        7.0.0.15902843     PSGallery
VMware.VimAutomation.Vmc       12.0.0.15947287    PSGallery
VMware.VumAutomation           6.5.1.7862888      PSGallery
VMware.VimAutomation.Stora...  1.3.0.0            PSGallery
VMware.VimAutomation.Security  12.0.0.15939672    PSGallery
VMware.VimAutomation.Hcx       12.0.0.15939647    PSGallery
VMware.VimAutomation.HA        6.5.4.7567193      PSGallery
VMware.VimAutomation.PCloud    10.0.0.7893924     PSGallery
VMware.CloudServices           12.0.0.15947289    PSGallery
VMware.VimAutomation.Workl... 12.0.0.15947288     PSGallery
现在我们有了一个可用的VMware模块列表,我们需要其中的VMware.PowerCLI模块。要安装该模块,我们将使用Install-Module cmdlet。
Find-Module Vmware.PowerCLI | Install-Module
Untrusted repository
You are installing the modules from an untrusted repository. If you trust this repository, change its InstallationPolicy value by running the SetPSRepository cmdlet.
Are you sure you want to install the modules from 'https://www.powershellgalle ry.com/api/v2/'?
[Y] Yes [A] Yes to All [N] No [L] No to All [S] Suspend [?] Help (default is "N"):
您可以使用 `Get-Module` 命令检查模块是否已安装。
PS C:\WINDOWS\system32> Get-Module -Name *vmware* -ListAvailable |
Select Name, Version
Name                         Version
----                         -------
VMware.CloudServices          12.0.0.15947289
VMware.DeployAutomation       7.0.0.15902843
VMware.DeployAutomation       6.5.1.5299608
VMware.ImageBuilder           7.0.0.15902843
VMware.ImageBuilder           6.5.1.5299608
vmware.powercli               12.0.0.15947286
VMware.Vim                    7.0.0.15939650
VMware.VimAutomation.Cis.Core 6.5.1.5374323
VMware.VimAutomation.Cloud    12.0.0.15940183
VMware.VimAutomation.Cloud    6.5.1.5375799
VMware.VimAutomation.Common   6.5.1.5335010
此方法的优点在于,它还会安装依赖模块。
离线方法
如果服务器没有网络连接,您需要从服务器或具有网络连接的桌面上的 PowerShell 库下载该软件包,然后将其复制到离线服务器。
您可以从 PowerShell 库下载软件包:https://www.powershellgallery.com/。例如,搜索软件包"Vmware.PowerCLI",如果该软件包存在,您将获得软件包名称。
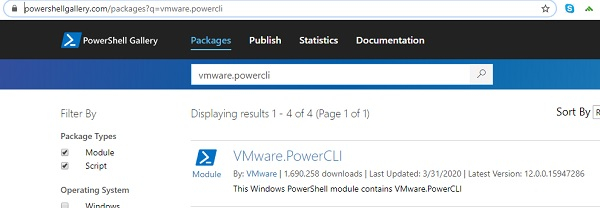
点击此软件包后,您将看到如下所示的手动下载选项卡。
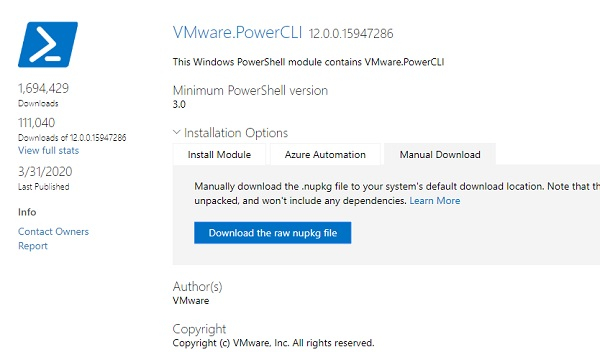
您下载的软件包将采用Nupkg格式(Nuget 软件包)。此软件包为ZIP格式文件,某些浏览器(例如 Internet Explorer)会自动将其转换为ZIP格式,但您也可以将其扩展名重命名为ZIP。您也可以使用7-Zip直接将Nupkg内容解压到文件夹中。
文件夹内容如下。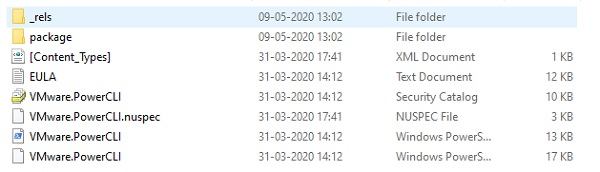
以上文件/文件夹内容的描述。
_rels 文件夹 包含列出依赖项的 .rels 文件。
Package 文件夹 包含 NuGet 特有的数据。
[Content_Types] 描述 NuGet 扩展文件如何与 PowerShellGet 协同工作。
<name>.nuspec 包含大部分元数据。
有关更多详细信息,请参阅 Microsoft 关于离线安装方法的文章。
解压缩后,文件夹名称类似于 <Modulename.Version>,请从文件夹名称中移除版本号,文件夹名称现在就是模块名称了。
根据上面的文章,我们需要从文件夹中删除 NuGet 特有的元素,但我们可以直接将整个解压缩后的文件夹复制粘贴到 PowerShell 模块路径。以下是 PowerShell 的模块路径。
PS C:\WINDOWS\system32> $env:PSModulePath -split ';'
C:\Users\admin\Documents\WindowsPowerShell\Modules
C:\Program Files\WindowsPowerShell\Modules
C:\WINDOWS\system32\WindowsPowerShell\v1.0\Modules\
C:\Program Files\PoSHServer\modules\
C:\Windows\System32\WindowsPowerShell\v1.0\Modules
我们将选择"C:\Program Files\WindowsPowerShell\Modules"模块文件夹,并将解压后的文件夹复制到该文件夹。现在重新打开或打开一个新的 PowerShell 会话,检查复制的新模块是否已正确加载,您应该可以看到 vmware.powercli 模块。
PS C:\WINDOWS\system32> Get-Module -Name *vmware* -ListAvailable | Select
Name,Version
Name                            Version
----                            -------
VMware.CloudServices             12.0.0.15947289
VMware.DeployAutomation          7.0.0.15902843
VMware.DeployAutomation          6.5.1.5299608
VMware.ImageBuilder              7.0.0.15902843
VMware.ImageBuilder              6.5.1.5299608
vmware.powercli                  12.0.0.15947286
VMware.Vim                       7.0.0.15939650
VMware.VimAutomation.Cis.Core    6.5.1.5374323
VMware.VimAutomation.Cloud       12.0.0.15940183
VMware.VimAutomation.Cloud       6.5.1.5375799
VMware.VimAutomation.Common      6.5.1.5335010
VMware.VimAutomation.Core        6.5.1.5374329
VMware.VimAutomation.HA          6.0.0.5314477
VMware.VimAutomation.Hcx         12.0.0.15939647
VMware.VimAutomation.HorizonView 7.12.0.15718406
VMware.VimAutomation.HorizonView 7.1.0.5307191
此方法不会安装依赖模块。如有需要,您需要单独下载并安装依赖模块。

