
实体框架 - 多个 DbContext
在本章中,我们将学习如何在应用程序中有多个 DbContext 类时将更改迁移到数据库中。
- 多个 DbContext 首次在 Entity Framework 6.0 中引入。
- 多个上下文类可能属于一个数据库或两个不同的数据库。
在我们的示例中,我们将为同一个数据库定义两个 Context 类。在下面的代码中,有两个分别用于 Student 和 Teacher 的 DbContext 类。
public class Student {
   public int ID { get; set; }
   public string LastName { get; set; }
   public string FirstMidName { get; set; }
   public DateTime EnrollmentDate { get; set; }
}

public class MyStudentContext : DbContext {
   public MyStudentContext() : base("UniContextDB") {}
   public virtual DbSet<Student> Students { get; set; }
}

public class Teacher {
   public int ID { get; set; }
   public string LastName { get; set; }
   public string FirstMidName { get; set; }
   public DateTime HireDate { get; set; }
}

public class MyTeacherContext : DbContext {
   public MyTeacherContext() : base("UniContextDB") {}
   public virtual DbSet<Teacher> Teachers { get; set; }
}
如您在上面的代码中看到的,有两个模型,分别称为"Student"和"Teacher"。每个模型都与特定的相应上下文类相关联,即 Student 与 MyStudentContext 相关联,而 Teacher 与 MyTeacherContext 相关联。
当同一个项目中有多个 Context 类时,这是迁移数据库中更改的基本规则。
enable-migrations -ContextTypeName <DbContext-Name-with-Namespaces> MigrationsDirectory:<Migrations-Directory-Name>
Add-Migration -configuration <DbContext-Migrations-Configuration-Class-withNamespaces> <Migrations-Name>
Update-Database -configuration <DbContext-Migrations-Configuration-Class-withNamespaces> -Verbose
让我们通过在程序包管理器控制台中执行以下命令来启用 MyStudentContext 迁移。
PM→ enable-migrations -ContextTypeName:EFCodeFirstDemo.MyStudentContext
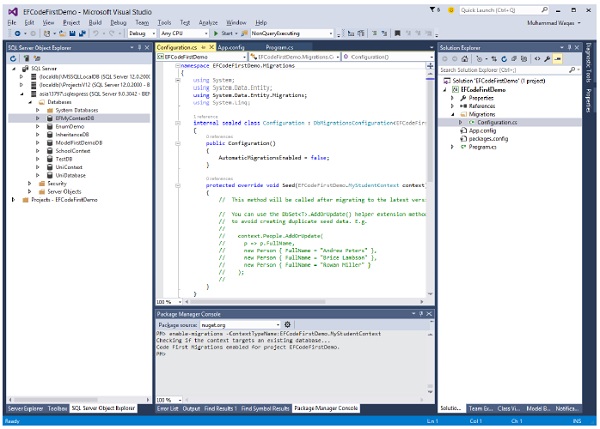
一旦执行,我们将在迁移历史记录中添加模型,为此,我们必须在同一控制台中触发 add-migration 命令。
PM→ add-migration -configuration EFCodeFirstDemo.Migrations.Configuration Initial
现在让我们向数据库的学生表和教师表中添加一些数据。
static void Main(string[] args) {

   using (var context = new MyStudentContext()) {

      //// Create and save a new Students
      Console.WriteLine("Adding new students");

      var student = new Student {
         FirstMidName = "Alain",
         LastName = "Bomer",
         EnrollmentDate = DateTime.Parse(DateTime.Today.ToString())
         //Age = 24
      };

      context.Students.Add(student);

      var student1 = new Student {
         FirstMidName = "Mark",
         LastName = "Upston",
         EnrollmentDate = DateTime.Parse(DateTime.Today.ToString())
         //Age = 30
      };

      context.Students.Add(student1);
      context.SaveChanges();

      // Display all Students from the database
      var students = (from s in context.Students orderby s.FirstMidName
         select s).ToList<Student>();

      Console.WriteLine("Retrieve all Students from the database:");

      foreach (var stdnt in students) {
         string name = stdnt.FirstMidName + " " + stdnt.LastName;
         Console.WriteLine("ID: {0}, Name: {1}", stdnt.ID, name);
      }

      Console.WriteLine("Press any key to exit...");
      Console.ReadKey();
   }

   using (var context = new MyTeacherContext()) {

      //// Create and save a new Teachers
      Console.WriteLine("Adding new teachers");

      var student = new Teacher {
         FirstMidName = "Alain",
         LastName = "Bomer",
         HireDate = DateTime.Parse(DateTime.Today.ToString())
         //Age = 24
      };

      context.Teachers.Add(student);

      var student1 = new Teacher {
         FirstMidName = "Mark",
         LastName = "Upston",
         HireDate = DateTime.Parse(DateTime.Today.ToString())
         //Age = 30
      };

      context.Teachers.Add(student1);
      context.SaveChanges();

      // Display all Teachers from the database
      var teachers = (from t in context.Teachers orderby t.FirstMidName
         select t).ToList<Teacher>();

      Console.WriteLine("Retrieve all teachers from the database:");

      foreach (var teacher in teachers) {
         string name = teacher.FirstMidName + " " + teacher.LastName;
         Console.WriteLine("ID: {0}, Name: {1}", teacher.ID, name);
      }

      Console.WriteLine("Press any key to exit...");
      Console.ReadKey();
   }
}
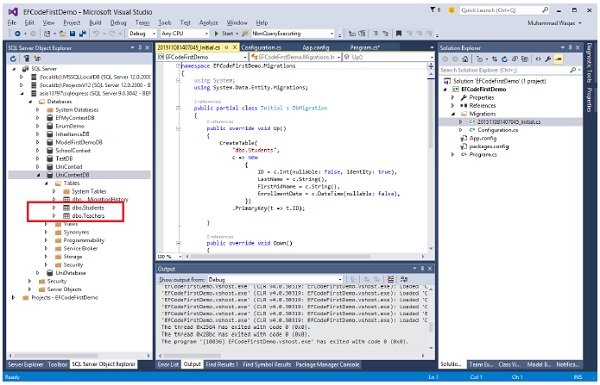
执行上述代码时,您将看到为两个不同的模型创建了两个不同的表,如下图所示。
我们建议您逐步执行上述示例,以便更好地理解。

