
使用 Python 实现自动编码器
自动编码器是一种人工神经网络 (ANN),用于学习对未标记数据进行有效编码。它们已成为机器学习和深度学习领域的重要工具。本章提供了使用 Python 编程语言实现自动编码器的分步指南。我们将使用 MNIST 数据集作为示例。
我们将介绍必要的设置、数据预处理、模型构建、训练和结果可视化。我们将使用 MNIST 手写数字数据集作为示例。
使用 Python 实现自动编码器的分步指南
让我们探索使用 Python 编程语言实现自动编码器的步骤 −
步骤 1:设置环境
在开始实现之前,我们必须确保安装了必要的库。如果未安装,您可以使用下面给出的 pip 命令来安装它们 −
pip install numpy matplotlib tensorflow
步骤 2:导入库
完成安装后,我们需要导入必要的库 −
# 导入必要的库
import numpy as np
import matplotlib.pyplot as plt
from tensorflow.keras.datasets import mnist
from tensorflow.keras.models import Model
from tensorflow.keras.layers import Input, Dense, Flatten, Reshape
from tensorflow.keras.optimizers import Adam
步骤 3:加载和预处理 MNIST 数据集
在此步骤中,我们将加载 MNIST 手写数字数据集并按如下方式规范化像素值 −
# 加载数据集
(x_train, _), (x_test, _) = mnist.load_data()

# 规范化数据
x_train = x_train.astype('float32') / 255.0
x_test = x_test.astype('float32') / 255.0

# 重塑数据以包含通道维度
x_train = np.reshape(x_train, (len(x_train), 28, 28, 1))
x_test = np.reshape(x_test, (len(x_test), 28, 28, 1))
步骤 4:构建自动编码器模型
在此步骤中,我们将通过定义编码器和解码器部分来构建自动编码器模型 −
# 定义自动编码器的输入形状
input_shape = (28, 28, 1)

# 定义自动编码器的编码器部分
input_img = Input(shape=input_shape)
x = Flatten()(input_img)
encoded = Dense(64,activation='relu')(x)

# 定义自动编码器的解码器部分
decoded = Dense(784,activation='sigmoid')(encoded)
decoded = Reshape((28, 28, 1))(decoded)

# 定义完整的自动编码器模型
autoencoder = Model(input_img,decoded)
autoencoder.compile(optimizer=Adam(),loss='binary_crossentropy')

# 打印自动编码器模型的摘要
autoencoder.summary()
第 5 步:训练自动编码器模型
接下来,我们需要使用训练数据训练自动编码器,如下所示 −
# 训练自动编码器
autoencoder.fit(x_train, x_train,
    epochs = 50, # 要训练的 epoch 数
    batch_size=256, # 训练的批次大小
    shuffle=True,
    validation_data = (x_test, x_test)
)
第 6 步:可视化原始数据和重建数据
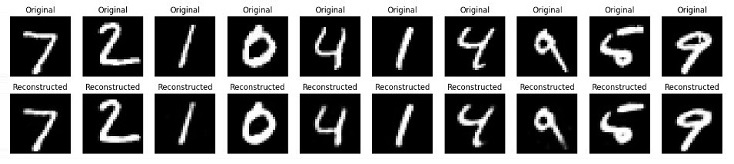
在这最后一步中,我们将可视化一些原始图像和重建图像,以检查自动编码器的性能。
# 从测试集中预测重建的图像
decoded_imgs = autoencoder.predict(x_test)

# 要显示的数字数量
n = 10

# 创建具有指定大小的图形
plt.figure(figsize=(20, 4))

# 循环遍历前 n 个测试图像

for i in range(n):

    # 显示原始图像
    ax = plt.subplot(2, n, i + 1) # 为原始图像创建子图

    # 重塑并绘制原始图像
    plt.imshow(x_test[i].reshape(28, 28), cmap='gray')
    plt.title("Original") # 设置图的标题
    plt.axis('off')

    # 显示重建的图像
    ax = plt.subplot(2, n, i + 1 + n)
    plt.imshow(decoded_imgs[i].reshape(28, 28), cmap='gray')
    plt.title("Reconstructed")
    plt.axis('off')

# 显示图形
plt.show()
完整的 Python 实现代码
下面给出了上述示例的完整 Python 脚本及其输出 −
# 导入必要的库
import numpy as np
import matplotlib.pyplot as plt
from tensorflow.keras.datasets import mnist
from tensorflow.keras.models import Model
from tensorflow.keras.layers import Input, Dense, Flatten, Reshape
from tensorflow.keras.optimizers import Adam

# 加载数据集
(x_train, _), (x_test, _) = mnist.load_data()

# 规范化数据
x_train = x_train.astype('float32') / 255.0
x_test = x_test.astype('float32') / 255.0

# 重塑数据以包含通道维度
x_train = np.reshape(x_train, (len(x_train), 28, 28, 1))
x_test = np.reshape(x_test, (len(x_test), 28, 28, 1))

# 定义自动编码器的输入形状
input_shape = (28, 28, 1)

# 定义自动编码器的编码器部分
input_img = Input(shape=input_shape)
x = Flatten()(input_img)
encoded = Dense(64,activation='relu')(x)

# 定义自动编码器的解码器部分
decoded = Dense(784,activation='sigmoid')(encoded)
decoded = Reshape((28, 28, 1))(decoded)

# 定义完整的自动编码器模型
autoencoder = Model(input_img,decoded)

autoencoder.compile(optimizer=Adam(), loss='binary_crossentropy')

# 打印自动编码器模型的摘要
autoencoder.summary()

# 训练自动编码器
autoencoder.fit(x_train, x_train,
    epochs=50, # 要训练的 epoch 数
    batch_size=256, # 训练的批次大小
    shuffle=True,
    validation_data=(x_test, x_test)
)

# 从测试集中预测重建的图像
decoded_imgs = autoencoder.predict(x_test)

# 要显示的数字数量
n = 10

# 创建具有指定大小的图形
plt.figure(figsize=(20, 4))

# 循环遍历前 n 个测试图像
for i in range(n):
    # 显示原始图像
    ax = plt.subplot(2, n, i + 1)
    plt.imshow(x_test[i].reshape(28, 28), cmap='gray')
    plt.title("Original") # 设置图的标题
    plt.axis('off')

    # 显示重建的图像
    ax = plt.subplot(2, n, i + 1 + n)
    plt.imshow(decoded_imgs[i].reshape(28, 28), cmap='gray')
    plt.title("Reconstructed")
    plt.axis('off')

# 显示图表
plt.show()
输出
运行上述脚本后,它将首先打印自动编码器模型的摘要,然后打印训练周期。最后,我们将得到显示原始数据和重建数据的图表。
Model: "functional_1"
| 图层(类型) | 输出形状 | 参数 # |
|---|---|---|
| input_layer_3 (InputLayer) | (None, 28, 28, 1) | 0 |
| flatten_3 (Flatten) | (None, 784) | 0 |
| dense_6 (Dense) | (None, 64) | 50, 240 |
| dense_7 (Dense) | (None, 784) | 50, 960 |
| reshape_3 (Reshape) | (None, 28, 28, 1) | 0 |
Total params: 101,200 (395.31 KB)
Trainable params: 101,200 (395.31 KB)
Non-trainable params: 0 (0.00 B)
结论
自动编码器是无监督学习的强大工具,可应用于各种任务,例如降维、特征提取和图像去噪。
在本章中,我们解释了如何使用 Python 实现一个简单的自动编码器并将其应用于 MNIST 手写数据集。它涉及设置环境、预处理数据、构建和训练模型,以及可视化结果以评估模型的性能。

