
MVVM – 连接 ViewModel
在本章中,我们将介绍如何连接 ViewModel。这是上一章的延续,上一章我们讨论了 View 的第一个构造。现在,第一个构造的下一个形式是 元模式,称为 ViewModelLocator。它是一种伪模式,位于 MVVM 模式之上。
在 MVVM 中,每个视图都需要与其 ViewModel 挂钩。
ViewModelLocator 是一种简单的方法,可以集中代码并进一步解耦视图。
这意味着它不必明确了解 ViewModel 类型及其构造方法。
有许多不同的方法可以使用 ViewModelLocator,但这里我们使用与 PRISM 框架最相似的方法。
ViewModelLocator 提供了一种标准、一致、声明性和松散耦合的方式来进行视图首次构造,从而自动完成将 ViewModel 连接到视图的过程。下图表示 ViewModelLocator 的高级过程。
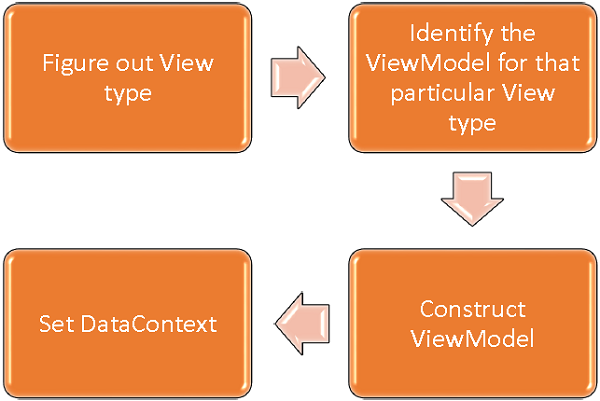
步骤 1 − 确定正在构建哪种 View 类型。
步骤 2 − 识别该特定 View 类型的 ViewModel。
步骤 3 − 构建该 ViewModel。
步骤 4 − 将 Views DataContext 设置为 ViewModel。
为了理解基本概念,让我们通过继续上一章中的相同示例来查看 ViewModelLocator 的简单示例。如果您查看 StudentView.xaml 文件,您将看到我们已经静态连接了 ViewModel。
现在,如下面的程序所示,注释这些 XAML 代码并从代码隐藏中删除代码。
<UserControl x:Class = "MVVMDemo.Views.StudentView"
   xmlns = "http://schemas.microsoft.com/winfx/2006/xaml/presentation"
   xmlns:x = "http://schemas.microsoft.com/winfx/2006/xaml"
   xmlns:mc = "http://schemas.openxmlformats.org/markup-compatibility/2006"
   xmlns:d = "http://schemas.microsoft.com/expression/blend/2008"
   xmlns:local = "clr-namespace:MVVMDemo.Views"
   xmlns:viewModel = "clr-namespace:MVVMDemo.ViewModel"
   mc:Ignorable = "d" d:DesignHeight = "300" d:DesignWidth = "300">

   <!--<UserControl.DataContext>
      <viewModel:StudentViewModel/>
   </UserControl.DataContext>-->

   <Grid>
      <StackPanel HorizontalAlignment = "Left">
         <ItemsControl ItemsSource = "{Binding Path = Students}">
            <ItemsControl.ItemTemplate>
               <DataTemplate>

                  <StackPanel Orientation = "Horizontal">
                     <TextBox Text = "{Binding Path = FirstName, Mode = TwoWay}"
                        Width = "100" Margin = "3 5 3 5"/>

                     <TextBox Text = "{Binding Path = LastName, Mode = TwoWay}"
                        Width = "100" Margin = "0 5 3 5"/>

                     <TextBlock Text = "{Binding Path = FullName, Mode = OneWay}"
                        Margin = "0 5 3 5"/>

                  </StackPanel>

               </DataTemplate>
            </ItemsControl.ItemTemplate>
         </ItemsControl>
      </StackPanel>
   </Grid>

</UserControl>
现在让我们创建一个新的文件夹 VML 并添加一个新的公共类 ViewModelLocator,它将包含一个附加属性(依赖属性)AutoHookedUpViewModel,如下面的代码所示。
public static bool GetAutoHookedUpViewModel(DependencyObject obj) {
   return (bool)obj.GetValue(AutoHookedUpViewModelProperty);
}

public static void SetAutoHookedUpViewModel(DependencyObject obj, bool value) {
   obj.SetValue(AutoHookedUpViewModelProperty, value);
}

// 使用 DependencyProperty 作为 AutoHookedUpViewModel 的后备存储。
// 这可以启用动画、样式、绑定等...

public static readonly DependencyProperty AutoHookedUpViewModelProperty =
   DependencyProperty.RegisterAttached("AutoHookedUpViewModel",
   typeof(bool), typeof(ViewModelLocator), new PropertyMetadata(false,
   AutoHookedUpViewModelChanged));
现在您可以看到一个基本的附加属性定义。要向属性添加行为,我们需要为此属性添加一个更改的事件处理程序,其中包含为 View 连接 ViewModel 的自动过程。执行此操作的代码如下 −
private static void AutoHookedUpViewModelChanged(DependencyObject d,
   DependencyPropertyChangedEventArgs e) {
   if (DesignerProperties.GetIsInDesignMode(d)) return;
   var viewType = d.GetType();
   string str = viewType.FullName;
   str = str.Replace(".Views.", ".ViewModel.");

   var viewTypeName = str;
   var viewModelTypeName = viewTypeName + "Model";
   var viewModelType = Type.GetType(viewModelTypeName);
   var viewModel = Activator.CreateInstance(viewModelType);
   ((FrameworkElement)d).DataContext = viewModel;
}
以下是 ViewModelLocator 类的完整实现。
using System;
using System.ComponentModel;
using System.Windows;

namespace MVVMDemo.VML {

   public static class ViewModelLocator {

      public static bool GetAutoHookedUpViewModel(DependencyObject obj) {
         return (bool)obj.GetValue(AutoHookedUpViewModelProperty);
      }

      public static void SetAutoHookedUpViewModel(DependencyObject obj, bool value) {
         obj.SetValue(AutoHookedUpViewModelProperty, value);
      }

      // Using a DependencyProperty as the backing store for AutoHookedUpViewModel.

      //This enables animation, styling, binding, etc...
      public static readonly DependencyProperty AutoHookedUpViewModelProperty =
         DependencyProperty.RegisterAttached("AutoHookedUpViewModel",
         typeof(bool), typeof(ViewModelLocator), new
         PropertyMetadata(false, AutoHookedUpViewModelChanged));

      private static void AutoHookedUpViewModelChanged(DependencyObject d,
         DependencyPropertyChangedEventArgs e) {
         if (DesignerProperties.GetIsInDesignMode(d)) return;
         var viewType = d.GetType();

         string str = viewType.FullName;
         str = str.Replace(".Views.", ".ViewModel.");

         var viewTypeName = str;
         var viewModelTypeName = viewTypeName + "Model";
         var viewModelType = Type.GetType(viewModelTypeName);
         var viewModel = Activator.CreateInstance(viewModelType);

        ((FrameworkElement)d).DataContext = viewModel;
      }
   }
}
首先要做的是添加一个命名空间,以便我们可以在项目的根目录中获取该 ViewModelLocator 类型。然后在作为视图类型的路由元素上,添加 AutoHookedUpViewModel 属性并将其设置为 true。
xmlns:vml = "clr-namespace:MVVMDemo.VML"
vml:ViewModelLocator.AutoHookedUpViewModel = "True"
Here is the complete implementation of StudentView.xaml file.
<UserControl x:Class = "MVVMDemo.Views.StudentView"
   xmlns = "http://schemas.microsoft.com/winfx/2006/xaml/presentation"
   xmlns:x = "http://schemas.microsoft.com/winfx/2006/xaml"
   xmlns:mc = "http://schemas.openxmlformats.org/markup-compatibility/2006"
   xmlns:d = "http://schemas.microsoft.com/expression/blend/2008"
   xmlns:local = "clr-namespace:MVVMDemo.Views"
   xmlns:viewModel = "clr-namespace:MVVMDemo.ViewModel"
   xmlns:vml = "clr-namespace:MVVMDemo.VML"
   vml:ViewModelLocator.AutoHookedUpViewModel = "True"
   mc:Ignorable = "d" d:DesignHeight = "300" d:DesignWidth = "300">

   <!--<UserControl.DataContext>
      <viewModel:StudentViewModel/>
   </UserControl.DataContext>-->

   <Grid>
      <StackPanel HorizontalAlignment = "Left">
         <ItemsControl ItemsSource = "{Binding Path = Students}">
            <ItemsControl.ItemTemplate>
               <DataTemplate>

                  <StackPanel Orientation = "Horizontal">
                     <TextBox Text = "{Binding Path = FirstName, Mode = TwoWay}"
                        Width = "100" Margin = "3 5 3 5"/>

                     <TextBox Text = "{Binding Path = LastName, Mode = TwoWay}"
                        Width = "100" Margin = "0 5 3 5"/>

                     <TextBlock Text = "{Binding Path = FullName, Mode = OneWay}"
                        Margin = "0 5 3 5"/>

                  </StackPanel>

               </DataTemplate>
            </ItemsControl.ItemTemplate>
         </ItemsControl>
      </StackPanel>
   </Grid>

</UserControl>
编译并执行上述代码后,您将看到 ViewModelLocator 正在为该特定视图连接 ViewModel。
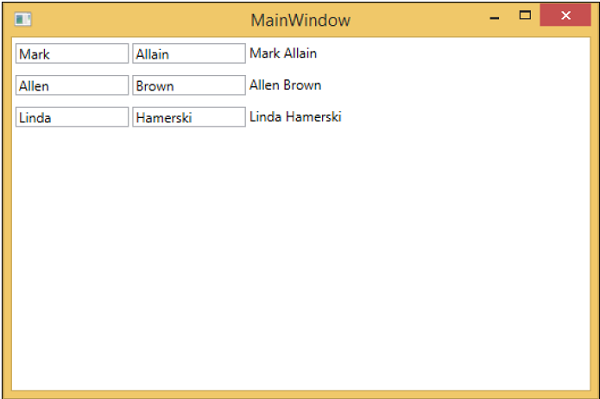
需要注意的关键一点是,视图不再以某种方式与其 ViewModel 的类型或构造方式耦合。所有这些都已移至 ViewModelLocator 内的中心位置。

