
Spring Cloud - 使用 Eureka 进行服务发现
简介
将应用程序部署为云中的微服务时,服务发现是最关键的部分之一。 这是因为对于任何使用操作,微服务架构中的应用程序可能需要访问多个服务以及它们之间的通信。
服务发现有助于跟踪服务地址和可以联系服务实例的端口。 这里有三个组件在起作用 −
服务实例 − 负责处理传入的服务请求并响应这些请求。
服务注册 − 跟踪服务实例的地址。 服务实例应该向服务注册中心注册它们的地址。
服务客户端 − 想要访问或想要发出请求并从服务实例获取响应的客户端。 服务客户端联系服务注册中心以获取实例的地址。
Apache Zookeeper、Eureka 和 Consul 是一些用于服务发现的知名组件。 在本教程中,我们将使用 Eureka
设置 Eureka 服务/注册
为了设置 Eureka 服务,我们需要更新 POM 文件以包含以下依赖项 −
<dependencies>
   <dependency>
      <groupId>org.springframework.cloud</groupId>
      <artifactId>spring-cloud-starter-netflix-eureka-server</artifactId>
   </dependency>
   <dependency>
      <groupId>org.springframework.boot</groupId>
      <artifactId>spring-boot-starter-web</artifactId>
   </dependency>
</dependencies>
然后,使用正确的注解来注解我们的 Spring 应用程序类,即@EnableEurekaServer。
package com.tutorialspoint;
import org.springframework.boot.SpringApplication;
import org.springframework.boot.autoconfigure.SpringBootApplication;
import org.springframework.cloud.netflix.eureka.server.EnableEurekaServer;
@SpringBootApplication
@EnableEurekaServer
public class RestaurantServiceRegistry{
   public static void main(String[] args) {
      SpringApplication.run(RestaurantServiceRegistry.class, args);
   }
}
如果我们想要配置注册表并更改其默认值,我们还需要一个属性文件。 以下是我们将做出的改变 −
将端口更新为 8900 而不是默认的 8080
在生产中,由于其高可用性,一个注册节点将具有多个节点。 这就是我们需要在注册中心之间进行点对点通信的地方。 由于我们在独立模式下执行此操作,我们可以简单地将客户端属性设置为 false 以避免任何错误。
所以,这就是我们的 application.yml 文件的样子 −
server:
   port: 8900
eureka:
   client:
      register-with-eureka: false
      fetch-registry: false
就是这样,现在让我们编译项目并使用以下命令运行程序 −
java -jar .\target\spring-cloud-eureka-server-1.0.jar
现在我们可以在控制台中看到日志 −
...
2021-03-07 13:33:10.156 INFO 17660 --- [ main]
o.s.b.w.embedded.tomcat.TomcatWebServer : Tomcat initialized with port(s): 8900
(http)
2021-03-07 13:33:10.172 INFO 17660 --- [ main]
o.apache.catalina.core.StandardService : Starting service [Tomcat]
...
2021-03-07 13:33:16.483 INFO 17660 --- [ main]
DiscoveryClientOptionalArgsConfiguration : Eureka HTTP Client uses Jersey
...
2021-03-07 13:33:16.632 INFO 17660 --- [ main]
o.s.c.n.eureka.InstanceInfoFactory : Setting initial instance status as:
STARTING
2021-03-07 13:33:16.675 INFO 17660 --- [ main]
com.netflix.discovery.DiscoveryClient : Initializing Eureka in region useast-
1
2021-03-07 13:33:16.675 INFO 17660 --- [ main]
com.netflix.discovery.DiscoveryClient : Client configured to neither register
nor query for data.
2021-03-07 13:33:16.686 INFO 17660 --- [ main]
com.netflix.discovery.DiscoveryClient : Discovery Client initialized at
timestamp 1615104196685 with initial instances count: 0
...
2021-03-07 13:33:16.873 INFO 17660 --- [ Thread-10]
e.s.EurekaServerInitializerConfiguration : Started Eureka Server
2021-03-07 13:33:18.609 INFO 17660 --- [ main]
c.t.RestaurantServiceRegistry : Started RestaurantServiceRegistry in
15.219 seconds (JVM running for 16.068)
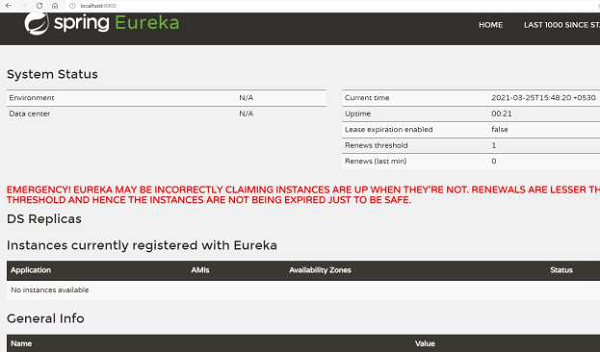
正如我们从上面的日志中看到的,Eureka 注册表已经设置好了。 我们还获得了托管在服务器 URL 上的 Eureka 仪表板(见下图)。
为实例设置 Eureka 客户端
现在,我们将设置将注册到 Eureka 服务器的服务实例。 为了设置 Eureka Client,我们将使用一个单独的 Maven 项目并更新 POM 文件以包含以下依赖项 −
<dependencies>
   <dependency>
      <groupId>org.springframework.cloud</groupId>
      <artifactId>spring-cloud-starter-netflix-eureka-client</artifactId>
   </dependency>
   <dependency>
      <groupId>org.springframework.boot</groupId>
      <artifactId>spring-boot-starter-web</artifactId>
   </dependency>
</dependencies>
然后,用正确的注解来注解我们的 Spring 应用程序类,即@EnableDiscoveryClient
package com.tutorialspoint;
import org.springframework.boot.SpringApplication;
import org.springframework.boot.autoconfigure.SpringBootApplication;
import org.springframework.cloud.client.discovery.EnableDiscoveryClient;
@SpringBootApplication
@EnableDiscoveryClient
public class RestaurantCustomerService{
   public static void main(String[] args) {
      SpringApplication.run(RestaurantCustomerService.class, args);
   }
}
如果我们想要配置客户端并更改其默认值,我们还需要一个属性文件。 以下是我们将做出的改变 −
我们将在运行时提供端口,而在执行时提供 jar。
我们将指定运行 Eureka 服务器的 URL。
所以,这就是我们的 application.yml 文件的样子
spring:
   application:
      name: customer-service
server:
   port: ${app_port}
eureka:
   client:
      serviceURL:
         defaultZone: http://localhost:8900/eureka
为了执行,我们将运行两个服务实例。 为此,让我们打开两个 shell,然后在一个 shell 上执行以下命令 −
java -Dapp_port=8081 -jar .\target\spring-cloud-eureka-client-1.0.jar
并在另一个shell上执行以下 −
java -Dapp_port=8082 -jar .\target\spring-cloud-eureka-client-1.0.jar
现在我们可以在控制台中看到日志 −
...
2021-03-07 15:22:22.474 INFO 16920 --- [ main]
com.netflix.discovery.DiscoveryClient : Starting heartbeat executor: renew
interval is: 30
2021-03-07 15:22:22.482 INFO 16920 --- [ main]
c.n.discovery.InstanceInfoReplicator : InstanceInfoReplicator onDemand
update allowed rate per min is 4
2021-03-07 15:22:22.490 INFO 16920 --- [ main]
com.netflix.discovery.DiscoveryClient : Discovery Client initialized at
timestamp 1615110742488 with initial instances count: 0
2021-03-07 15:22:22.492 INFO 16920 --- [ main]
o.s.c.n.e.s.EurekaServiceRegistry : Registering application CUSTOMERSERVICE
with eureka with status UP
2021-03-07 15:22:22.494 INFO 16920 --- [ main]
com.netflix.discovery.DiscoveryClient : Saw local status change event
StatusChangeEvent [timestamp=1615110742494, current=UP, previous=STARTING]
2021-03-07 15:22:22.500 INFO 16920 --- [nfoReplicator-0]
com.netflix.discovery.DiscoveryClient : DiscoveryClient_CUSTOMERSERVICE/
localhost:customer-service:8081: registering service...
2021-03-07 15:22:22.588 INFO 16920 --- [ main]
o.s.b.w.embedded.tomcat.TomcatWebServer : Tomcat started on port(s): 8081
(http) with context path ''
2021-03-07 15:22:22.591 INFO 16920 --- [ main]
.s.c.n.e.s.EurekaAutoServiceRegistration : Updating port to 8081
2021-03-07 15:22:22.705 INFO 16920 --- [nfoReplicator-0]
com.netflix.discovery.DiscoveryClient : DiscoveryClient_CUSTOMERSERVICE/
localhost:customer-service:8081 - registration status: 204
...
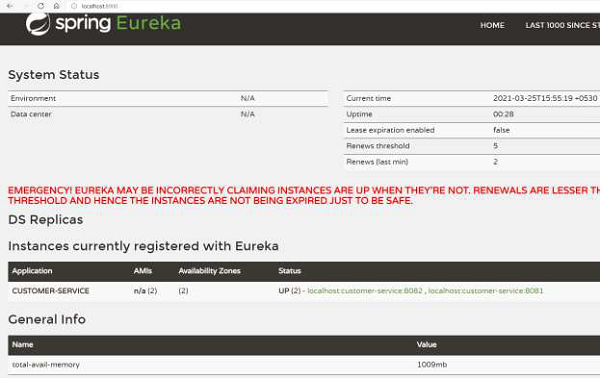
正如我们从上面的日志中看到的,客户端实例已经设置好了。 我们还可以查看我们之前看到的 Eureka 服务器仪表板。 如我们所见,Eureka 服务器知道有两个正在运行的"CUSTOMER-SERVICE"实例 −
Eureka 客户端消费者示例
我们的 Eureka 服务器已经注册了"Customer-Service"设置的客户端实例。 我们现在可以设置消费者,它可以向 Eureka 服务器询问"Customer-Service"节点的地址。
为此,让我们添加一个可以从 Eureka 注册获取信息的控制器。 这个控制器将被添加到我们早期的 Eureka 客户端本身,即"Customer Service"中。 让我们为客户端创建以下控制器。
package com.tutorialspoint;
import java.util.List;
import org.springframework.beans.factory.annotation.Autowired;
import org.springframework.cloud.client.ServiceInstance;
import org.springframework.cloud.client.discovery.DiscoveryClient;
import org.springframework.web.bind.annotation.RequestMapping;
import org.springframework.web.bind.annotation.RestController;
@RestController
class RestaurantCustomerInstancesController {
   @Autowired
   private DiscoveryClient eurekaConsumer;
   @RequestMapping("/customer_service_instances")
请注意注解 @DiscoveryClient,这是 Spring 框架提供的与注册表对话的内容。
现在让我们重新编译我们的 Eureka 客户端。 为了执行,我们将运行两个服务实例。 为此,让我们打开两个 shell,然后在一个 shell 上执行以下命令 −
java -Dapp_port=8081 -jar .\target\spring-cloud-eureka-client-1.0.jar
并在另一个 shell 上执行以下 −
java -Dapp_port=8082 -jar .\target\spring-cloud-eureka-client-1.0.jar
一旦两个 shell 上的客户端都启动了,现在让我们点击我们在控制器中创建的 http://localhost:8081/customer_service_instances。 此 URL 显示有关这两个实例的完整信息。
[
   {
      "scheme": "http",
      "host": "localhost",
      "port": 8081,
      "metadata": {
         "management.port": "8081"
      },
      "secure": false,
      "instanceInfo": {
         "instanceId": "localhost:customer-service:8081",
         "app": "CUSTOMER-SERVICE",
         "appGroupName": null,
         "ipAddr": "10.0.75.1",
         "sid": "na",
         "homePageUrl": "http://localhost:8081/",
         "statusPageUrl": "http://localhost:8081/actuator/info",
         "healthCheckUrl": "http://localhost:8081/actuator/health",
         "secureHealthCheckUrl": null,
         "vipAddress": "customer-service",
         "secureVipAddress": "customer-service",
         "countryId": 1,
         "dataCenterInfo": {
            "@class": "com.netflix.appinfo.InstanceInfo$DefaultDataCenterInfo",
            "name": "MyOwn"
         },
         "hostName": "localhost",
         "status": "UP",
         "overriddenStatus": "UNKNOWN",
         "leaseInfo": {
            "renewalIntervalInSecs": 30,
            "durationInSecs": 90,
            "registrationTimestamp": 1616667914313,
            "lastRenewalTimestamp": 1616667914313,
            "evictionTimestamp": 0,
            "serviceUpTimestamp": 1616667914313
         },
         "isCoordinatingDiscoveryServer": false,
         "metadata": {
            "management.port": "8081"
         },
         "lastUpdatedTimestamp": 1616667914313,
         "lastDirtyTimestamp": 1616667914162,
         "actionType": "ADDED",
         "asgName": null
      },
      "instanceId": "localhost:customer-service:8081",
      "serviceId": "CUSTOMER-SERVICE",
      "uri": "http://localhost:8081"
   },
   {
      "scheme": "http",
      "host": "localhost",
      "port": 8082,
      "metadata": {
         "management.port": "8082"
      },
      "secure": false,
      "instanceInfo": {
      "instanceId": "localhost:customer-service:8082",
      "app": "CUSTOMER-SERVICE",
      "appGroupName": null,
      "ipAddr": "10.0.75.1",
      "sid": "na",
      "homePageUrl": "http://localhost:8082/",
      "statusPageUrl": "http://localhost:8082/actuator/info",
      "healthCheckUrl": "http://localhost:8082/actuator/health",
      "secureHealthCheckUrl": null,
      "vipAddress": "customer-service",
      "secureVipAddress": "customer-service",
      "countryId": 1,
      "dataCenterInfo": {
         "@class": "com.netflix.appinfo.InstanceInfo$DefaultDataCenterInfo",
         "name": "MyOwn"
      },
      "hostName": "localhost",
      "status": "UP",
      "overriddenStatus": "UNKNOWN",
      "leaseInfo": {
         "renewalIntervalInSecs": 30,
         "durationInSecs": 90,
         "registrationTimestamp": 1616667913690,
         "lastRenewalTimestamp": 1616667913690,
         "evictionTimestamp": 0,
         "serviceUpTimestamp": 1616667913690
      },
      "isCoordinatingDiscoveryServer": false,
      "metadata": {
         "management.port": "8082"
      },
      "lastUpdatedTimestamp": 1616667913690,
      "lastDirtyTimestamp": 1616667913505,
      "actionType": "ADDED",
      "asgName": null
     },
     "instanceId": "localhost:customer-service:8082",
     "serviceId": "CUSTOMER-SERVICE",
     "uri": "http://localhost:8082"
   }
]
Eureka 服务器 API
Eureka 服务器为客户端实例或与之交谈的服务提供了各种 API。 很多这些 API 都是抽象的,可以直接与我们之前定义和使用的 @DiscoveryClient 一起使用。 请注意,它们的 HTTP 对应物也存在,并且可用于 Eureka 的非 Spring 框架使用。
事实上,我们之前使用的 API,即获取有关运行 "Customer_Service" 的客户端的信息,也可以通过浏览器使用 http://localhost:8900/eureka/apps/customer-service 调用,如下所示 −
<application slick-uniqueid="3">
   <div>
      <a id="slick_uniqueid"/>
   </div>
   <name>CUSTOMER-SERVICE</name>
   <instance>
         <instanceId>localhost:customer-service:8082</instanceId>
         <hostName>localhost</hostName>
         <app>CUSTOMER-SERVICE</app>
         <ipAddr>10.0.75.1</ipAddr>
         <status>UP</status>
         <overriddenstatus>UNKNOWN</overriddenstatus>
         <port enabled="true">8082</port>
         <securePort enabled="false">443</securePort>
         <countryId>1</countryId>
         <dataCenterInfo
class="com.netflix.appinfo.InstanceInfo$DefaultDataCenterInfo">
               <name>MyOwn</name>
         </dataCenterInfo>
         <leaseInfo>
            <renewalIntervalInSecs>30</renewalIntervalInSecs>
            <durationInSecs>90</durationInSecs>
            <registrationTimestamp>1616667913690</registrationTimestamp>
            <lastRenewalTimestamp>1616668273546</lastRenewalTimestamp>
            <evictionTimestamp>0</evictionTimestamp>
            <serviceUpTimestamp>1616667913690</serviceUpTimestamp>
         </leaseInfo>
         <metadata>
            <management.port>8082</management.port>
         </metadata>
         <homePageUrl>http://localhost:8082/</homePageUrl>
         <statusPageUrl>http://localhost:8082/actuator/info</statusPageUrl>
   <healthCheckUrl>http://localhost:8082/actuator/health</healthCheckUrl>
         <vipAddress>customer-service</vipAddress>
         <secureVipAddress>customer-service</secureVipAddress>
         <isCoordinatingDiscoveryServer>false</isCoordinatingDiscoveryServer>
         <lastUpdatedTimestamp>1616667913690</lastUpdatedTimestamp>
         <lastDirtyTimestamp>1616667913505</lastDirtyTimestamp>
         <actionType>ADDED</actionType>
   </instance>
   <instance>
         <instanceId>localhost:customer-service:8081</instanceId>
         <hostName>localhost</hostName>
         <app>CUSTOMER-SERVICE</app>
         <ipAddr>10.0.75.1</ipAddr>
         <status>UP</status>
         <overriddenstatus>UNKNOWN</overriddenstatus>
         <port enabled="true">8081</port>
         <securePort enabled="false">443</securePort>
         <countryId>1</countryId>
         <dataCenterInfo
class="com.netflix.appinfo.InstanceInfo$DefaultDataCenterInfo">
            <name>MyOwn</name>
         </dataCenterInfo>
         <leaseInfo>
               <renewalIntervalInSecs>30</renewalIntervalInSecs>
               <durationInSecs>90</durationInSecs>
               <registrationTimestamp>1616667914313</registrationTimestamp>
               <lastRenewalTimestamp>1616668274227</lastRenewalTimestamp>
               <evictionTimestamp>0</evictionTimestamp>
               <serviceUpTimestamp>1616667914313</serviceUpTimestamp>
         </leaseInfo>
         <metadata>
            <management.port>8081</management.port>
         </metadata>
         <homePageUrl>http://localhost:8081/</homePageUrl>
         <statusPageUrl>http://localhost:8081/actuator/info</statusPageUrl>
   <healthCheckUrl>http://localhost:8081/actuator/health</healthCheckUrl>
         <vipAddress>customer-service</vipAddress>
         <secureVipAddress>customer-service</secureVipAddress>
         <isCoordinatingDiscoveryServer>false</isCoordinatingDiscoveryServer>
         <lastUpdatedTimestamp>1616667914313</lastUpdatedTimestamp>
         <lastDirtyTimestamp>1616667914162</lastDirtyTimestamp>
         <actionType>ADDED</actionType>
   </instance>
</application>
其他一些有用的 API 是 −
| 动作 | API |
|---|---|
| 注册新服务 | POST /eureka/apps/{appIdentifier} |
| 注销服务 | DELTE /eureka/apps/{appIdentifier} |
| 有关服务的信息 | GET /eureka/apps/{appIdentifier} |
| 有关服务实例的信息 | GET /eureka/apps/{appIdentifier}/ {instanceId} |
有关编程 API 的更多详细信息,请参见此处 https://javadoc.io/doc/com.netflix.eureka/eureka-client/latest/index.html
Eureka – 高可用性
我们一直在独立模式下使用 Eureka 服务器。 但是,在生产环境中,理想情况下我们应该运行多个 Eureka 服务器实例。 这样可以确保即使一台机器出现故障,具有另一台 Eureka 服务器的机器也会继续运行。
让我们尝试在高可用性模式下设置 Eureka 服务器。 对于我们的示例,我们将使用两个实例。为此,我们将使用以下 application-ha.yml 来启动 Eureka 服务器。
注意事项 −
我们已经参数化了端口,以便我们可以使用相同的配置文件启动多个实例。
我们添加了地址,再次参数化,以传递 Eureka 服务器地址。
我们将应用程序命名为 "Eureka-Server"。
spring:
   application:
      name: eureka-server
server:
   port: ${app_port}
eureka:
   client:
      serviceURL:
         defaultZone: ${eureka_other_server_url}
现在让我们重新编译我们的 Eureka 服务器项目。 为了执行,我们将运行两个服务实例。 为此,让我们打开两个 shell,然后在一个 shell 上执行以下命令 −
java -Dapp_port=8900 '-Deureka_other_server_url=http://localhost:8901/eureka' -
jar .\target\spring-cloud-eureka-server-1.0.jar --
spring.config.location=classpath:application-ha.yml
并在另一个 shell 上执行以下 −
java -Dapp_port=8901 '-Deureka_other_server_url=http://localhost:8900/eureka' -
jar .\target\spring-cloud-eureka-server-1.0.jar --
spring.config.location=classpath:application-ha.yml
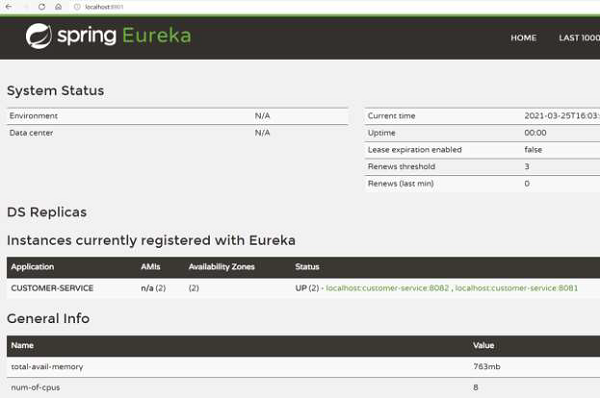
我们可以通过查看仪表板来验证服务器是否已启动并以高可用性模式运行。 例如,这里是 Eureka 服务器 1 上的仪表板 −
这是 Eureka server 2 的仪表板 −
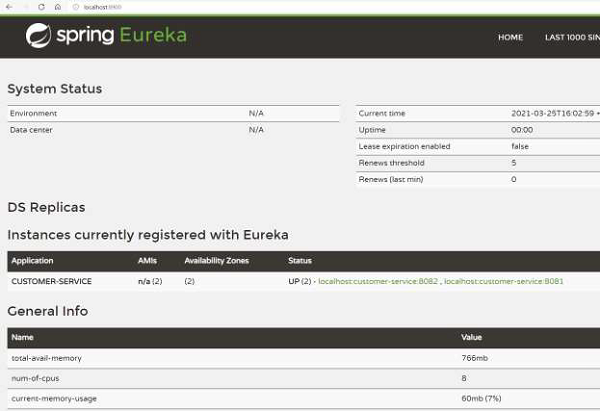
因此,正如我们所见,我们有两台 Eureka 服务器正在运行并同步。 即使一台服务器出现故障,另一台服务器也会继续运行。
我们还可以通过使用逗号分隔的服务器地址来更新服务实例应用程序,使其拥有两个 Eureka 服务器的地址。
spring:
   application:
      name: customer-service
server:
   port: ${app_port}
eureka:
   client:
      serviceURL:
         defaultZone: http://localhost:8900/eureka,
http://localhost:8901/eureka
Eureka – 区域感知
Eureka 还支持区域感知的概念。 当我们拥有跨不同地理区域的集群时,区域感知作为一个概念非常有用。 比如说,我们收到一个服务的传入请求,我们需要选择应该为该请求提供服务的服务器。 与其在位于较远的服务器上发送和处理该请求,不如选择位于同一区域中的服务器更有成效。 这是因为,网络瓶颈在分布式应用程序中非常常见,因此我们应该避免它。
现在让我们尝试设置 Eureka 客户端并让它们感知区域。 为此,让我们添加 application-za.yml
spring:
   application:
      name: customer-service
server:
   port: ${app_port}
eureka:
   instance:
      metadataMap:
         zone: ${zoneName}
   client:
      serviceURL:
         defaultZone: http://localhost:8900/eureka
现在让我们重新编译我们的 Eureka 客户端项目。 为了执行,我们将运行两个服务实例。 为此,让我们打开两个 shell,然后在一个 shell 上执行以下命令 −
java -Dapp_port=8080 -Dzone_name=USA -jar .\target\spring-cloud-eureka-client-
1.0.jar --spring.config.location=classpath:application-za.yml
并在另一个 shell 上执行以下 −
java -Dapp_port=8081 -Dzone_name=EU -jar .\target\spring-cloud-eureka-client-
1.0.jar --spring.config.location=classpath:application-za.yml
我们可以返回仪表板来验证 Eureka 服务器是否注册了服务的区域。 如下图所示,我们有两个可用区,而不是 1 个,直到现在我们才看到。
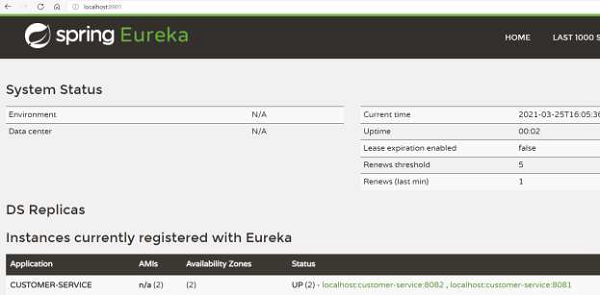
现在,任何客户端都可以查看它所在的区域。假设客户端位于 USA,它会更喜欢 USA 的服务实例。 并且可以从 Eureka 服务器获取区域信息。

