
Struts 2 - Property 属性标签
property 标签用于获取值的属性,如果未指定,则默认为堆栈顶部。此示例向您展示了三个简单数据标签的用法 - 即 set、push 和 property。
创建操作类
对于本练习,让我们重用"数据类型转换"一章中给出的示例,但稍作修改。因此,让我们从创建类开始。考虑以下 POJO 类 Environment.java。
package com.tutorialspoint.struts2;

public class Environment {
   private String name;
   public  Environment(String name) {
      this.name = name;
   }

   public String getName() {
      return name;
   }

   public void setName(String name) {
      this.name = name;
   }
}
让我们有以下动作类 −
package com.tutorialspoint.struts2;
import com.opensymphony.xwork2.ActionSupport;

public class SystemDetails extends ActionSupport {
   private Environment environment = new Environment("Development");
   private String operatingSystem = "Windows XP SP3";

   public String execute() {
      return SUCCESS;
   }

   public Environment getEnvironment() {
      return environment;
   }

   public void setEnvironment(Environment environment) {
      this.environment = environment;
   }

   public String getOperatingSystem() {
      return operatingSystem;
   }

   public void setOperatingSystem(String operatingSystem) {
      this.operatingSystem = operatingSystem;
   }
}
创建视图
让我们拥有包含以下内容的 System.jsp −
<%@ page language = "java" contentType = "text/html; charset = ISO-8859-1"
	pageEncoding = "ISO-8859-1"%>
<%@ taglib prefix = "s" uri = "/struts-tags"%>
<!DOCTYPE html PUBLIC "-//W3C//DTD HTML 4.01 Transitional//EN"
"http://www.w3.org/TR/html4/loose.dtd">

<html>
   <head>
      <title>System Details</title>
   </head>

   <body>
      <p>The environment name property can be accessed in three ways:</p>

      (Method 1) Environment Name:
      <s:property value = "environment.name"/><br/>

      (Method 2) Environment Name:
      <s:push value = "environment">
         <s:property value = "name"/><br/>
      </s:push>

      (Method 3) Environment Name:
      <s:set name = "myenv" value = "environment.name"/>
      <s:property value = "myenv"/>

   </body>
</html>
现在让我们逐一介绍这三个选项 −
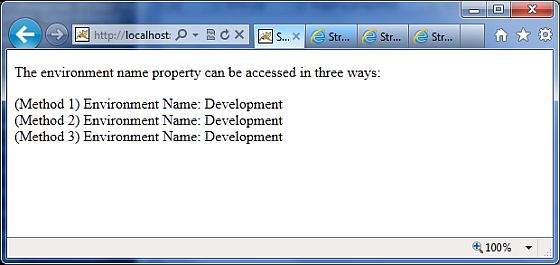
在第一种方法中,我们使用属性标记来获取环境名称的值。由于环境变量位于操作类中,因此它会自动出现在值堆栈中。我们可以使用属性 environment.name 直接引用它。当类中的属性数量有限时,方法 1 可以正常工作。想象一下,如果 Environment 类中有 20 个属性。每次需要引用这些变量时,都需要添加"environment."作为前缀。这就是 push 标记派上用场的地方。
在第二种方法中,我们将"environment"属性推送到堆栈。因此,现在在 push 标记的主体中,环境属性在堆栈的根目录中可用。从现在起,您可以非常轻松地引用该属性,如示例中所示。
在最后一种方法中,我们使用 set 标签创建一个名为 myenv 的新变量。此变量的值设置为 environment.name。因此,现在我们可以在引用环境名称的任何地方使用此变量。
配置文件
您的 struts.xml 应如下所示 −
<?xml version = "1.0" Encoding = "UTF-8"?>
<!DOCTYPE struts PUBLIC
   "-//Apache Software Foundation//DTD Struts Configuration 2.0//EN"
   "http://struts.apache.org/dtds/struts-2.0.dtd">

<struts>
   <constant name = "struts.devMode" value = "true" />
   <package name = "helloworld" extends = "struts-default">
      <action name = "system"
         class = "com.tutorialspoint.struts2.SystemDetails"
         method = "execute">
         <result name = "success">/System.jsp</result>
      </action>
   </package>
</struts>
文件 web.xml 应类似于 −
<?xml version = "1.0" Encoding = "UTF-8"?>
<web-app xmlns:xsi = "http://www.w3.org/2001/XMLSchema-instance"
   xmlns = "http://java.sun.com/xml/ns/javaee"
   xmlns:web = "http://java.sun.com/xml/ns/javaee/web-app_2_5.xsd"
   xsi:schemaLocation = "http://java.sun.com/xml/ns/javaee
   http://java.sun.com/xml/ns/javaee/web-app_3_0.xsd"
   id = "WebApp_ID" version = "3.0">

   <display-name>Struts 2</display-name>

   <welcome-file-list>
      <welcome-file>index.jsp</welcome-file>
   </welcome-file-list>

   <filter>
      <filter-name>struts2</filter-name>
      <filter-class>
         org.apache.struts2.dispatcher.FilterDispatcher
      </filter-class>
   </filter>

   <filter-mapping>
      <filter-name>struts2</filter-name>
      <url-pattern>/*</url-pattern>
   </filter-mapping>
</web-app>
右键单击项目名称,然后单击导出 > WAR 文件以创建 War 文件。然后将此 WAR 部署到 Tomcat 的 webapps 目录中。最后,启动 Tomcat 服务器并尝试访问 URL http://localhost:8080/HelloWorldStruts2/system.action。这将产生以下屏幕 −
 struts_data_tags.html
