
Zend Framework - 视图层
视图层是 MVC 应用程序的表示层。它将应用程序逻辑与表示逻辑分开。在典型的 PHP Web 应用程序中,所有业务逻辑和设计都是混合在一起的。混合可以加快小型项目的开发速度。但是,在涉及大量高级架构的大型项目中,混合会失败。要更改 Web 应用程序的设计,开发人员还需要处理业务逻辑。这可能会造成灾难性的后果,导致业务逻辑中断。
Zend Framework 提供了一个经过深思熟虑、干净、灵活且可扩展的视图层。视图层可作为单独的模块 Zend/View 使用,并与 Zend/Mvc 模块完美集成。 Zend View Layer 被分成多个组件,彼此之间可以很好地交互。
其各个组件如下 −
变量容器 − 保存视图层的数据。
视图模型 − 保存变量容器和设计模板。
渲染器 − 处理来自视图模型的数据和模板并输出设计表示,可能是最终的 html 输出。
解析器 − 以渲染器可以使用的方式解析视图模型中可用的模板。
视图 (Zend\View\View) −将请求映射到渲染器,然后将渲染器映射到响应。
渲染策略 − 由视图使用,将请求映射到渲染器。
响应策略 − 由视图使用,将渲染器映射到响应。
视图层 View 处理 ViewModel,使用 Resolver 解析模板,使用 Rendering Strategy 渲染模板,最后使用 Response Renderer 输出模板。
视图层配置
与控制器一样,视图层可以在名为 - module.config.php 的模块配置文件中进行配置。主要配置是指定模板的放置位置。这可以通过在"module.config.php"中添加以下配置来实现。
'view_manager' => [
   'template_path_stack' => ['tutorial' => __DIR__ . '/../view',],
]
默认情况下,View 层对其所有组件都有默认行为。例如,ViewModel 通过"lowercase-module-name/lowercase-controller-name/lowercase-action-name"规则解析模板根中控制器操作的模板名称。但是,这可以通过 ViewModel 的 setTemplate() 方法覆盖。
控制器和 View 层
默认情况下,控制器不需要向 View 层发送任何数据。将模板写在适当的位置就足够了。
例如,在我们的示例 TutorialController 中,模板需要放置在 myapp/module/Tutorial/view/tutorial/tutorial/index.phtml。index.phtml 引用基于 PHP 的模板,它将由 PHPRenderer 呈现。还有其他渲染器,例如用于 json 输出的 JsonRenderer 和用于 rss 和 atom 输出的 FeedRenderer。
完整列表如下 −
<?php
namespace Tutorial\Controller;
use Zend\Mvc\Controller\AbstractActionController;
use Zend\View\Model\ViewModel;
class TutorialController extends AbstractActionController {
   public function indexAction() {
   }
}
Zend 应用程序模板
<div class = "row content">
   <h3>This is my first Zend application</h3>
</div>
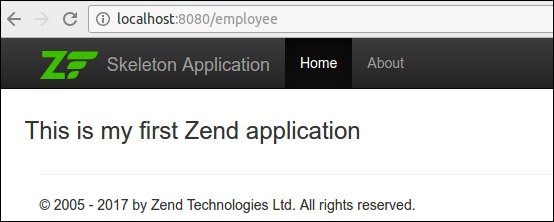
最后,我们成功完成了 Tutorial 模块,我们可以使用 url - http://localhost:8080/tutorial 访问它。
将数据传递到视图层
将数据发送到视图层的最简单方法是使用 ViewModel 参数。更改后的 indexAction 方法如下 −
public function indexAction() {
   $view = new ViewModel([
      'message' => 'Hello, Tutorial'
   ]);
   return $view;
}
现在,按如下方式更改 index.phtml 文件 −
<div class = "row content">
   <h3>This is my first Zend application</h3>
   <h4><?php echo $this->message?></h4>
</div>
视图助手
视图助手用于编写模板中使用的小型原子函数。Zend 框架提供了一个接口 Zend\View\Helper\HelperInterface 来编写标准视图助手。
HelperInterface 只有两种方法,
setView() − 此方法接受 Zend\View\Renderer\RendererInterface 实例/实现。
getView() − 它用于检索该实例。
HelperInterface 的完整代码清单如下 −
namespace Zend\View\Helper;
use Zend\View\Renderer\RendererInterface as Renderer;
interface HelperInterface {
   /**
      * Set the View object
      *
      * @param  Renderer $view
      * @return HelperInterface
   */
   public function setView(Renderer $view);
   /**
      * Get the View object
      *
      * @return Renderer
   */
   public function getView();
}
要在视图脚本中使用帮助程序,请使用 $this->helperName() 访问它。
内置帮助程序
Zend Framework 提供了许多内置帮助程序函数,可用于各种目的。 zend-mvc 中可用的部分视图助手如下 −
URL
URL 助手用于生成与应用程序中定义的路由匹配的 URL。
URL 助手的定义是 −
$this->url($name, $params, $options, $reuseMatchedParameters)
例如,在教程模块中,路由名为 tutorial,它有两个参数 action 和 id。我们可以使用 URL 助手生成两个不同的 URL,如下所示 −
<a href = "<? = $this->url('tutorial'); ?>">Tutorial Index</a>
<a href = "<? = $this->url('tutorial', ['action' => 'show', 'id' =>10]); ?>">
   Details of Tutorial #10
</a>
结果将如下所示 −
<a href = "/tutorial">Tutorial Index</a>
<a href = "/tutorial/show/10"> Details of Tutorial #10</a>
占位符
占位符助手用于在视图脚本和视图实例之间持久保存内容。它提供了最初设置数据然后在后续阶段使用它的选项。
例如,我们可以设置 公司名称,然后在所有其他地方使用它。
<?php $this->placeholder('companyname')->set("TutorialsPoint") ?>
<?= $this->placeholder('companyname'); ?>
占位符提供了一些高级选项,可以从 PHP 数组和对象生成复杂内容。它还可以选择捕获模板本身的某些部分。
例如,以下代码捕获中间的模板结果并将其存储在 productlist 占位符中。
类 - 产品
class Product {
   public $name;
   public $description;
}
控制器
$p1 = new Product();
$p1->name = 'Car';
$p1->description = 'Car';
$p2 = new Product();
$p2->name = 'Cycle';
$p2->description = 'Cycle';
$view = new ViewModel(['products' => $products]);
模板
<!-- start capture -->
<?php $this->placeholder('productlist')->captureStart();
   foreach ($this->products as $product): ?>
<div>
   <h2><?= $product->name ?></h2>
   <p><?= $product->description ?></p>
</div>
<?php endforeach; ?>
<?php $this->placeholder('productlist')->captureEnd() ?>
<!-- end capture -->
<?= $this->placeholder('productlist') ?>
结果
<div class = "foo">
   <h2>Car</h2>
   <p>Car</p>
</div>
<div class = "foo">
   <h2>Cycle</h2>
   <p>Cycle</p>
</div>
Doctype
Doctype 助手用于生成各种 html 文档类型。它是 Placeholder 助手的具体实现。可以在引导文件和配置文件中设置文档类型。
基本用法如下所示 −
应用程序引导文件
use Zend\View\Helper\Doctype;
$doctypeHelper = new Doctype();
$doctypeHelper->doctype('XHTML5');
模块配置
// module/Application/config/module.config.php:
return [
   /* ... */
   'view_manager' => [
      'doctype' => 'html5',
      /* ... */
   ],
];
模板
<?php echo $this->doctype() ?>
HeadTitle
HeadTitle 助手用于生成 html 标题元素。它是 Placeholder 助手的具体实现。Zend 提供了一个在模块配置文件中设置标题的选项,并且可以在任何级别设置,如站点、模块、控制器、操作等。HeadTitle 的部分代码如下 −
模块
headTitleHelper->append($action);
$headTitleHelper->append($controller);
$headTitleHelper->append($module);
$headTitleHelper->append($siteName);
模板
<?= $this->headTitle() ?>
结果
action - controller - module - Zend Framework
HeadMeta
HeadMeta 助手用于生成 html 元标记。它是 Placeholder 助手的具体实现。
模板 −
<?php
   $this->headMeta()->appendName('keywords', 'turorialspoint, zend framework, php');
   echo $this->headMeta()
?>
结果
<meta name = "keywords" content = "tutorialspoint, zend framework, php" />
HeadLink
HeadLink 帮助程序用于生成 html 链接以包含外部资源。它是 Placeholder 帮助程序的具体实现。
模板
<?php
   // 在视图脚本中设置链接:
   $this->headLink(['rel' => 'icon', 'href' => '/img/favicon.ico'], 'PREPEND')
      ->appendStylesheet('/styles/site.css')
      ->prependStylesheet('/styles/mystyle.css', 'screen', true, ['id' => 'mystyle']);

   // 从布局渲染链接:
   echo $this->headLink();
?>
结果
<link href = "/styles/mystyle.css" media = "screen" rel = "stylesheet"
   type = "text/css" id = "mystyle">
<link href = "/img/favicon.ico" rel = "icon">
<link href = "/styles/site.css" media = "screen" rel = "stylesheet" type = "text/css">
HeadStyle
The HeadStyle helper is used to generate inline CSS styles. It is concrete implementation of the Placeholder helper.
模板
<?php $this->headStyle()->appendStyle($styles); ?>
<?php echo $this->headStyle() ?>
HeadScript
HeadScript 用于生成内联脚本或包含外部脚本。它是 Placeholder 助手的具体实现。
模板
<? $this->headScript()->appendFile(‘/js/sample.js’);?>
<?php echo $this->headScript() ?>
InlineScript
InlineScript 用于在 html 模板的 head 和 body 部分生成脚本。它派生自 HeadScript。
HTMLList
HTMLList 用于生成有序和无序列表。HTMLList 的定义如下 −
定义
htmlList($items, $ordered, $attribs, $escape)
模板
$items = [
   '2015',
   ['March', 'November'],
   '2016',
];
echo $this->htmlList($items);
结果
<ul>
   <li>2015
      <ul>
         <li>March</li>
         <li>November</li>
      </ul>
   </li>
   <li>2016</li>
</ul>
Cycle
Cycle 用于在循环环境中生成替代方案。它具有分配、下一个和上一个函数。
控制器
$view = new ViewModel(['message' => 'Hello, Tutorial', 'data' => array('One', 'Two')]);
模板
<?php $this->cycle()->assign(['#F0F0F0', '#FFF'], 'colors'); ?>

<table>
   <?php foreach ($this->data as $datum): ?>
   <tr style = "background-color: <?= $this->cycle()->setName('colors')>next() ?>">
      <td><?= $this->escapeHtml($datum) ?></td>
   </tr>
   <?php endforeach ?>
</table>
结果
<table>
   <tr style = "background-color: #F0F0F0">
      <td>One</td>
   </tr>
   <tr style = "background-color: #FFF">
      <td>Two</td>
   </tr>
</table>
其他几个重要的内置助手如下 −
BasePath − BasePath 用于生成应用程序根目录的公共文件夹的路径。
Partial − Partial 用于在其自己的变量范围内呈现特定模板。
PartialLoop − PartialLoop 与 Partial 类似,但用于循环环境。
Identity − Identity 用于从身份验证服务中检索已登录用户的身份。
JSON − JSON 用于 restful 环境中,输出为 JSON 格式。它发出正确的 HTTP 标头并禁用布局概念。
Zend Framework 中仍有许多可用的帮助程序,例如 i18n 帮助程序、表单帮助程序、分页帮助程序、导航帮助程序等。
创建视图帮助程序
Zend Framework 提供了一个内置的 AbstractHelper,它实现了 HelperInterface 来编写视图帮助程序。
编写新帮助程序所涉及的步骤如下 −
步骤 1 − 扩展 Zend\View\Helper\AbstractHelper 类。
步骤 2 −重写 __invoke() 函数。
步骤 3 − 在 module.config.php 文件 中设置配置。
步骤 4 − 在视图脚本中使用视图助手。
现在让我们创建一个 TestHelper
在 myapp/module/Tutorial/src/View 目录 创建 Helper 文件夹。在 Helper 目录中写入 TestHelper,即 TestHelper.php。
完整清单如下 −
<?php
namespace Tutorial\View\Helper;
use Zend\View\Helper\AbstractHelper;
class TestHelper extends AbstractHelper {
   public function __invoke() {
      $output = "I am from test helper";
      return htmlspecialchars($output, ENT_QUOTES, 'UTF-8');
   }
}
在 module.config.php 中设置配置。
'view_helpers' => [
   'aliases' => [
      'testHelper' => View\Helper\TestHelper::class,
   ],
   'factories' => [
      View\Helper\TestHelper::class => InvokableFactory::class,
   ],
],
在 about 视图脚本中使用新创建的 TestHelper。
<?= $this->testHelper() ?>

