
Android 中使用 Recycler View
Recycler View 是 ListView 的更高级版本,基于 View Holder 设计模式。使用 RecyclerView,我们可以显示网格以及项目列表。
本示例演示了如何集成 RecyclerView,创建一个美观的学生记录应用,显示学生姓名和年龄。
步骤 1 − 在 Android Studio 中创建一个新项目,前往"文件"->"新建项目",并填写所有必需信息以创建新项目。
步骤 2 − 打开 build.gradle 并添加 Recycler View 库依赖项。
apply plugin: 'com.android.application'
android {
   compileSdkVersion 28
   defaultConfig {
      applicationId "com.example.andy.tutorialspoint"
      minSdkVersion 19
      targetSdkVersion 28
      versionCode 1
      versionName "1.0"
      testInstrumentationRunner "android.support.test.runner.AndroidJUnitRunner"
   }
   buildTypes {
      release {
         minifyEnabled false
         proguardFiles getDefaultProguardFile('proguard-android.txt'), 'proguard-rules.pro'
      }
   }
}
dependencies {
   implementation fileTree(dir: 'libs', include: ['*.jar'])
   implementation 'com.android.support:appcompat-v7:28.0.0'
   implementation 'com.android.support:design:28.0.0'
   implementation 'com.android.support.constraint:constraint-layout:1.1.3'
   implementation 'com.android.support:recyclerview-v7:28.0.0'
   testImplementation 'junit:junit:4.12'
   androidTestImplementation 'com.android.support.test:runner:1.0.2'
   androidTestImplementation 'com.android.support.test.espresso:espresso-core:3.0.2'
}
步骤 3 − 将以下代码添加到 res/layout/activity_main.xml。
<?xml version="1.0" encoding="utf-8"?>
<RelativeLayout
   xmlns:android="http://schemas.android.com/apk/res/android"
   xmlns:tools="http://schemas.android.com/tools"
   xmlns:app="http://schemas.android.com/apk/res-auto"
   android:layout_width="match_parent"
   android:layout_height="match_parent"
   app:layout_behavior="@string/appbar_scrolling_view_behavior"
   tools:showIn="@layout/activity_main"
   tools:context=".MainActivity">
   <android.support.v7.widget.RecyclerView
      android:id="@+id/recycler_view"
      android:layout_width="match_parent"
      android:layout_height="wrap_content"
      android:scrollbars="vertical"
    />
</RelativeLayout>
在上面的代码中,我们将 Recycler 视图作为相对父布局添加到窗口管理器中。
步骤 4 − 将以下代码添加到 src/MainActivity.java
package com.example.andy.tutorialspoint;
import android.annotation.TargetApi;
import android.os.Build;
import android.os.Bundle;
import android.support.design.widget.TabLayout;
import android.support.v4.view.ViewPager;
import android.support.v7.app.AppCompatActivity;
import android.support.v7.widget.DividerItemDecoration;
import android.support.v7.widget.LinearLayoutManager;
import android.support.v7.widget.RecyclerView;
import android.support.v7.widget.Toolbar;
import java.util.ArrayList;
import java.util.List;
public class MainActivity extends AppCompatActivity {
   private RecyclerView recyclerView;
   private StudentAdapter studentAdapter;
   private List studentDataList =new ArrayList<>();
   @TargetApi(Build.VERSION_CODES.O)
   @Override
   protected void onCreate(Bundle savedInstanceState) {
      super.onCreate(savedInstanceState);
      setContentView(R.layout.activity_main);
      recyclerView = findViewById(R.id.recycler_view);
      studentAdapter=new StudentAdapter(studentDataList);
      RecyclerView.LayoutManager manager=new LinearLayoutManager(this);
      recyclerView.setLayoutManager(manager);
      recyclerView.addItemDecoration(new DividerItemDecoration(this, LinearLayoutManager.VERTICAL));
      recyclerView.setAdapter(studentAdapter);
      StudentDataPrepare();
   }
   private void StudentDataPrepare() {
      studentData data=new studentData("sai",25);
      studentDataList.add(data);
      data=new studentData("sai",25);
      studentDataList.add(data);
      data=new studentData("raghu",20);
      studentDataList.add(data);
      data=new studentData("raj",28);
      studentDataList.add(data);
      data=new studentData("amar",15);
      studentDataList.add(data);
      data=new studentData("bapu",19);
      studentDataList.add(data);
      data=new studentData("chandra",52);
      studentDataList.add(data);
      data=new studentData("deraj",30);
      studentDataList.add(data);
      data=new studentData("eshanth",28);
      studentDataList.add(data);
   }
}
在上面的代码中,我们添加了一个 Recycler 视图和 StudentAdapter。在该 Student 适配器中,我们将 StudentDatalist 作为 ArrayList 传递。在 Student 中,数据列表包含学生的姓名和年龄。
步骤 5 − 以下是修改后的 src/StudentAdapter.java 文件的内容。
package com.example.andy.tutorialspoint;
import android.support.annotation.NonNull;
import android.support.v7.widget.RecyclerView;
import android.view.LayoutInflater;
import android.view.View;
import android.view.ViewGroup;
import android.widget.TextView;
import java.util.List;
class StudentAdapter extends RecyclerView.Adapter {
   List studentDataList;
   public StudentAdapter(List studentDataList) {
      this.studentDataList=studentDataList;
   }
   @NonNull
   @Override
   public MyViewHolder onCreateViewHolder(@NonNull ViewGroup viewGroup, int i) {
      View itemView = LayoutInflater.from(viewGroup.getContext())
      .inflate(R.layout.student_list_row, viewGroup, false);
      return new MyViewHolder(itemView);
   }
   @Override
   public void onBindViewHolder(MyViewHolder viewHolder, int i) {
      studentData data=studentDataList.get(i);
      viewHolder.name.setText(data.name);
      viewHolder.age.setText(String.valueOf(data.age));
   }
   @Override
   public int getItemCount() {
      return studentDataList.size();
   }
   class MyViewHolder extends RecyclerView.ViewHolder {
      TextView name,age;
      public MyViewHolder(View itemView) {
         super(itemView);
         name=itemView.findViewById(R.id.name);
         age=itemView.findViewById(R.id.age);
      }
   }
}
在适配器类中,我们有以下四个方法 -
onCreateViewHolder() - 用于创建视图持有者并返回一个视图。
onBindViewHolder() - 用于绑定创建的视图持有者。
getItemCount() - 用于获取列表的大小。
MyViewHolder 类 - 它是视图持有者的内部类,由 RecyclerView.ViewHolder 扩展。
步骤 6 − 以下是 xml res/layout/student_list_row.xml 的修改内容。
<?xml version="1.0" encoding="utf-8"?>
<LinearLayout xmlns:android="http://schemas.android.com/apk/res/android"
   android:orientation="horizontal" android:layout_width="match_parent"
   android:weightSum="1"
   android:layout_height="wrap_content">
<TextView
   android:id="@+id/name"
   android:layout_width="0dp"
   android:layout_weight="0.5"
   android:gravity="center"
   android:textSize="15sp"
   android:layout_height="100dp" />
   <TextView
      android:id="@+id/age"
      android:layout_width="0dp"
      android:layout_weight="0.5"
      android:gravity="center"
      android:textSize="15sp"
      android:layout_height="100dp" />
</LinearLayout>
在上面的列表项视图中,我们创建了两个文本视图,分别为姓名和年龄。
步骤 7 − 以下是修改后的 src/studentData.java 文件的内容。
package com.example.andy.tutorialspoint;
class studentData {
   String name;
   int age;
   public studentData(String name, int age) {
      this.name=name;
      this.age=age;
   }
}
上面的代码提供了有关学生数据对象的信息。让我们尝试运行您的应用程序。假设您已将实际的 Android 移动设备连接到电脑。要从 Android Studio 运行应用,请打开项目的某个活动文件,然后点击工具栏上的"运行"图标  。选择您的移动设备作为选项,然后勾选将显示默认屏幕的移动设备。
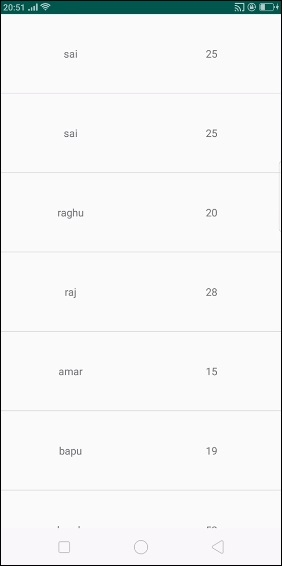
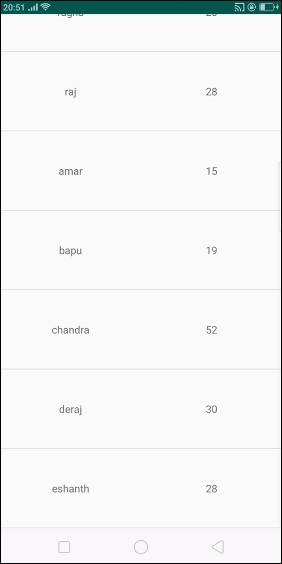
现在向下滚动。其结果如下 -
点击此处下载项目代码

