
Android 中的 Bundle 示例
Android 中的 Bundle 是什么?
在本教程中,我们将学习如何使用 Kotlin 编程语言在 Android 应用程序中使用 Bundle。
Bundle 是 Android 中的一个类,用于在 Android 应用程序中将数据从一个 Activity 传递到另一个 Activity。我们可以使用 Bundle 的键值对传递数据。我们可以使用键传递数据,也可以使用相同的键检索通过该键传递的数据。
实现
我们将创建一个简单的应用程序,其中只显示一个编辑文本,以便用户输入信息。然后,我们将提供一个按钮,用于通过 Bundle 将数据从一个 Activity 传递到另一个 Activity。我们将按照分步指南在 Android 应用程序中实现 Toast 消息。
步骤 1:在 Android Studio 中创建新项目
如下图所示,导航到 Android Studio。在下方屏幕中,点击"新建项目"以创建一个新的 Android Studio 项目。
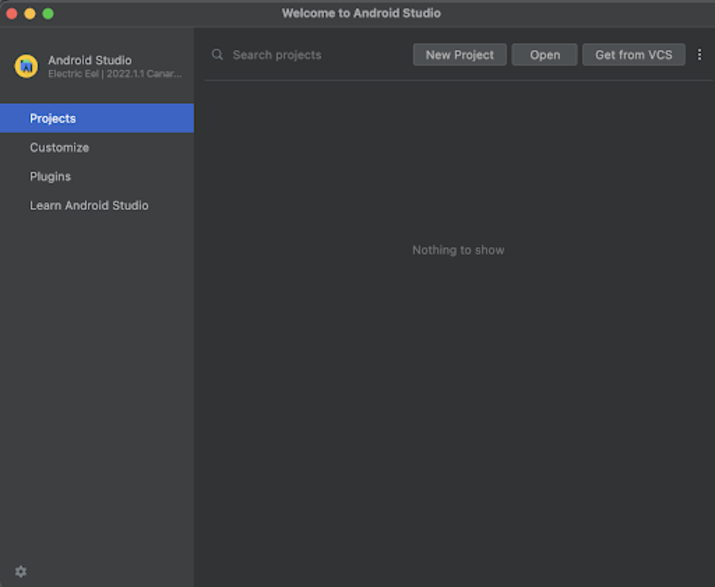
点击"新建项目"后,您将看到以下屏幕。
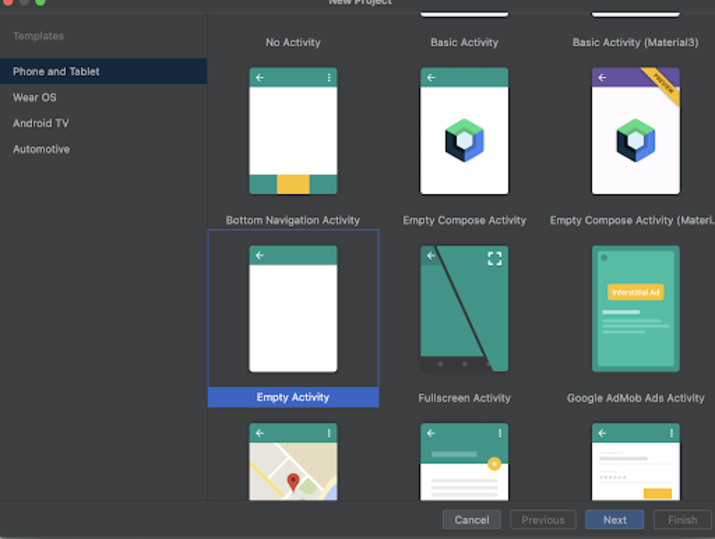
在此屏幕中,我们只需选择"空活动",然后点击"下一步"。点击"下一步"后,您将看到以下屏幕。
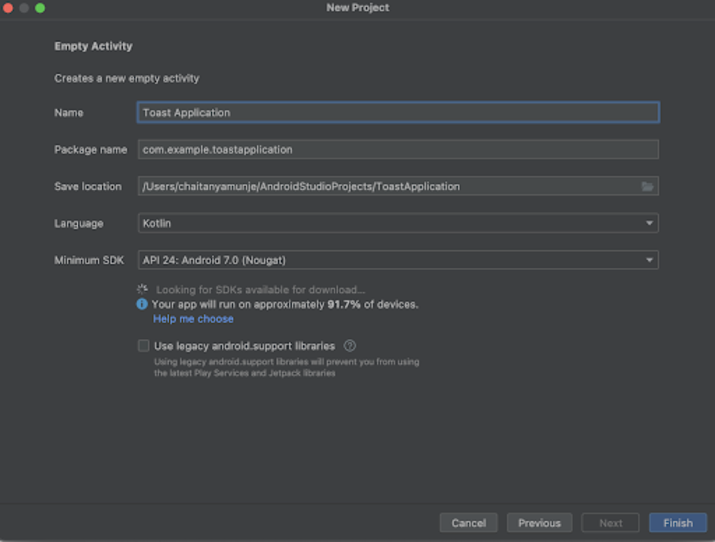
在此屏幕中,我们只需指定项目名称。然后包名称将自动生成。
注意- 确保选择"语言"为 Kotlin。
指定所有详细信息后,点击"完成"以创建一个新的 Android Studio 项目。
项目创建完成后,我们将看到两个打开的文件,即 activity_main.xml 和 MainActivity.kt 文件。
步骤 2:使用 activity_main.xml
导航到 activity_main.xml。如果看不到此文件,请打开它。在左侧窗格中,导航至 app>res>layout>activity_main.xml 并打开此文件。打开此文件后,添加以下代码。代码中添加了注释,以便您详细了解。
<?xml version="1.0" encoding="utf-8"?>
<RelativeLayout xmlns:android="http://schemas.android.com/apk/res/android"
   xmlns:app="http://schemas.android.com/apk/res-auto"
   xmlns:tools="http://schemas.android.com/tools"
   android:layout_width="match_parent"
   android:layout_height="match_parent"
   tools:context=".MainActivity">

   <!-- creating text view for displaying heading-->
   <TextView
      android:id="@+id/idTVHeading"
      android:layout_width="match_parent"
      android:layout_height="wrap_content"
      android:layout_above="@id/idEdtMsg"
      android:layout_margin="20dp"
      android:gravity="center"
      android:text="Bundle in Android"
      android:textAlignment="center"
      android:textAllCaps="false"
      android:textColor="#FF000000"
      android:textSize="20sp"
      android:textStyle="bold" />


   <!-- edit text for entering the message-->
   <EditText
      android:id="@+id/idEdtMsg"
      android:layout_width="match_parent"
      android:layout_height="wrap_content"
      android:layout_centerInParent="true"
      android:layout_margin="20dp"
      android:hint="Enter your message" />

   <!-- creating a button to  copy text to clip board-->
   <Button
      android:id="@+id/idBtnPassData"
      android:layout_width="match_parent"
      android:layout_height="wrap_content"
      android:layout_below="@id/idEdtMsg"
      android:layout_margin="20dp"
      android:text="Pass Data using Bundle"
      android:textAllCaps="false" />

</RelativeLayout>
说明− 在上面的代码中,根元素是 Android 中的相对布局。此布局是一个视图组,用于将其中的所有元素彼此对齐。我们可以借助 id 或位置来相对对齐相对布局中的所有元素。
在此相对布局中,我们创建的第一个视图是文本视图。它用于显示一条简单的文本消息。在此文本视图窗口小部件中,我们将其宽度指定为 match_parent,以便它将占据移动设备的完整宽度,并将其高度指定为包裹内容以获取文本高度。我们为文本视图指定了 id,它是该窗口小部件的唯一标识符。我们可以使用此 id 来执行此文本视图的某些操作,例如为其覆盖新文本。然后,我们在上方参数中添加一个布局,以便借助编辑文本视图 id 将此文本视图布局对齐到编辑文本上方。然后,我们从各个方向为文本视图添加边距。之后,我们添加一个文本作为参数,并在其中指定要在文本视图中显示的值。指定文本后,我们指定文本对齐方式。这将使文本视图窗口小部件内的文本与窗口小部件的中心对齐。然后,我们将文本颜色指定为黑色,文本大小指定为 20sp,最后将文本样式指定为粗体。
添加文本视图后,我们将添加一个编辑文本,用于接收用户的输入。在这个窗口小部件中,我们首先为编辑文本指定 id,我们将使用该 id 从用户输入的编辑文本中获取数据。然后,我们将布局宽度指定为 match_parent,高度指定为 wrap content。之后,为了使此编辑文本与屏幕中心对齐,我们在父级中添加了布局中心。然后,我们在编辑文本的所有边缘添加边距。最后,我们为编辑文本指定提示,告知用户在编辑文本中需要输入什么。
添加编辑文本后,我们添加一个按钮,用于将数据从一个活动传递到另一个活动。在按钮内部,我们首先指定按钮的 ID,我们将使用该 ID 为其添加点击监听器。然后,我们将按钮的高度指定为 wrap content,宽度指定为 match_parent。最后,我们将按钮的四边距设置为 20dp。最后,我们指定按钮的文本。最后,我们将按钮的 textAllCaps 属性设置为 false,使其文本字体与我们在 text 标签中指定的文本字体相同。
最后,我们为相对布局添加一个结束标签,因为文本视图和按钮都包含在相对布局中。
步骤 3:创建一个新的空 Activity
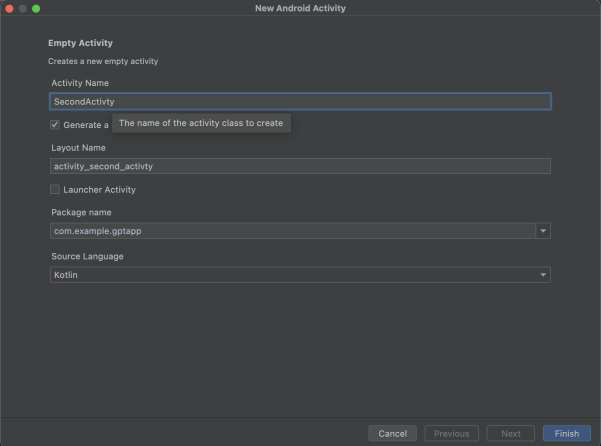
在项目选项卡中导航到"应用"选项,然后右键单击它,选择"新建">"Activity">"空 Activity",并按如下所示命名您的 Activity。
步骤 3:使用 MainActivity.kt
导航到 MainActivity.kt。如果此文件不可见,请打开此文件。在左侧窗格中,导航至 app>java>您的应用包名称>MainActivity.kt 并打开此文件。打开此文件后,添加以下代码。代码中添加了注释,方便您详细了解。
package com.example.gptapp

import android.content.Intent
import android.os.Bundle
import android.widget.Button
import android.widget.EditText
import androidx.appcompat.app.AppCompatActivity

class MainActivity : AppCompatActivity() {

   // creating variables for edit text and button on below line.
   lateinit var messageEdt: EditText
   lateinit var passDataBtn: Button

   override fun onCreate(savedInstanceState: Bundle?) {
      super.onCreate(savedInstanceState)
      setContentView(R.layout.activity_main)
      // initializing variable for video view on below line.
      messageEdt = findViewById(R.id.idEdtMsg)
      passDataBtn = findViewById(R.id.idBtnPassData)

      // adding click listener for button.
      passDataBtn.setOnClickListener {
         val msg = messageEdt.text.toString()

         // creating a bundle instance on below line
         val bundle = Bundle()
         // passing the data into the bundle
         bundle.putString(
            "message",
            msg
         )
         val intent = Intent(this@MainActivity, SecondActivity::class.java)
         // passing the bundle to the intent on below line.
         intent.putExtras(bundle)
         startActivity(intent)
      }
   }
}
说明− 在上述 MainActivity.kt 文件的代码中,我们首先为已创建的不同视图(例如按钮和编辑文本)创建一个变量。
现在我们来看一下 onCreate 方法。这是每个 Android 应用程序的默认方法。此方法在应用程序视图创建时调用。在此方法中,我们设置内容视图,即名为 activity_main.xml 的布局文件,以便从该文件设置 UI。
指定视图后,我们将使用 activity_main.xml 文件中指定的唯一 ID 初始化按钮变量(名为 passDataBtn)和编辑文本变量(名为 messageEdt)。
初始化按钮和编辑文本(名为 messageEdt)后,使用其唯一 ID 初始化按钮和编辑文本,并通过调用 setOnClickListner 方法为按钮添加点击监听器。在该方法中,我们将数据从一个活动传递到另一个活动。
在 onClickListner 方法中,我们创建一个名为 msg 的变量,用于从编辑文本中获取数据并将其存储在其中。之后,我们创建并初始化 bundle 的变量。创建 bundle 变量后,我们将使用该变量通过键值对传递数据。我们将消息作为键传递,并将数据从编辑文本中获取的 sg 变量中传递。之后,我们创建一个用于 Intent 的变量,并将其传递给 SecondActivity,当用户点击按钮时,我们需要向 SecondActivity 传递数据。然后,我们调用 put extras 函数来放置我们生成的 bundle,并将其发送给 SecondActivity。之后,我们只需调用 startActivity 函数来启动 SecondActivity 即可查看传递的数据。
步骤 4:使用 activity_second.xml
导航到 activity_second.xml。如果此文件不可见,请打开此文件。在左侧窗格中,导航至 app>res>layout>activity_second.xml 并打开此文件。打开此文件后,添加以下代码。代码中添加了注释,以便您详细了解。
<?xml version="1.0" encoding="utf-8"?>
<RelativeLayout xmlns:android="http://schemas.android.com/apk/res/android"
   xmlns:app="http://schemas.android.com/apk/res-auto"
   xmlns:tools="http://schemas.android.com/tools"
   android:layout_width="match_parent"
   android:layout_height="match_parent"
   tools:context=".SecondActivity">

   <!-- creating text view for displaying heading-->
   <TextView
      android:id="@+id/idTVHeading"
      android:layout_width="match_parent"
      android:layout_height="wrap_content"
      android:layout_above="@id/idTVMessage"
      android:layout_margin="20dp"
      android:gravity="center"
      android:text="Bundle in Android"
      android:textAlignment="center"
      android:textAllCaps="false"
      android:textColor="#FF000000"
      android:textSize="20sp"
      android:textStyle="bold" />

   <!-- creating text view for displaying message which we passed from main activity-->
   <TextView
      android:id="@+id/idTVMessage"
      android:layout_width="match_parent"
      android:layout_height="wrap_content"
      android:layout_centerInParent="true"
      android:layout_margin="20dp"
      android:gravity="center"
      android:text="Message"
      android:textAlignment="center"
      android:textAllCaps="false"
      android:textColor="#FF000000"
      android:textSize="20sp"
      android:textStyle="bold" />
</RelativeLayout>
说明− 在上面的代码中,根元素是 Android 中的相对布局。此布局是一个视图组,用于将其中的所有元素彼此对齐。我们可以借助 id 或位置来相对对齐相对布局中的所有元素。
在此相对布局中,我们创建的第一个视图是文本视图。它用于显示一条简单的文本消息。在此文本视图窗口小部件中,我们将其宽度指定为 match_parent,以便它将占据移动设备的完整宽度,并将其高度指定为环绕内容以获取文本高度。我们为文本视图指定了 id,它是该窗口小部件的唯一标识符。我们可以使用此 id 来执行此文本视图的某些操作,例如为其覆盖新文本。然后,我们在上方参数中添加一个布局,以便借助消息文本视图 id 将此文本视图布局对齐到另一个文本视图的上方。然后,我们从各个方向为文本视图添加边距。之后,我们添加一个文本作为参数,并在其中指定要在文本视图中显示的值。指定文本后,我们指定文本对齐方式。这将使文本视图窗口小部件内的文本与窗口小部件的中心对齐。然后,我们将文本颜色指定为黑色,文本大小指定为 20sp,最后将文本样式指定为粗体。
添加文本视图后,我们将再创建一个文本视图,用于显示从 MainActivity 传递的消息。
步骤 5:使用 SecondActivity.kt
导航到 SecondActivity.kt。如果此文件不可见,请打开此文件。在左侧窗格中,导航至 app>java>您的应用包名称>SecondActivity.kt 以打开此文件。打开此文件后,将以下代码添加到其中。代码中添加了注释,以便您详细了解。
package com.example.gptapp

import android.os.Bundle
import android.widget.TextView
import androidx.appcompat.app.AppCompatActivity

class SecondActivity : AppCompatActivity() {
   lateinit var messageTV: TextView
   override fun onCreate(savedInstanceState: Bundle?) {
      super.onCreate(savedInstanceState)
      setContentView(R.layout.activity_second)
      messageTV = findViewById(R.id.idTVMessage)
      // getting the bundle from the intent
      val bundle = intent.extras
      messageTV.text = bundle!!.getString("message")

   }
}
说明- 在上面的代码中,我们首先为消息文本视图创建一个变量。现在,在 create 方法中,我们使用在 activity_second.xml 文件中指定的唯一 ID 来初始化此变量。之后,我们为 bundle 创建并初始化该变量。然后,我们从 bundle 中获取数据,并将其值设置为消息文本视图,以便在 SecondActivity 中显示从 MainActivity 传递的数据。
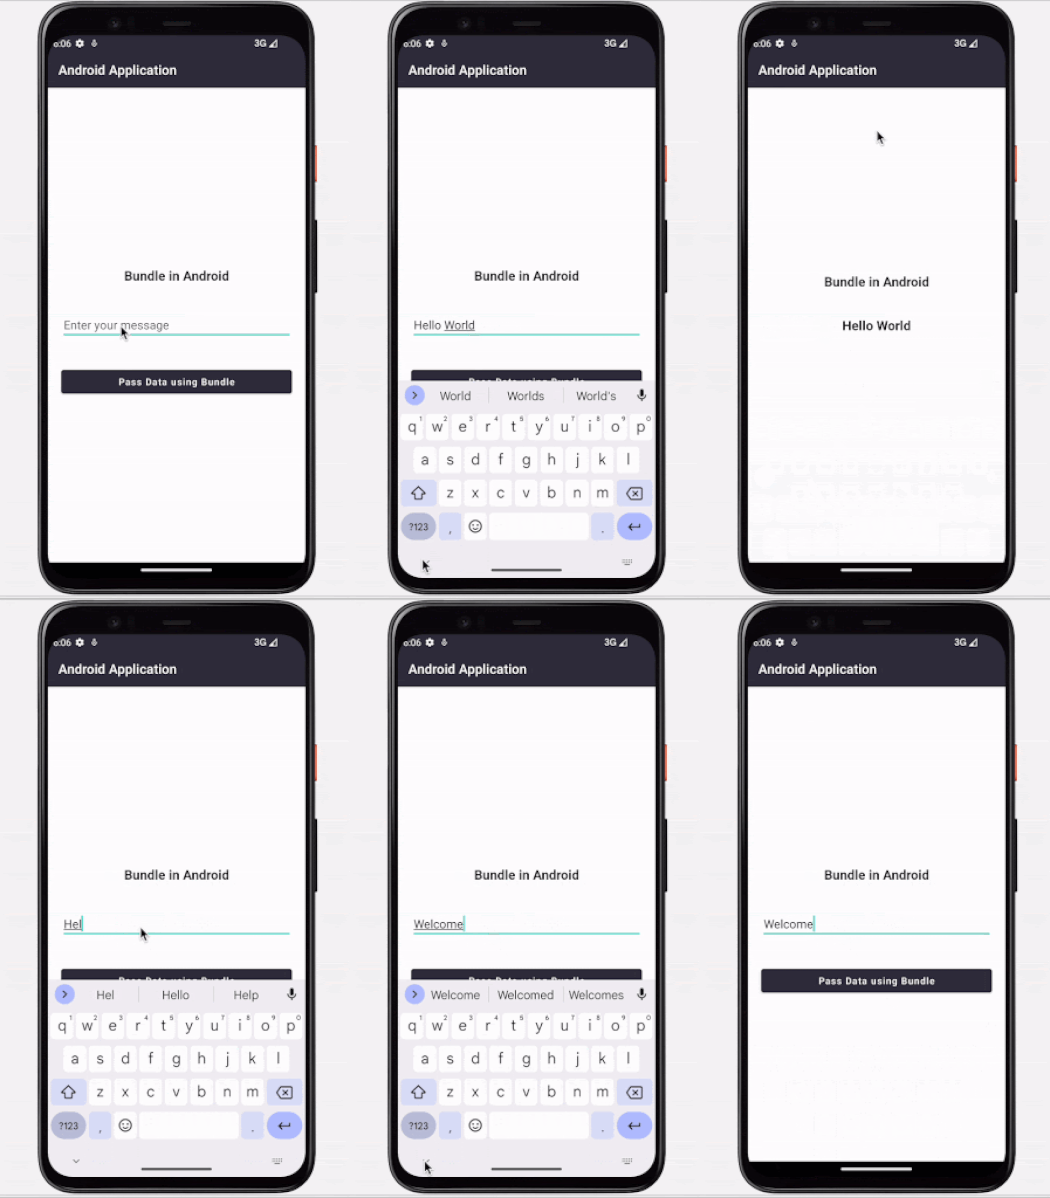
添加上述代码后,只需点击顶部栏中的绿色图标即可在移动设备上运行我们的应用程序。
注意− 确保您已连接到真实设备或模拟器。
结论
在以上教程中,我们了解了 Android 中的 bundle 是什么,以及如何在 Android 应用程序中使用它来将数据从一个 Activity 传递到另一个 Activity。

