在 iOS 中创建圆形进度条
对于 iOS 开发者来说,了解如何创建圆形进度条非常重要,几乎每个应用程序都有这个功能。
它主要用于显示下载状态、加载状态或任何其他与进度相关的信息。
对于新程序员来说,创建圆形进度条可能非常繁琐,他们可能会难以上手。
创建圆形进度条的方法有很多种。在本文中,我们将介绍一种最简单易行的创建圆形进度条的方法。
那么,让我们开始吧
步骤 1 −打开 Xcode,选择"单视图应用程序",并将其命名为"CircularProgress"。
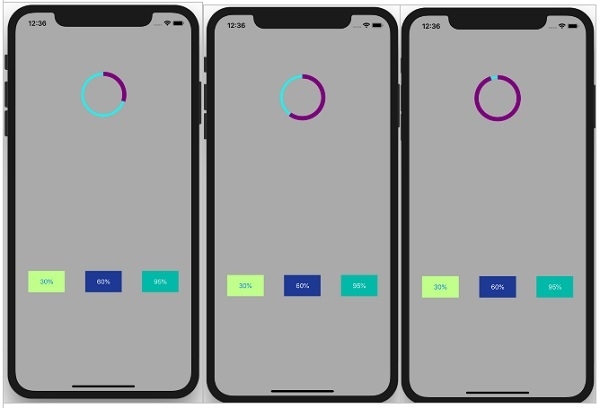
因此,我们将创建一个包含 3 个按钮(带有百分比)和一个圆形进度视图的应用程序,点击按钮时,进度视图将根据百分比进行更改。
步骤 2 − 创建新类,文件 -→ 添加新文件 -→ Cocoa Touch 类 -→ UIView 类的 CircularProgressView。
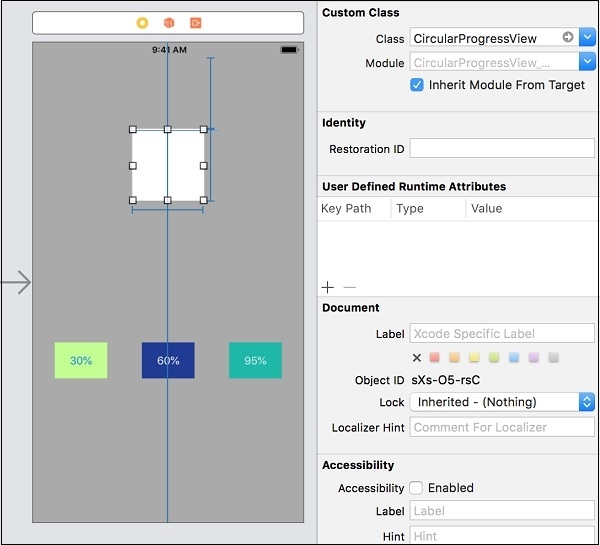
步骤 3 −创建 UI,添加 UI 视图,并添加相同的 CircularProgressView 类,如下图所示,添加三个按钮,分别命名为 30%、60% 和 95%。
在 ViewController.swift 中为所有三个按钮创建 @IBAction,并按如下所示命名
@IBAction func btn95(_ sender: Any) {
}
@IBAction func btn30(_ sender: Any) {
}
@IBAction func btn60(_ sender: Any) {
}
在 ViewController.swift 中为 UI 视图创建 @IBoutlet,并按如下所示命名
@IBOutlet weak var circularProgress: CircularProgressView!
步骤 4 − 在 CircularProgressView.swift 中,创建两个 CAShapeLayer() 类型的进度层和轨道层对象。
var progressLyr = CAShapeLayer()
var trackLyr = CAShapeLayer()
步骤 5 编写 did-set 方法,设置 progressLyr 和 trackLyr,如下所示
var progressClr = UIColor.white {
   didSet {
      progressLyr.strokeColor = progressClr.cgColor
   }
}
var trackClr = UIColor.white {
   didSet {
      trackLyr.strokeColor = trackClr.cgColor
   }
}
这里我们设置了 progressLyr 和 trackLyr 属性。
didSet 是一个属性观察器,属性观察器会观察并响应属性值的变化。每次设置属性值时都会调用属性观察器,即使新值与属性的当前值相同。
步骤 5 添加 makeCircularPath 函数并添加以下代码。
func makeCircularPath() {
   self.backgroundColor = UIColor.clear
   self.layer.cornerRadius = self.frame.size.width/2
   let circlePath = UIBezierPath(arcCenter: CGPoint(x: frame.size.width/2, y: frame.size.height/2), radius: (frame.size.width - 1.5)/2, startAngle: CGFloat(-0.5 * .pi), endAngle: CGFloat(1.5 * .pi), clockwise: true)
   trackLyr.path = circlePath.cgPath
   trackLyr.fillColor = UIColor.clear.cgColor
   trackLyr.strokeColor = trackClr.cgColor
   trackLyr.lineWidth = 5.0
   trackLyr.strokeEnd = 1.0
   layer.addSublayer(trackLyr)
   progressLyr.path = circlePath.cgPath
   progressLyr.fillColor = UIColor.clear.cgColor
   progressLyr.strokeColor = progressClr.cgColor
   progressLyr.lineWidth = 10.0
   progressLyr.strokeEnd = 0.0
   layer.addSublayer(progressLyr)
}
在此函数中,我们创建了一个圆形路径,并定义了它的参数及其行为。
步骤 6 − 添加必需的 init 函数。当我们从故事板设计 UI 时,我们应该使用必需的 init;当您以编程方式设计 UI 时,我们将使用 override init;在本例中,我们将使用 require init。
required init?(coder aDecoder: NSCoder) {
   super.init(coder: aDecoder)
    makeCircularPath()
}
步骤 7 −现在我们要为进度添加动画效果,因此创建一个新的函数 setProgressWithAnimation 并编写以下代码。
func setProgressWithAnimation(duration: TimeInterval, value: Float) {
   let animation = CABasicAnimation(keyPath: "strokeEnd")
   animation.duration = duration
   animation.fromValue = 0
   animation.toValue = value
   animation.timingFunction = CAMediaTimingFunction(name: kCAMediaTimingFunctionLinear)
   progressLyr.strokeEnd = CGFloat(value)
   progressLyr.add(animation, forKey: "animateprogress")
}
大功告成,CircularProgressView.swift 的最终代码应该如下所示
import UIKit
class CircularProgressView: UIView {
   var progressLyr = CAShapeLayer()
   var trackLyr = CAShapeLayer()
   required init?(coder aDecoder: NSCoder) {
      super.init(coder: aDecoder)
      makeCircularPath()
   }
   var progressClr = UIColor.white {
      didSet {
         progressLyr.strokeColor = progressClr.cgColor
      }
   }
   var trackClr = UIColor.white {
      didSet {
         trackLyr.strokeColor = trackClr.cgColor
      }
   }
   func makeCircularPath() {
      self.backgroundColor = UIColor.clear
      self.layer.cornerRadius = self.frame.size.width/2
      let circlePath = UIBezierPath(arcCenter: CGPoint(x: frame.size.width/2, y: frame.size.height/2), radius: (frame.size.width - 1.5)/2, startAngle: CGFloat(-0.5 * .pi), endAngle: CGFloat(1.5 * .pi), clockwise: true)
      trackLyr.path = circlePath.cgPath
      trackLyr.fillColor = UIColor.clear.cgColor
      trackLyr.strokeColor = trackClr.cgColor
      trackLyr.lineWidth = 5.0
      trackLyr.strokeEnd = 1.0
      layer.addSublayer(trackLyr)
      progressLyr.path = circlePath.cgPath
      progressLyr.fillColor = UIColor.clear.cgColor
      progressLyr.strokeColor = progressClr.cgColor
      progressLyr.lineWidth = 10.0
      progressLyr.strokeEnd = 0.0
      layer.addSublayer(progressLyr)
   }
   func setProgressWithAnimation(duration: TimeInterval, value: Float) {
      let animation = CABasicAnimation(keyPath: "strokeEnd")
      animation.duration = duration
      animation.fromValue = 0
      animation.toValue = value
      animation.timingFunction = CAMediaTimingFunction(name: kCAMediaTimingFunctionLinear)
      progressLyr.strokeEnd = CGFloat(value)
      progressLyr.add(animation, forKey: "animateprogress")
   }
}
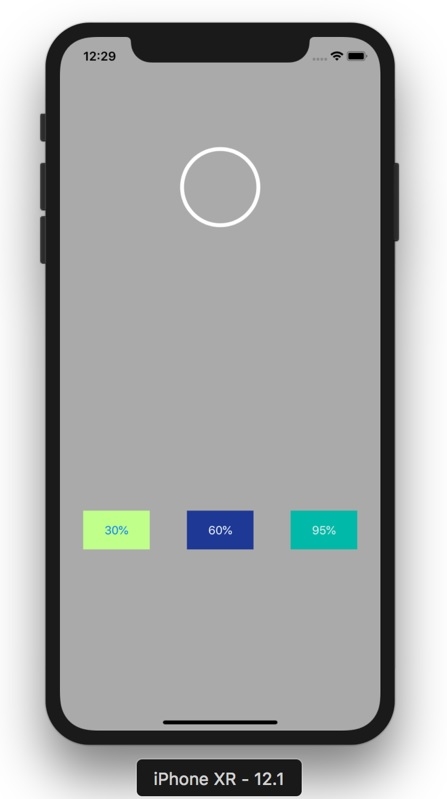
步骤 8 − 运行上述代码,检查一切是否正常。您应该看到如下所示的 UI,但由于我们尚未在 ViewController.swift 中添加任何代码,因此 UI 无法正常运行。
步骤 9 − 让我们在 ViewController.swift 中添加一些代码。
在 viewDidLoad() 中写入以下代码,这将指定进度条的颜色。
circularProgress.trackClr = UIColor.cyan
circularProgress.progressClr = UIColor.purple
Add below lines in your button functionality, with duration of 95%, 30% and 60%
@IBAction func btn95(_ sender: Any) {
   circularProgress.setProgressWithAnimation(duration: 1.0, value: 0.95)
}
@IBAction func btn30(_ sender: Any) {
   circularProgress.setProgressWithAnimation(duration: 1.0, value: 0.30)
}
@IBAction func btn60(_ sender: Any) {
   circularProgress.setProgressWithAnimation(duration: 1.0, value: 0.60)

}
最后你的 ViewController.swift 应该有以下代码
import UIKit
class ViewController: UIViewController {
   @IBOutlet weak var circularProgress: CircularProgressView!
   override func viewDidLoad() {
      super.viewDidLoad()
      circularProgress.trackClr = UIColor.cyan
      circularProgress.progressClr = UIColor.purple
   }
   @IBAction func btn95(_ sender: Any) {
      circularProgress.setProgressWithAnimation(duration: 1.0, value: 0.95)
   }
   @IBAction func btn30(_ sender: Any) {
      circularProgress.setProgressWithAnimation(duration: 1.0, value: 0.30)
   }
   @IBAction func btn60(_ sender: Any) {
      circularProgress.setProgressWithAnimation(duration: 1.0, value: 0.60)
   }
}
在按钮函数中,我们调用 setProgressWithAnimation 函数,并传入值和持续时间。
好了,大功告成!运行应用,点击 30%、60% 或 95%。你会看到视图动画效果。