
如何在 Android 中创建 DigitalSpeedDashboard?
androidmobile developmentapps/applications
本示例演示了如何在 Android 中创建 DigitalSpeedDashboard。
步骤 1 − 在 Android Studio 中创建一个新项目,前往"文件"->"新建项目",并填写所有必需信息以创建新项目。
步骤 2 − 打开 build.gradle 并添加库依赖项,如下所示 –
apply plugin: 'com.android.application'
android {
   compileSdkVersion 28
   defaultConfig {
      applicationId "com.example.andy.myapplication"
      minSdkVersion 19
      targetSdkVersion 28
      versionCode 1
      versionName "1.0"
      testInstrumentationRunner "android.support.test.runner.AndroidJUnitRunner"
   }
   configurations {
      cleanedAnnotations
      compile.exclude group: 'org.jetbrains' , module:'annotations'
   }
   buildTypes {
      release {
         minifyEnabled false
         proguardFiles getDefaultProguardFile('proguard-android.txt'), 'proguard-rules.pro'
      }
   }
}
dependencies {
   implementation fileTree(dir: 'libs', include: ['*.jar'])
   implementation 'com.android.support:appcompat-v7:28.0.0'
   implementation 'com.github.ngallazzi:DigitalSpeedDashboard:master-SNAPSHOT'
   implementation 'com.android.support.constraint:constraint-layout:1.1.3'
   testImplementation 'junit:junit:4.12'
   androidTestImplementation 'com.android.support.test:runner:1.0.2'
   androidTestImplementation 'com.android.support.test.espresso:espresso-core:3.0.2'
   implementation 'org.jetbrains:annotations-java5:15.0'
}
现在打开 build.gradle(application) 并添加以下行-
// 顶级构建文件,您可以在其中添加所有子项目/模块通用的配置选项。
buildscript {
   repositories {
      google()
      jcenter()
   }
   dependencies {
      classpath 'com.android.tools.build:gradle:3.2.1'
      //注意:不要将您的应用程序依赖项放在这里;它们属于
      // 在各个模块的 build.gradle 文件中
   }
}
allprojects {
   repositories {
      google()
      jcenter()
      maven { url 'https://jitpack.io' }
   }
}
task clean(type: Delete) {
   delete rootProject.buildDir
}
步骤 3 − 将以下代码添加到 res/layout/activity_main.xml。
<?xml version = "1.0" encoding = "utf-8"?>
<LinearLayout xmlns:android = "http://schemas.android.com/apk/res/android"
   xmlns:app = "http://schemas.android.com/apk/res-auto"
   xmlns:tools = "http://schemas.android.com/tools"
   android:layout_width = "match_parent"
   android:layout_height = "match_parent"
   android:orientation = "vertical"
   tools:context = ".MainActivity">
   <com.ngallazzi.speedandrpmdashboard.DigitalSpeedDashboard
      android:id = "@+id/srDashboard"
      android:layout_width = "350dp"
      android:layout_height = "350dp"
      app:idleColor = "#35ABABAB"
      android:background = "#000000"
      app:speedColor = "#FFFFFF"/>
   <TextView
      android:id = "@+id/text"
      android:layout_width = "wrap_content"
      android:layout_height = "wrap_content"
      android:text = "Start Dashboard"
      android:textSize = "25sp" />
</LinearLayout>
在上面的代码中,我们引入了文本视图和 digitalSpeedDashboard。当用户点击文本视图时,它将启动 digitalSpeedDashboard。
步骤 4 − 将以下代码添加到 src/MainActivity.java
package com.example.andy.myapplication;
import android.os.Bundle;
import android.support.v7.app.AppCompatActivity;
import android.view.View;
import android.widget.TextView;
import com.ngallazzi.speedandrpmdashboard.DigitalSpeedDashboard;
public class MainActivity extends AppCompatActivity {
   TextView text;
   int speed;
   boolean time;
   DigitalSpeedDashboard digitalSpeedDashboard;
   @Override
   protected void onCreate(Bundle savedInstanceState) {
      super.onCreate(savedInstanceState);
      setContentView(R.layout.activity_main);
      text = findViewById(R.id.text);
      digitalSpeedDashboard = findViewById(R.id.srDashboard);
      digitalSpeedDashboard.setMaxSpeed(200);
      text.setOnClickListener(new View.OnClickListener() {
         @Override
         public void onClick(View v) {
            new Thread(new Runnable() {
               @Override
               public void run() {
                  time = true;
                  while (time) {
                     speed++;
                     digitalSpeedDashboard.setSpeed(speed);
                     try {
                        Thread.sleep(10);
                     } catch (InterruptedException e) {
                        e.printStackTrace();
                     }
                     if (speed == 200) {
                        time = false;
                        speed = 0;
                     }
                  }
               }
            }).start();
         }
      });
   }
}
让我们尝试运行您的应用程序。假设您已将实际的 Android 移动设备连接到电脑。要从 Android Studio 运行该应用程序,请打开项目的某个活动文件,然后点击工具栏上的"运行"图标  。选择您的移动设备作为选项,然后勾选将显示默认屏幕的移动设备 –
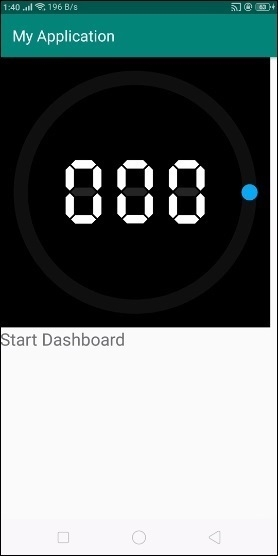
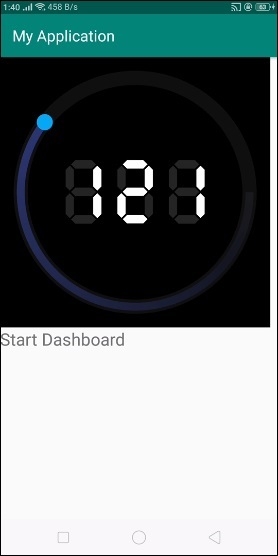
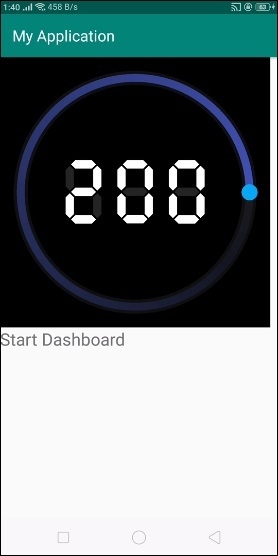
以上屏幕是初始屏幕,当用户点击文本视图时,它将启动数字仪表板,最终达到 200 后停止数字仪表板,如下所示 -
点击此处下载项目代码

