
如何在 Android 中启用蓝牙?
androidmobile developmentapps/applications
在开始示例之前,我们应该了解 Android 中的服务是什么。服务会在后台运行,无需与 UI 交互,即使在 Activity 销毁后也能正常工作。
此示例演示了如何检查 Android 服务是否正在运行。
步骤 1 − 在 Android Studio 中创建一个新项目,转到"文件"->"新建项目",并填写所有必需的信息以创建新项目。
步骤 2 − 将以下代码添加到 res/layout/activity_main.xml。
<?xml version = "1.0" encoding = "utf-8"?>
<android.support.constraint.ConstraintLayout xmlns:android = "http://schemas.android.com/apk/res/android"
   xmlns:app = "http://schemas.android.com/apk/res-auto"
   xmlns:tools = "http://schemas.android.com/tools"
   android:layout_width = "match_parent"
   android:layout_height = "match_parent"
   tools:context = ".MainActivity">
   <TextView
      android:id = "@+id/text"
      android:layout_width = "wrap_content"
      android:layout_height = "wrap_content"
      android:text = "Start Service"
      android:textSize = "25sp"
      app:layout_constraintBottom_toBottomOf = "parent"
      app:layout_constraintLeft_toLeftOf = "parent"
      app:layout_constraintRight_toRightOf = "parent"
      app:layout_constraintTop_toTopOf = "parent" />
</android.support.constraint.ConstraintLayout>
在上面的代码中,我们采用了文本视图,当用户点击文本视图时,它将启动服务和停止服务。
步骤 3 − 将以下代码添加到 src/MainActivity.java
package com.example.andy.myapplication;
import android.app.ActivityManager;
import android.content.Context;
import android.content.Intent;
import android.support.v7.app.AppCompatActivity;
import android.os.Bundle;
import android.util.Log;
import android.view.View;
import android.widget.TextView;
public class MainActivity extends AppCompatActivity {
   @Override
   protected void onCreate(Bundle savedInstanceState) {
      super.onCreate(savedInstanceState);
      setContentView(R.layout.activity_main);
      final TextView text = findViewById(R.id.text);
      text.setOnClickListener(new View.OnClickListener() {
         @Override
         public void onClick(View v) {
            if (isMyServiceRunning(service.class)) {
               text.setText("Stoped");
               stopService(new Intent(MainActivity.this, service.class));
            } else {
               text.setText("Started");
               startService(new Intent(MainActivity.this, service.class));
            }
         }
      });
   }
   private boolean isMyServiceRunning(Class<?> serviceClass) {
      ActivityManager manager = (ActivityManager) getSystemService(Context.ACTIVITY_SERVICE);
      for (ActivityManager.RunningServiceInfo service : manager.getRunningServices(Integer.MAX_VALUE)) {
         if (serviceClass.getName().equals(service.service.getClassName())) {
            return true;
         }
      }
      return false;
   }
}
上述代码用于启动和停止服务。我们使用了 Intent 并传递了上下文和服务类。现在在包文件夹中创建一个服务类 service.class,并添加以下代码:–
package com.example.andy.myapplication;
import android.app.Service;
import android.content.Intent;
import android.os.IBinder;
import android.widget.Toast;
public class service extends Service {
   @Override
   public IBinder onBind(Intent intent) {
      return null;
   }
   @Override
   public int onStartCommand(Intent intent, int flags, int startId) {
      Toast.makeText(this, "Service started by user.", Toast.LENGTH_LONG).show();
      return START_STICKY;
   }
   @Override
   public void onDestroy() {
      super.onDestroy();
      Toast.makeText(this, "Service destroyed by user.", Toast.LENGTH_LONG).show();
   }
}
要确定服务是否正常工作,请使用以下代码-
ActivityManager manager = (ActivityManager) getSystemService(Context.ACTIVITY_SERVICE);
for (ActivityManager.RunningServiceInfo service : manager.getRunningServices(Integer.MAX_VALUE)) {
   if (serviceClass.getName().equals(service.service.getClassName())) {
      return true;
   }
}
return false;
要调用上述方法,请使用以下代码-
isMyServiceRunning(service.class)
步骤 4 − 将以下代码添加到 manifest.xml
<?xml version = "1.0" encoding = "utf-8"?>
<manifest xmlns:android = "http://schemas.android.com/apk/res/android"
   package = "com.example.andy.myapplication">
   <application
      android:allowBackup = "true"
      android:icon = "@mipmap/ic_launcher"
      android:label = "@string/app_name"
      android:roundIcon = "@mipmap/ic_launcher_round"
      android:supportsRtl = "true"
      android:theme = "@style/AppTheme">
      <activity android:name = ".MainActivity">
         <intent-filter>
            <action android:name = "android.intent.action.MAIN" />
            <category android:name = "android.intent.category.LAUNCHER" />
         </intent-filter>
      </activity>
      <service android:name = ".service"/>
   </application>
</manifest>
让我们尝试运行您的应用程序。假设您已将实际的 Android 移动设备连接到电脑。要从 Android Studio 运行该应用程序,请打开项目的某个活动文件,然后点击工具栏上的"运行"图标  。选择您的移动设备作为选项,然后勾选将显示默认屏幕的移动设备 –
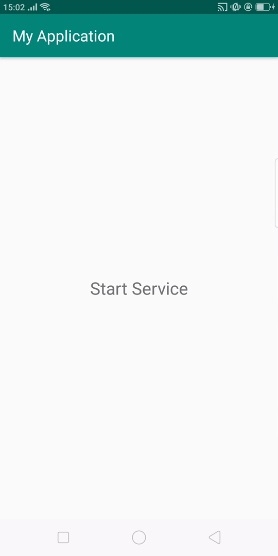
以上结果为初始屏幕,点击"文本"视图,将启动如下所示的服务 –
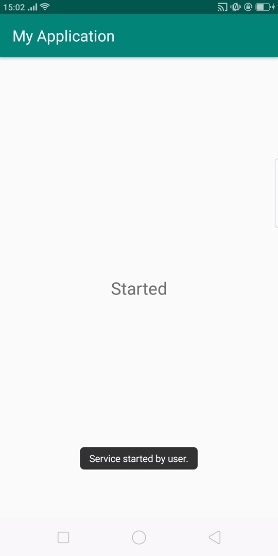
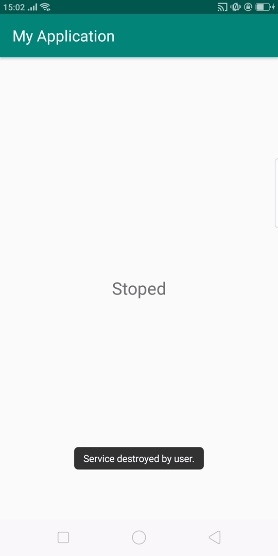
在上面的结果中,服务已启动。现在点击文本视图,它将停止服务,如下所示 -
点击此处下载项目代码

