
如何举例说明 Android 共享偏好设置?
androidmobile developmentapps/applications
使用共享偏好设置,我们可以将值存储或检索为键值对。共享偏好设置中有五种不同的方法,如下所示 −
Edit() − 用于编辑共享偏好设置值
commit() − 用于将共享偏好设置值提交到 xml 文件中
apply() − 用于将编辑器中的更改提交回共享偏好设置。
remove(String key) − 用于从共享偏好设置中删除键和值。
Put() −它将把键和值放入共享首选项 xml 中。
共享首选项的示例语法如下 −
final SharedPreferences sharedPreferences = getSharedPreferences("USER",MODE_PRIVATE);
在上述语法中,我们创建了一个共享首选项文件 USER.xml,它是私有模式,意味着其他应用程序无法访问此共享首选项。
以下示例演示了如何在 Android 中使用共享首选项。
步骤 1 − 在 Android Studio 中创建一个新项目,转到"文件"->"新建项目",并填写所有必需的详细信息以创建新项目。
步骤 2 − 将以下代码添加到 res/layout/activity_main.xml。
<?xml version = "1.0" encoding = "utf-8"?>
<android.support.constraint.ConstraintLayout
   xmlns:android = "http://schemas.android.com/apk/res/android"
   xmlns:app = "http://schemas.android.com/apk/res-auto"
   xmlns:tools = "http://schemas.android.com/tools"
   android:layout_width = "match_parent"
   android:layout_height = "match_parent"
   android:orientation = "vertical"
   tools:context = ".MainActivity"
   tools:layout_editor_absoluteY = "81dp">
   <EditText android:id = "@+id/name"
      android:layout_width = "match_parent"
      android:layout_height = "60dp"
      android:layout_marginTop = "8dp"
      android:autofillHints = ""
      android:hint = "NAME" app:layout_constraintTop_toTopOf = "parent"
      tools:layout_editor_absoluteX = "0dp" />
   <EditText android:id = "@+id/address" android:layout_width = "match_parent"
      android:layout_height = "wrap_content"
      android:layout_marginTop = "84dp"
      android:hint = "Phone Number"
      android:importantForAutofill = "no"
      android:inputType = ""
      app:layout_constraintTop_toTopOf = "@+id/name"
      tools:layout_editor_absoluteX = "16dp"
      tools:targetApi = "o" />
   <Button
      android:id = "@+id/button"
      android:layout_width = "108dp"
      android:layout_height = "wrap_content"
      android:layout_marginStart = "8dp"
      android:layout_marginLeft = "8dp"
      android:layout_marginTop = "120dp"
      android:layout_marginEnd = "8dp"
      android:layout_marginRight = "8dp"
      android:gravity = "center_horizontal"
      android:text = "Save"
      app:layout_constraintEnd_toEndOf = "parent"
      app:layout_constraintHorizontal_bias = "0.503"
      app:layout_constraintStart_toStartOf = "parent"
      app:layout_constraintTop_toTopOf = "@+id/address" />
   <Button
      android:id = "@+id/read"
      android:layout_width = "wrap_content"
      android:layout_height = "wrap_content"
      android:layout_marginStart = "8dp"
      android:layout_marginLeft = "8dp"
      android:layout_marginTop = "88dp"
      android:layout_marginEnd = "8dp"
      android:layout_marginRight = "8dp"
      android:gravity = "center_horizontal"
      android:text = "read"
      app:layout_constraintEnd_toEndOf = "parent"
      app:layout_constraintStart_toStartOf = "parent"
      app:layout_constraintTop_toBottomOf = "@+id/button" />
   <TextView
      android:id = "@+id/result"
      android:layout_width = "wrap_content"
      android:layout_height = "0dp"
      android:layout_marginStart = "8dp"
      android:layout_marginLeft = "8dp"
      android:layout_marginTop = "184dp"
      android:layout_marginEnd = "8dp"
      android:layout_marginRight = "8dp"
      android:text = "result"
      app:layout_constraintEnd_toEndOf = "parent"
      app:layout_constraintStart_toStartOf = "parent"
      app:layout_constraintTop_toBottomOf = "@+id/button" />
</android.support.constraint.ConstraintLayout>
上面的 xml 文件包含两个编辑文本,分别用于姓名和地址。当用户点击"保存"按钮时,它会将值存储在共享首选项中;当用户点击"读取"按钮时,它会从共享首选项中读取值。
步骤 3 − 将以下代码添加到 src/MainActivity.java
package com.example.andy.myapplication;
import android.content.SharedPreferences;
import android.support.v7.app.AppCompatActivity;
import android.os.Bundle;
import android.view.View;
import android.widget.Button;
import android.widget.EditText;
import android.widget.TextView;
import android.widget.Toast;
public class MainActivity extends AppCompatActivity {
   @Override
   protected void onCreate(Bundle savedInstanceState) {
      super.onCreate(savedInstanceState);
      setContentView(R.layout.activity_main);
      final SharedPreferences sharedPreferences = getSharedPreferences("USER",MODE_PRIVATE);
      final EditText name = findViewById(R.id.name);
      final EditText address = findViewById(R.id.address);
      final TextView result = findViewById(R.id.result);
      Button save = findViewById(R.id.button);
      Button read = findViewById(R.id.read);
      read.setOnClickListener(new View.OnClickListener() {
         @Override
         public void onClick(View v) {
            result.setText("Name is "+sharedPreferences.getString("Name","No name")+" Address "+ sharedPreferences.getString("Address","No Address"));
        }
      });
      save.setOnClickListener(new View.OnClickListener() {
         @Override
         public void onClick(View v) {
            if(name.getText().toString().isEmpty() && address.getText().toString().isEmpty()) {
               Toast.makeText(MainActivity.this,"Plz Enter all the data",Toast.LENGTH_LONG).show();
            } else {
               String nameData = name.getText().toString().trim();
               String addressData = address.getText().toString().trim();
               SharedPreferences.Editor editor = sharedPreferences.edit();
               editor.putString("Name",nameData);
               editor.putString("Address",addressData);
               editor.commit();
            }
         }
      });
   }
}
步骤 4 无需更改 manifest.xml 让我们尝试运行您的应用程序。假设您已将实际的 Android 移动设备连接到电脑。要从 Android Studio 运行该应用程序,请打开项目的某个活动文件,然后点击工具栏上的"运行"图标  。选择您的移动设备作为选项,然后检查您的移动设备,它将显示您的默认屏幕 −
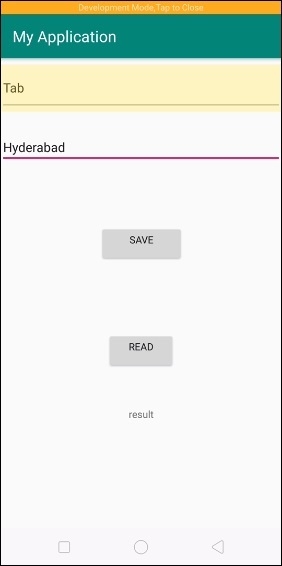
在上面的例子中,我们添加了姓名和地址,然后点击了"保存"按钮。
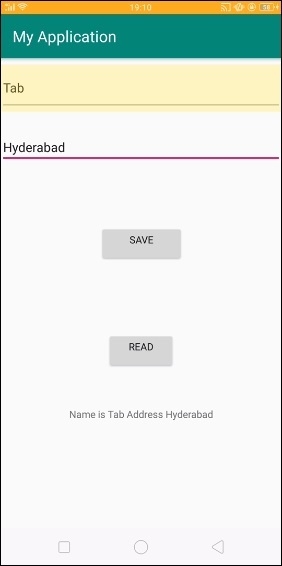
在上面的例子中,我们点击了"阅读"按钮。它会将文本附加到文本视图

