
如何集成 Android Snackbar?
Snackbar 类似于 Android 中的 Toast,但它会与操作进行交互。它会在屏幕底部显示消息,不会与其他视图发生任何交互,并在超时后自动关闭。
本示例演示如何集成 Android Snackbar。
步骤 1 - 在 Android Studio 中创建一个新项目,依次点击"文件">"新建项目",并填写所有必需信息以创建一个新项目。
步骤 2 - 打开 build.gradle 文件并添加设计支持库依赖项。
apply plugin: 'com.android.application'
android {
   compileSdkVersion 28
   defaultConfig {
      applicationId "com.example.andy.myapplication"
      minSdkVersion 19
      targetSdkVersion 28
      versionCode 1
      versionName "1.0"
      testInstrumentationRunner "android.support.test.runner.AndroidJUnitRunner"
   }
   buildTypes {
      release {
         minifyEnabled false
         proguardFiles getDefaultProguardFile('proguard-android.txt'), 'proguard-rules.pro'
      }
   }
}
dependencies {
   implementation fileTree(dir: 'libs', include: ['*.jar'])
   implementation 'com.android.support:appcompat-v7:28.0.0'
   implementation 'com.android.support:design:28.0.0'
   implementation 'com.android.support.constraint:constraint-layout:1.1.3'
   testImplementation 'junit:junit:4.12'
   androidTestImplementation 'com.android.support.test:runner:1.0.2'
   androidTestImplementation 'com.android.support.test.espresso:espresso-core:3.0.2'
}
步骤 3 − 将以下代码添加到 res/layout/activity_main.xml。
<?xml version="1.0" encoding="utf-8"?>
<android.support.design.widget.CoordinatorLayout xmlns:android="http://schemas.android.com/apk/res/android"
   android:layout_width="match_parent"
   android:id="@+id/layout"
   android:layout_height="match_parent">
   <Button
      android:id="@+id/button"
      android:layout_width="wrap_content"
      android:layout_height="wrap_content"
      android:layout_centerHorizontal="true"
      android:text="Click here" />
</android.support.design.widget.CoordinatorLayout>
在上面的代码中,我们声明了布局 ID,因为 Snackbar 需要父视图。当用户点击按钮时,它会在底部打开 Snackbar。
步骤 4 − 将以下代码添加到 src/MainActivity.java
import android.annotation.TargetApi;
import android.content.Intent;
import android.graphics.Color;
import android.net.Uri;
import android.os.Build;
import android.os.Bundle;
import android.support.design.widget.CoordinatorLayout;
import android.support.design.widget.Snackbar;
import android.support.v7.app.AppCompatActivity;
import android.view.View;
import android.widget.Button;
import android.widget.TextView;
public class MainActivity extends AppCompatActivity {
   CoordinatorLayout coordinatorLayout;
   @TargetApi(Build.VERSION_CODES.O)
   @Override
   protected void onCreate(Bundle savedInstanceState) {
      super.onCreate(savedInstanceState);
      setContentView(R.layout.activity_main);
      coordinatorLayout=findViewById(R.id.layout);
      Button button=findViewById(R.id.button);
      button.setOnClickListener(new View.OnClickListener() {
         @Override
         public void onClick(View v) {
            Snackbar snackbar = Snackbar
            .make(coordinatorLayout, "Welcome to tutorialspoint.com", Snackbar.LENGTH_LONG)
            .setAction("Click", new View.OnClickListener() {
               @Override
               public void onClick(View view) {
                  String url = "http://www.tutorialspoint.com";
                  Intent i = new Intent(Intent.ACTION_VIEW);
                  i.setData(Uri.parse(url));
                  startActivity(i);
               }
            });
            // 更改消息文本颜色
            snackbar.setActionTextColor(Color.RED);
            // 更改操作按钮文本颜色
            View sbView = snackbar.getView();
            TextView textView = (TextView) sbView.findViewById(
            android.support.design.R.id.snackbar_text);
            textView.setTextColor(Color.YELLOW);
            snackbar.show();
         }
      });
   }
}
如上所示,当用户点击按钮时,将显示如下所示的提示栏 -
Snackbar snackbar = Snackbar
.make(coordinatorLayout, "Welcome to tutorialspoint.com", Snackbar.LENGTH_LONG)
.setAction("Click", new View.OnClickListener() {
   @Override
   public void onClick(View view) {
      String url = "http://www.tutorialspoint.com";
      Intent i = new Intent(Intent.ACTION_VIEW);
      i.setData(Uri.parse(url));
      startActivity(i);
   }
});
// 更改消息文本颜色
snackbar.setActionTextColor(Color.RED);
// 更改操作按钮文本颜色
View sbView = snackbar.getView();
TextView textView = (TextView) sbView.findViewById(android.support.design.R.id.snackbar_text);
textView.setTextColor(Color.YELLOW);
snackbar.show();
在上面的代码中,我们声明了一个提示框,其消息为"欢迎访问 tutorialspoint.com",并添加了一个"点击"按钮。当用户点击该按钮时,它将在默认浏览器中打开 tutorialspoint 网站。
步骤 5 - 将以下代码添加到 manifest.xml 文件中。
<?xml version="1.0" encoding="utf-8"?>
<manifest xmlns:android="http://schemas.android.com/apk/res/android"
   package="com.example.andy.myapplication">
   <uses-permission android:name="android.permission.INTERNET" />
   <application
      android:allowBackup="true"
      android:icon="@mipmap/ic_launcher"
      android:label="@string/app_name"
      android:roundIcon="@mipmap/ic_launcher_round"
      android:supportsRtl="true"
      android:theme="@style/AppTheme">
    <activity android:name=".MainActivity">
      <intent-filter>
          <action android:name="android.intent.action.MAIN" />
          <category android:name="android.intent.category.LAUNCHER" />
      </intent-filter>
    </activity>
   </application>
</manifest>
在上面的代码中,我们声明了显示网站的互联网权限。
让我们尝试运行您的应用程序。我假设您已将 Android 移动设备连接到计算机。要从 Android Studio 运行应用程序,请打开项目中的一个 Activity 文件,然后单击工具栏中的"运行"图标。选择您的移动设备作为选项,然后选中您的移动设备,它将显示您的默认屏幕。 −
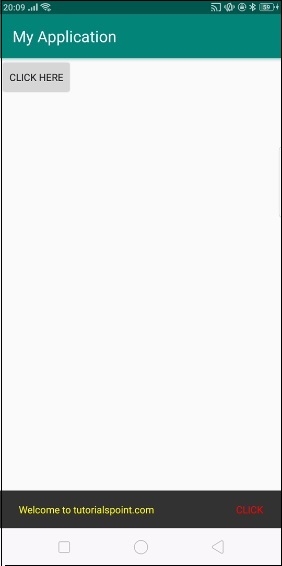
点击按钮后,会显示一个带有"点击"按钮的提示信息栏,如上图所示。
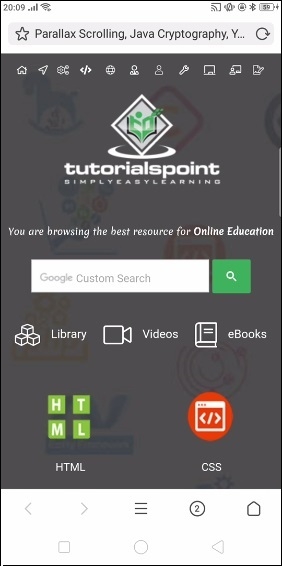
点击"点击"按钮后,将打开默认浏览器并访问 tutorialspoint.com 网站。

