
如何在 Android 中通过 Intent 启动 Google 地图路线规划?
简介
在 Android 应用中,特定商店或地点的地址通常会以图标的形式显示。点击该 Google 地图图标后,应用会将用户重定向到 Google 地图应用,从而显示从用户当前位置到商店位置的路线。本文将介绍如何在 Android 中通过 Intent 启动 Google 地图路线规划。
实现
我们将创建一个简单的应用,其中包含一个用于显示应用标题的文本视图。之后,我们将创建两个文本输入框,用于获取用户的出发地和目的地。然后,我们将显示一个按钮,点击该按钮将启动 Google 地图 Intent 并绘制从出发地到目的地的路线。现在让我们打开 Android Studio 创建一个新项目。
步骤 1:在 Android Studio 中创建新项目
按照下图所示打开 Android Studio。在下图所示的界面中,点击"新建项目"创建一个新的 Android Studio 项目。
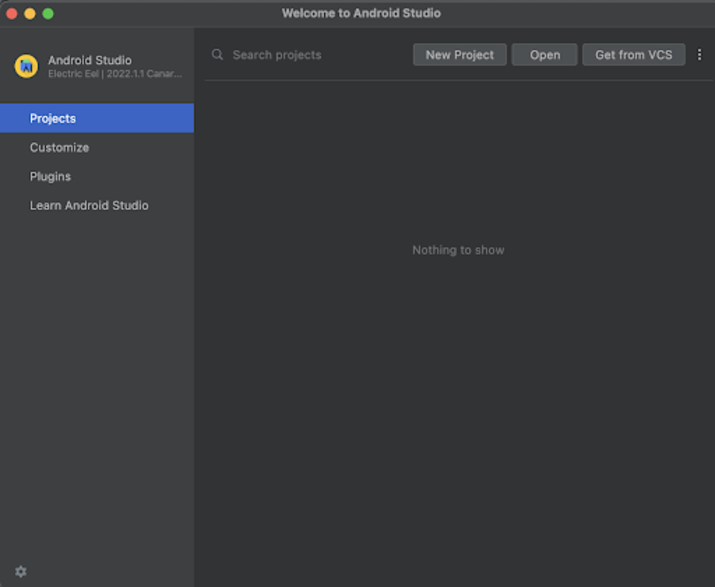
点击"新建项目"后,您将看到下图所示的界面。
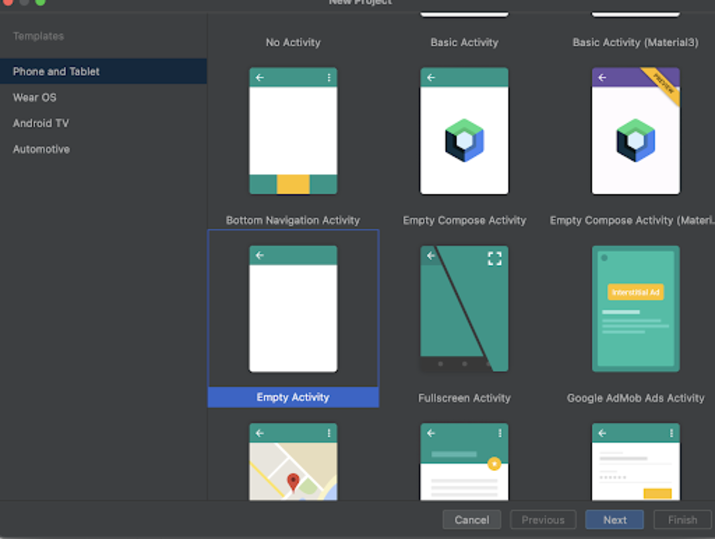
在此界面中,我们只需选择"空 Activity",然后点击"下一步"。点击"下一步"后,您将看到下图所示的界面。
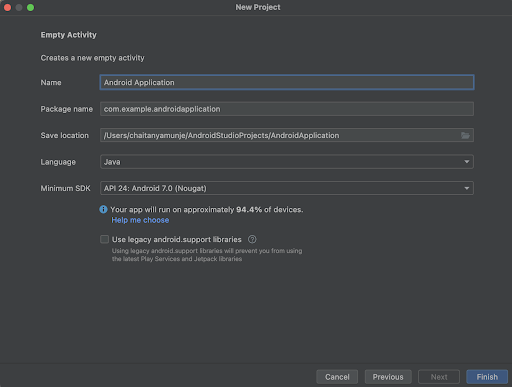
在此屏幕中,我们只需指定项目名称。然后,包名将自动生成。
注意 - 请确保选择 Java 作为语言。
指定所有详细信息后,单击"完成"以创建一个新的 Android Studio 项目。
项目创建完成后,我们将看到两个已打开的文件,即 activity_main.xml 和 MainActivity.java 文件。
步骤 2:使用 activity_main.xml
导航到 activity_main.xml。如果此文件不可见,请在左侧窗格中导航到 app>res>layout>activity_main.xml 以打开此文件。打开此文件后,请将以下代码添加到其中。代码中添加了注释,以便您了解详细信息。
<?xml version="1.0" encoding="utf-8"?>
<RelativeLayout xmlns:android="http://schemas.android.com/apk/res/android"
   xmlns:tools="http://schemas.android.com/tools"
   android:layout_width="match_parent"
   android:layout_height="match_parent"
   android:orientation="vertical"
   tools:context=".MainActivity">
   <!-- on below line creating a text view for displaying the heading of our application -->
   <TextView
       android:id="@+id/idTVHeading"
       android:layout_width="match_parent"
       android:layout_height="wrap_content"
       android:layout_marginStart="10dp"
       android:layout_marginTop="100dp"
       android:layout_marginEnd="10dp"
       android:gravity="center"
       android:padding="4dp"
       android:text="Google Maps Direction Intent in Android"
       android:textAlignment="center"
       android:textColor="@color/black"
       android:textSize="20sp"
       android:textStyle="bold" />
   <!-- on below line creating edit text for source location -->
   <EditText
       android:id="@+id/idEdtSourceLocation"
       android:layout_width="match_parent"
       android:layout_height="wrap_content"
       android:layout_below="@id/idTVHeading"
       android:layout_margin="10dp"
       android:hint="Enter Source Location" />
   <!-- on below line creating edit text for destination location -->
   <EditText
       android:id="@+id/idEdtDestinationLocation"
       android:layout_width="match_parent"
       android:layout_height="wrap_content"
       android:layout_below="@id/idEdtSourceLocation"
       android:layout_margin="10dp"
       android:hint="Enter Destination Location" />
   <!-- on below line creating a button to show direction on maps-->
   <Button
       android:id="@+id/idBtnShowDirection"
       android:layout_width="match_parent"
       android:layout_height="wrap_content"
       android:layout_below="@id/idEdtDestinationLocation"
       android:layout_margin="10dp"
       android:padding="4dp"
       android:text="Show Direction on Maps"
       android:textAllCaps="false" />
</RelativeLayout>
说明 - 在上面的代码中,我们创建了一个根布局,它使用相对布局 (Relative Layout)。在这个布局中,我们创建了一个文本视图 (TextView),用于显示应用程序的标题。之后,我们创建了两个文本编辑框 (Edit Text Fields),用于获取用户的出发地和目的地。然后,我们创建了一个按钮,用于打开 Google 地图 Intent 并在 Google 地图应用程序上绘制路线。
步骤 3:使用 MainActivity.java 文件
导航到 MainActivity.java 文件。如果该文件不可见,请在左侧面板中导航到 app>res>layout>MainActivity.java 以打开该文件。打开该文件后,将以下代码添加到其中。代码中添加了注释,以便您详细了解其含义。
package com.example.java_test_application;
import android.app.Activity;
import android.content.ActivityNotFoundException;
import android.content.Intent;
import android.net.Uri;
import android.os.Bundle;
import android.util.Log;
import android.view.View;
import android.widget.Button;
import android.widget.EditText;
import android.widget.Toast;
import androidx.appcompat.app.AppCompatActivity;
public class MainActivity extends AppCompatActivity {
   // 创建变量,用于编辑下面一行的文本。
   private EditText sourceEdt, destinationEdt;
   // 为下面这行中的按钮创建变量。
   private Button directionBtn;
   @Override
   protected void onCreate(Bundle savedInstanceState) {
        super.onCreate(savedInstanceState);

        setContentView(R.layout.activity_main);

        // 初始化以下编辑框的变量。

        sourceEdt = findViewById(R.id.idEdtSourceLocation);

        destinationEdt = findViewById(R.id.idEdtDestinationLocation);

        // 初始化以下按钮的变量。

        directionBtn = findViewById(R.id.idBtnShowDirection);

        // 为以下按钮添加点击监听器。

        directionBtn.setOnClickListener(new View.OnClickListener() {
           @Override
           public void onClick(View v) {
               if (sourceEdt.getText().toString().isEmpty() && destinationEdt.getText().toString().isEmpty()) {
                   // 显示提示信息,要求输入出发地和目的地。
                   Toast.makeText(MainActivity.this, "Please enter source and destination location..", Toast.LENGTH_SHORT).show();
               } else {
                   // 下面这行调用 open maps intent 方法来打开 maps intent,并将源位置和目标位置传递给它。
                   openMapsIntent(sourceEdt.getText().toString(), destinationEdt.getText().toString());
               }
           }
       });
   }
   // 下面这行创建了一个打开地图意图的方法。
   private void openMapsIntent(String source, String destination) {
       try {
            // 在以下代码行创建一个 URI,并传入要打开的 Google 地图 URL,以及源位置和目标位置。

            Uri uri = Uri.parse("https://www.google.co.in/maps/dir/" + source + "/" + destination);

            // 在以下代码行初始化一个包含操作视图和 URI 的 Intent。

            Intent i = new Intent(Intent.ACTION_VIEW, uri);

            // 在以下代码行设置 Google 地图的包名。

            i.setPackage("com.google.android.apps.maps");

            // 在以下代码行设置标志以创建一个新的 Google 地图任务。

            i.setFlags(Intent.FLAG_ACTIVITY_NEW_TASK);

            // 在以下代码行启动 Activity。

            startActivity(i);
       } catch (ActivityNotFoundException e) {
            // 当用户设备上未安装 Google 地图时

            // 我们将重定向用户到 Google Play 下载 Google 地图。

            Uri uri = Uri.parse("https://play.google.com/store/apps/details?id=com.google.android.apps.maps");

            // 使用操作视图初始化 Intent。

            Intent i = new Intent(Intent.ACTION_VIEW, uri);

            // 在以下代码行设置标志。

            i.setFlags(Intent.FLAG_ACTIVITY_NEW_TASK);

            // 在以下代码行启动 Activity。

            startActivity(i);
       }
   }
}
说明:在上面的代码中,我们首先创建了按钮和编辑框的变量。现在我们来看看 onCreate 方法。这是每个 Android 应用程序的默认方法。当应用程序视图创建时,会调用此方法。在这个方法中,我们设置内容视图,也就是名为 activity_main.xml 的布局文件,以便从该文件中设置 UI。在 onCreate 方法中,我们使用 activity_main.xml 文件中指定的 ID 初始化按钮和编辑框的变量。之后,我们为按钮添加了一个点击事件监听器。在点击事件监听器中,我们首先检查源和目标编辑框是否为空。如果为空,则显示一个 Toast 消息提示用户输入源和目标位置。如果源和目标编辑框不为空,则调用打开地图的 Intent 方法,并将源和目标位置传递给该方法以打开 Google 地图。
现在,在打开地图的 Intent 方法中,我们创建一个 URI,并将源和目标位置传递给该方法。之后,我们创建一个 Intent,并在其中设置 Google 地图应用程序的包名。然后,我们调用一个 Start Activity 方法来启动 Google 地图应用程序。同时,我们将这段代码放在一个 try-catch 块中。在 catch 块中,我们检查用户的设备上是否安装了 Google 地图应用程序。如果未安装,我们将打开 Google Play 应用商店,并将用户重定向到 Google 地图应用程序的安装页面进行安装。
添加以上代码后,现在只需点击顶部栏中的绿色图标即可在移动设备上运行我们的应用程序。
注意 - 请确保您已连接到您的真机或模拟器。
输出
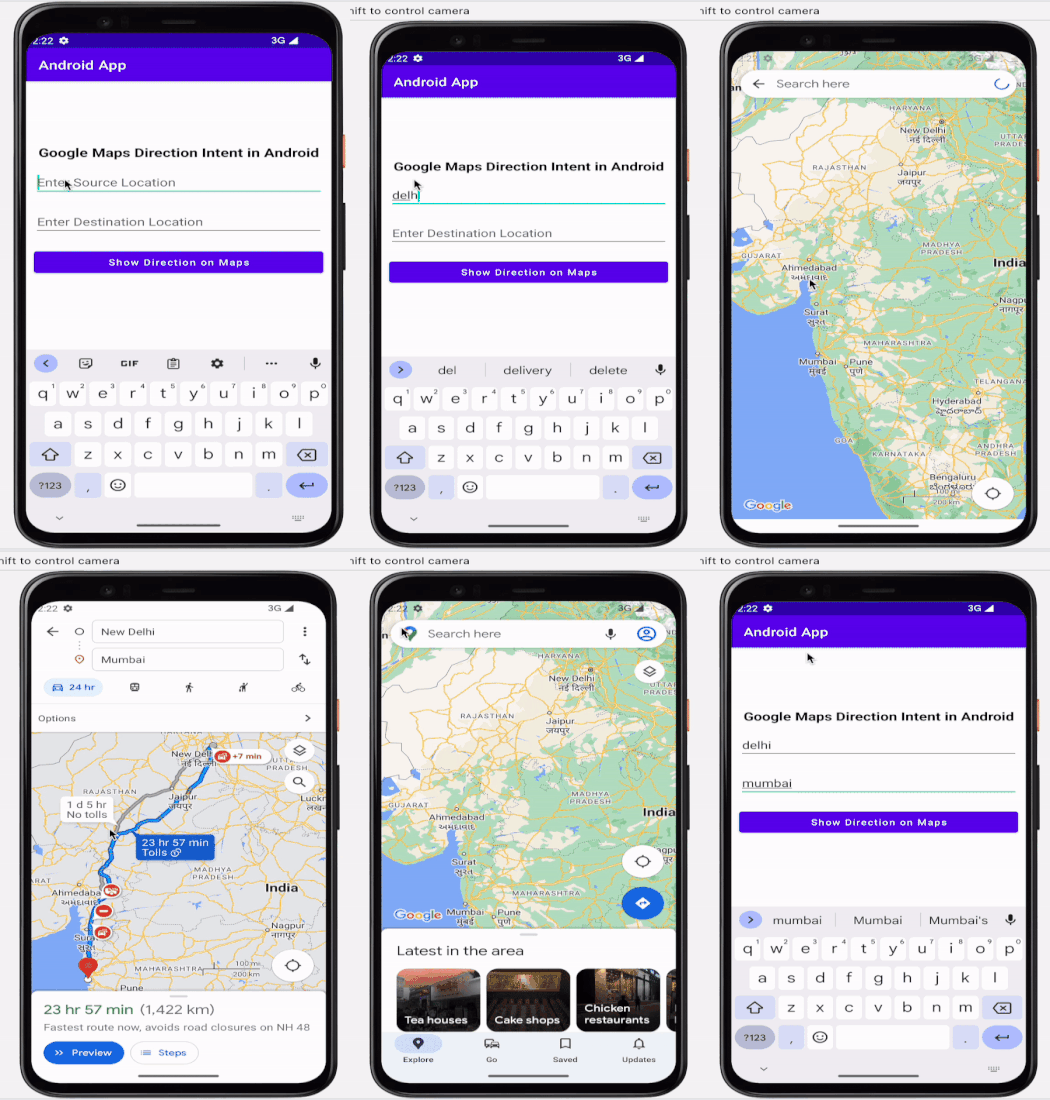
结论
在以上文章中,我们探讨了如何在 Android 应用中通过 Intent 启动 Google 地图导航。

