Flutter - 动画
动画在任何移动应用中都是一个复杂的过程。尽管动画很复杂,但它将用户体验提升到了一个新的水平,并提供了丰富的用户交互。由于动画的丰富性,它成为现代移动应用不可或缺的一部分。Flutter 框架认识到动画的重要性,并提供了一个简单直观的框架来开发所有类型的动画。
简介
动画是在特定时间内按特定顺序显示一系列图像/图片以产生运动错觉的过程。动画最重要的方面如下 −
动画有两个不同的值:起始值和结束值。动画从 起始 值开始,经过一系列中间值,最后在结束值结束。例如,要使小部件淡出,初始值将是完全不透明度,最终值将是零不透明度。
中间值本质上可能是线性或非线性(曲线),并且可以配置。了解动画的工作原理是配置的。每种配置都会为动画提供不同的感觉。例如,小部件的淡出本质上是线性的,而球的弹跳本质上是非线性的。
动画过程的持续时间会影响动画的速度(慢速或快速)。
控制动画过程的能力,如启动动画、停止动画、重复动画以设置次数、反转动画过程等,
在 Flutter 中,动画系统不会执行任何真正的动画。相反,它仅提供渲染图像时每帧所需的值。
基于动画的类
Flutter 动画系统基于 Animation 对象。核心动画类及其用法如下 −
动画
在一定持续时间内生成两个数字之间的插值。最常见的动画类是 −
Animation<double> − 在两个十进制数之间插入值
Animation<Color> − 在两种颜色之间插入颜色
Animation<Size> −在两个尺寸之间插入尺寸
AnimationController − 特殊动画对象用于控制动画本身。每当应用程序准备好新帧时,它都会生成新值。它支持基于线性的动画,值从 0.0 到 1.0 开始
controller = AnimationController(duration: const Duration(seconds: 2), vsync: this);
这里,控制器控制动画,duration 选项控制动画过程的持续时间。vsync 是一个特殊选项,用于优化动画中使用的资源。
CurvedAnimation
与 AnimationController 类似,但支持非线性动画。 CurvedAnimation 可以与 Animation 对象一起使用,如下所示 −
controller = AnimationController(duration: const Duration(seconds: 2), vsync: this);
animation = CurvedAnimation(parent: controller, curve: Curves.easeIn)
Tween<T>
从 Animatable<T> 派生,用于生成除 0 和 1 之外的任意两个数字之间的数字。它可以通过使用 animate 方法并传递实际的 Animation 对象与 Animation 对象一起使用。
AnimationController controller = AnimationController(
   duration: const Duration(milliseconds: 1000),
vsync: this); Animation<int> customTween = IntTween(
   begin: 0, end: 255).animate(controller);
Tween 还可以与 CurvedAnimation 一起使用,如下所示 −
AnimationController controller = AnimationController(
   duration: const Duration(milliseconds: 500), vsync: this);
final Animation curve = CurvedAnimation(parent: controller, curve: Curves.easeOut);
Animation<int> customTween = IntTween(begin: 0, end: 255).animate(curve);
这里的controller是实际的动画控制器,curve提供非线性的类型,customTween提供自定义范围0到255。
Flutter动画的工作流程
动画的工作流程如下 −
在StatefulWidget的initState中定义并启动动画控制器。
AnimationController(duration: const Duration(seconds: 2), vsync: this);
animation = Tween<double>(begin: 0, end: 300).animate(controller);
controller.forward();
添加基于动画的监听器,addListener来改变widget的状态。
animation = Tween<double>(begin: 0, end: 300).animate(controller) ..addListener(() {
   setState(() {
      // The state that has changed here is the animation object’s value.
   });
});
内置小部件 AnimatedWidget 和 AnimatedBuilder 可用于跳过此过程。这两个小部件都接受动画对象并获取动画所需的当前值。
在小部件的构建过程中获取动画值,然后将其应用于宽度、高度或任何相关属性,而不是原始值。
child: Container(
   height: animation.value,
   width: animation.value,
   child: <Widget>,
)
工作应用程序
让我们编写一个简单的基于动画的应用程序来了解 Flutter 框架中的动画概念。
在 Android Studio 中创建一个新的 Flutter 应用程序 product_animation_app。
将 assets 文件夹从 product_nav_app 复制到 product_animation_app,并在 pubspec.yaml 文件中添加 assets。
flutter:
   assets:
   - assets/appimages/floppy.png
   - assets/appimages/iphone.png
   - assets/appimages/laptop.png
   - assets/appimages/pendrive.png
   - assets/appimages/pixel.png
   - assets/appimages/tablet.png
删除默认启动代码(main.dart)。
添加导入和基本 main 函数。
import 'package:flutter/material.dart';
void main() => runApp(MyApp());
创建从 StatefulWidgtet 派生的 MyApp 小部件。
class MyApp extends StatefulWidget {
   _MyAppState createState() => _MyAppState();
}
创建 _MyAppState 小部件并实现 initState 和 dispose 以及默认的构建方法。
class _MyAppState extends State<MyApp> with SingleTickerProviderStateMixin {
   Animation<double> animation;
   AnimationController controller;
   @override void initState() {
      super.initState();
      controller = AnimationController(
         duration: const Duration(seconds: 10), vsync: this
      );
      animation = Tween<double>(begin: 0.0, end: 1.0).animate(controller);
      controller.forward();
   }
   // 此小部件是您的应用程序的根。
   @override
   Widget build(BuildContext context) {
      controller.forward();
      return MaterialApp(
         title: 'Flutter Demo',
         theme: ThemeData(primarySwatch: Colors.blue,),
         home: MyHomePage(title: 'Product layout demo home page', animation: animation,)
      );
   }
   @override
   void dispose() {
      controller.dispose();
      super.dispose();
   }
}
这里,
在 initState 方法中,我们创建了一个动画控制器对象(controller)、一个动画对象(animation),并使用 controller.forward 启动了动画。
在 dispose 方法中,我们已处理动画控制器对象(controller)。
在 build 方法中,通过构造函数将动画发送到 MyHomePage 小部件。现在,MyHomePage 小部件可以使用动画对象为其内容设置动画。
现在,添加 ProductBox 小部件
class ProductBox extends StatelessWidget {
   ProductBox({Key key, this.name, this.description, this.price, this.image})
      : super(key: key);
   final String name;
   final String description;
   final int price;
   final String image;

   Widget build(BuildContext context) {
      return Container(
         padding: EdgeInsets.all(2),
         height: 140,
         child: Card(
            child: Row(
               mainAxisAlignment: MainAxisAlignment.spaceEvenly,
               children: <Widget>[
                  Image.asset("assets/appimages/" + image),
                  Expanded(
                     child: Container(
                        padding: EdgeInsets.all(5),
                        child: Column(
                           mainAxisAlignment: MainAxisAlignment.spaceEvenly,
                           children: <Widget>[
                              Text(this.name, style:
                                 TextStyle(fontWeight: FontWeight.bold)),
                              Text(this.description),
                                 Text("Price: " + this.price.toString()),
                           ],
                        )
                     )
                  )
               ]
            )
         )
      );
   }
}
创建一个新的小部件 MyAnimatedWidget,使用不透明度进行简单的淡入淡出动画。
class MyAnimatedWidget extends StatelessWidget {
   MyAnimatedWidget({this.child, this.animation});

   final Widget child;
   final Animation<double> animation;

   Widget build(BuildContext context) => Center(
   child: AnimatedBuilder(
      animation: animation,
      builder: (context, child) => Container(
         child: Opacity(opacity: animation.value, child: child),
      ),
      child: child),
   );
}
在这里,我们使用 AniatedBuilder 来制作动画。AnimatedBuilder 是一个在制作动画的同时构建内容的小部件。它接受动画对象以获取当前动画值。我们使用动画值 animation.value 来设置子小部件的不透明度。实际上,小部件将使用不透明度概念为子小部件制作动画。
最后,创建 MyHomePage 小部件并使用动画对象为其任何内容制作动画。
class MyHomePage extends StatelessWidget {
   MyHomePage({Key key, this.title, this.animation}) : super(key: key);

   final String title;
   final Animation<double>
   animation;

   @override
   Widget build(BuildContext context) {
      return Scaffold(
         appBar: AppBar(title: Text("Product Listing")),body: ListView(
            shrinkWrap: true,
            padding: const EdgeInsets.fromLTRB(2.0, 10.0, 2.0, 10.0),
            children: <Widget>[
               FadeTransition(
                  child: ProductBox(
                     name: "iPhone",
                     description: "iPhone is the stylist phone ever",
                     price: 1000,
                     image: "iphone.png"
                  ), opacity: animation
               ),
               MyAnimatedWidget(child: ProductBox(
                  name: "Pixel",
                  description: "Pixel is the most featureful phone ever",
                  price: 800,
                  image: "pixel.png"
               ), animation: animation),
               ProductBox(
                  name: "Laptop",
                  description: "Laptop is most productive development tool",
                  price: 2000,
                  image: "laptop.png"
               ),
               ProductBox(
                  name: "Tablet",
                  description: "Tablet is the most useful device ever for meeting",
                  price: 1500,
                  image: "tablet.png"
               ),
               ProductBox(
                  name: "Pendrive",
                  description: "Pendrive is useful storage medium",
                  price: 100,
                  image: "pendrive.png"
               ),
               ProductBox(
                  name: "Floppy Drive",
                  description: "Floppy drive is useful rescue storage medium",
                  price: 20,
                  image: "floppy.png"
               ),
            ],
         )
      );
   }
}
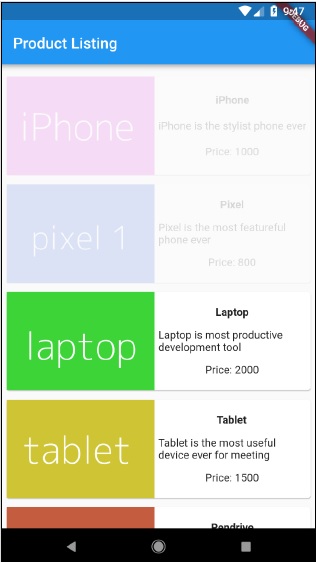
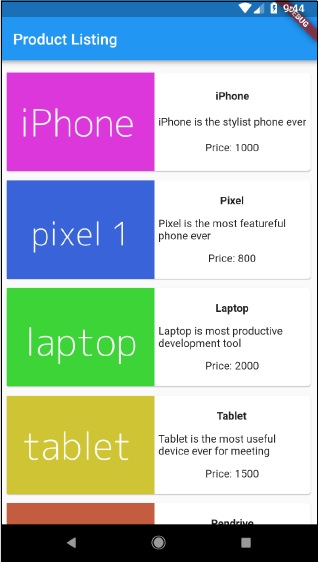
在这里,我们使用了 FadeAnimation 和 MyAnimationWidget 来为列表中的前两个项目制作动画。FadeAnimation 是一个内置动画类,我们用它来使用不透明度概念为其子项制作动画。
完整代码如下 −
import 'package:flutter/material.dart';
void main() => runApp(MyApp());

class MyApp extends StatefulWidget {
   _MyAppState createState() => _MyAppState();
}
class _MyAppState extends State<MyApp> with SingleTickerProviderStateMixin {
   Animation<double> animation;
   AnimationController controller;

   @override
   void initState() {
      super.initState();
      controller = AnimationController(
         duration: const Duration(seconds: 10), vsync: this);
      animation = Tween<double>(begin: 0.0, end: 1.0).animate(controller);
      controller.forward();
   }
   // 此小部件是您的应用程序的根。
   @override
   Widget build(BuildContext context) {
      controller.forward();
      return MaterialApp(
         title: 'Flutter Demo', theme: ThemeData(primarySwatch: Colors.blue,),
         home: MyHomePage(title: 'Product layout demo home page', animation: animation,)
      );
   }
   @override
   void dispose() {
      controller.dispose();
      super.dispose();
   }
}
class MyHomePage extends StatelessWidget {
   MyHomePage({Key key, this.title, this.animation}): super(key: key);
   final String title;
   final Animation<double> animation;

   @override
   Widget build(BuildContext context) {
      return Scaffold(
         appBar: AppBar(title: Text("Product Listing")),
         body: ListView(
            shrinkWrap: true,
            padding: const EdgeInsets.fromLTRB(2.0, 10.0, 2.0, 10.0),
            children: <Widget>[
               FadeTransition(
                  child: ProductBox(
                     name: "iPhone",
                     description: "iPhone is the stylist phone ever",
                     price: 1000,
                     image: "iphone.png"
                  ),
                  opacity: animation
               ),
               MyAnimatedWidget(
                  child: ProductBox(
                     name: "Pixel",
                     description: "Pixel is the most featureful phone ever",
                     price: 800,
                     image: "pixel.png"
                  ),
                  animation: animation
               ),
               ProductBox(
                  name: "Laptop",
                  description: "Laptop is most productive development tool",
                  price: 2000,
                  image: "laptop.png"
               ),
               ProductBox(
                  name: "Tablet",
                  description: "Tablet is the most useful device ever for meeting",
                  price: 1500,
                  image: "tablet.png"
               ),
               ProductBox(
                  name: "Pendrive",
                  description: "Pendrive is useful storage medium",
                  price: 100,
                  image: "pendrive.png"
               ),
               ProductBox(
                  name: "Floppy Drive",
                  description: "Floppy drive is useful rescue storage medium",
                  price: 20,
                  image: "floppy.png"
               ),
            ],
         )
      );
   }
}
class ProductBox extends StatelessWidget {
   ProductBox({Key key, this.name, this.description, this.price, this.image}) :
      super(key: key);
   final String name;
   final String description;
   final int price;
   final String image;
   Widget build(BuildContext context) {
      return Container(
         padding: EdgeInsets.all(2),
         height: 140,
         child: Card(
            child: Row(
               mainAxisAlignment: MainAxisAlignment.spaceEvenly,
               children: <Widget>[
                  Image.asset("assets/appimages/" + image),
                  Expanded(
                     child: Container(
                        padding: EdgeInsets.all(5),
                        child: Column(
                           mainAxisAlignment: MainAxisAlignment.spaceEvenly,
                           children: <Widget>[
                              Text(
                                 this.name, style: TextStyle(
                                    fontWeight: FontWeight.bold
                                 )
                              ),
                              Text(this.description), Text(
                                 "Price: " + this.price.toString()
                              ),
                           ],
                        )
                     )
                  )
               ]
            )
         )
      );
   }
}
class MyAnimatedWidget extends StatelessWidget {
   MyAnimatedWidget({this.child, this.animation});
   final Widget child;
   final Animation<double> animation;

   Widget build(BuildContext context) => Center(
      child: AnimatedBuilder(
         animation: animation,
         builder: (context, child) => Container(
            child: Opacity(opacity: animation.value, child: child),
         ),
         child: child
      ),
   );
}
编译并运行应用程序以查看结果。应用程序的初始版本和最终版本如下 −