FuelPHP - 模型和数据库
模型在 FuelPHP Web 框架中扮演着重要的角色。它代表应用程序的业务实体。它们要么由客户提供,要么从后端数据库获取,根据业务规则进行操作并持久保存回数据库。让我们在本章中了解模型以及它们如何与后端系统交互。
创建模型
在 FuelPHP 中,模型只是扩展内置模型类的普通 PHP 类。默认情况下,模型可能以 Model_ 为前缀,类似于控制器,应放置在 fuel/app/classes/model/ 文件夹中。让我们创建一个基本的员工模型并在继续进行时对其进行扩展。
fuel/app/classes/model/employee.php
<?php
   namespace Model;

   class Model_Employee extends \Model {
      public static function fetchAll() {
         // 从数据库获取员工的代码
      }
   }
访问模型
一旦定义了模型,就可以在任何控制器中自由使用它,只需将其包含在控制器中即可,如下所示。
use \Model\Employee;

class Controller_Employee extends Controller {
   public function action_index() {
      $employees = Employee::fetchAll();
   }
}
数据库概述
FuelPHP 提供自己的数据库抽象层来从数据库获取数据。它提供基本和高级的基于 ORM 的工具。基本工具包由基于 DB、DBUtil 和 Query_Builer 的类组成。高级工具包是 Orm。Orm 工具包源自基本工具包,并捆绑为单独的包。
数据库配置
FuelPHP 将数据库设置与主配置文件分开,文件为 fuel/app/config/db.php。它支持每个环境的单独设置。目前,FuelPHP 支持 MySQL、MySQLi 和 PDO 驱动程序。示例设置如下 −
<?php
   return array (
      'development' => array (
         'type'           => 'mysqli',
         'connection'     => array (
            'hostname'    => 'localhost',
            'port'        => '3306',
            'database'    => 'tutorialspoint_fueldb',
            'username'    => 'root',
            'password'    => 'password',
            'persistent'  => false,
            'compress'    => false,
         ),

         'identifier'     => '`',
         'table_prefix'   => '',
         'charset'        => 'utf8',
         'enable_cache'   => true,
         'profiling'      => false,
         'readonly'       => false,
      ),
   )
基于 DB 的工具包
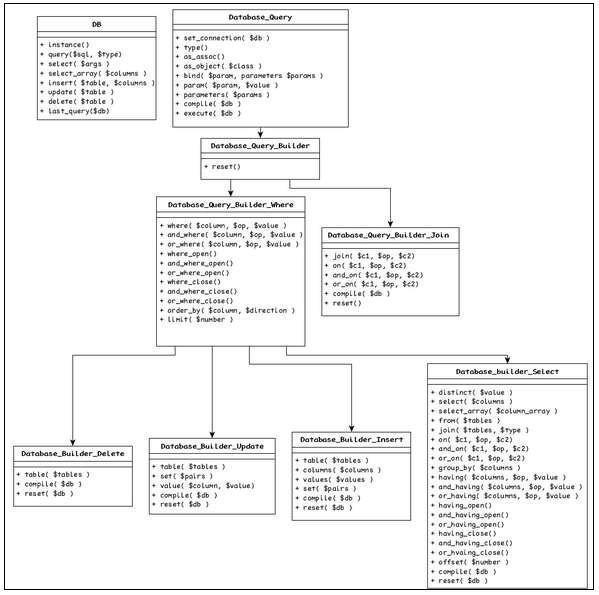
DB 类是从应用程序访问数据库的最简单选项。它提供构建数据库查询、针对目标数据库执行查询以及最终获取结果的选项。DB 类与以下类交互并提供全面的数据库 API。
Database_Connection − 与数据库交互的单例和主类
Database_Query − 基础,执行 SQL 查询和获取结果的具体类
Database_Query_Builder − 基础,构建 SQL 查询的抽象类
Database_Query_Builder_Join −用于构建 SQL 连接的类
Database_Query_Builder_Where − 用于构建 SQL 查询条件的抽象类
Database_Query_Builder_Select − 用于构建 SQL 选择查询的具体类
Database_Query_Builder_Insert − 用于构建 SQL 插入查询的抽象类
Database_Query_Builder_Update − 用于构建 SQL 更新查询的抽象类
Database_Query_Builder_Delete −抽象类构建 SQL 删除查询
下图描述了类与类提供的方法之间的关系。
DB API
让我们在本节中了解 DB 类中可用的最重要的方法。
instance
用途 − 创建并返回新的 Database_Connection 实例。
参数 −
$db −配置文件中定义的数据库连接名称,可选。
返回 − 返回 Database_Connection 对象
例如,
$db = DB::instance();
$db = DB::instance('test');
query
用途 − 准备提供的 SQL 语句并返回 Database_Query 对象,该对象可用于插入、更新、删除或从数据库中获取数据。
参数 −
$query − SQL 语句,可能包含占位符;
$type − SQL 类型,可选 (DB::SELECT、DB::INSERT、DB::UPDATE 和 DB::DELETE)
返回 − 返回 Database_Query 对象
例如,
$query = DB::query('SELECT * FROM 'employees'');
last_query
用途 − 获取最后执行的查询
参数 − 无
返回 − 返回最后执行的查询
例如,
$employees = DB::Select('Select * from 'employee'');
$sql = DB::last_query();
select
用途 − 生成查询的选择部分
参数 −
$columns −数据库列名列表
返回 − 返回 Database_Query_Builder_Select 对象
例如,
$query = DB::select(); // 选择 *
$query = DB::select('id', 'name'); // 选择 id、name
select_array (DB)
它与 select 类似,只是我们可以将列作为数组发送。
$query = DB::select_array(array('id', 'name')); // 选择 id、name
insert
用途 − 生成查询的插入部分
参数 −
$table_name − 数据库表的名称;
$columns − 表列的数组
返回 − 返回 Database_Query_Builder_Insert 对象
例如,
$query = DB::insert('employee'); // 插入员工
$query = DB::insert('employee', array('id', 'name')); // 插入员工 (id, name)
update
用途 − 生成查询的更新部分
参数 −
$table_name − 数据库表的名称
返回 − 返回 Database_Query_Builder_Update 对象
例如,
$query = DB::update('employee'); // 更新 `employee`
delete
用途 − 生成查询的删除部分
参数 −
$table_name − 数据库表的名称
返回 − 返回 Database_Query_Builder_Delete 对象
例如
$query = DB::delete('employee'); // 从"employee"中删除
Query API
Database_Query 提供了一个选项来设置数据库连接、执行查询并将结果作为关联数组或对象获取。让我们看看 Database_Query 类提供的方法。
set_connection
用途 − 设置要执行查询的数据库(数据库连接详细信息)
参数 − $db - 数据库连接名称
返回 − 返回 Database_Query 对象
例如,
$query = DB::query('DELETE * FROM employee', DB::DELETE);
$query->set_connection('2nd-db');
param
用途 − 设置 Query 对象中定义的参数的值
参数 −
$param − 参数名称;
$value − 参数的值
返回 − 返回 Database_Query 对象
例如,
// 设置一些变量
$table = 'employee';
$id = 1;
$name = 'Jon';

// don't use
$query = DB::query('SELECT * FROM '.$table.'. WHERE id = '.$id.' AND name = "'.$name.'"');

// but use
$query = DB::query('SELECT * FROM :tablename WHERE id = :id AND name = :name');
$query->param('tablename', 'employee');
$query->param('id', $id);
$query->param('name', $name);
类似方法
parameters 是一个类似的对象,只不过它提供了一次提供多个值的选项。
$query->parameters (array(
   'tablename' => $table,
   'id' => $id,
   'name' => $name
});
bind
用途 − 将变量设置为 Query 对象中定义的参数
参数 −
$param − 参数名称
$var − 要将参数绑定到的变量
返回 − 返回 Database_Query 对象
例如,
// 绑定查询参数
$table = 'employee';
$query = DB::query('DELETE * FROM :tablename', DB::DELETE);
$query->bind('tablename', $table);

// 更新变量
$table = 'employee_salary';

// DELETE * FROM `employee_salary`;
$sql = $query->compile();
compile
用途 − 将定义的查询对象编译为 SQL 查询
参数 −
$db −连接字符串,可选
返回 −
例如,
// 为查询参数分配一个值
$table = 'employee';
$query = DB::query('DELETE * FROM :tablename', DB::DELETE);
$query->param('tablename', $table);

// 编译查询,返回:DELETE * FROM employee
$sql = $query->compile();
execute
用途 − 执行 Query 对象中定义的查询并返回结果
参数 −
$db − 数据库连接名称
返回 − 返回结果
例如,
// 为查询参数分配一个值
$table = 'employee';
$query = DB::query('DELETE * FROM :tablename', DB::DELETE);
$query->param('tablename', $table);

// 执行查询
$query->execute();
as_assoc
用途 − 将返回类型设置为关联数组而不是对象
参数 − 无
返回 − 返回当前对象
例如,
$query = DB::query('SELECT * FROM employee', DB::SELECT);
$result = $query->as_assoc()->execute();
foreach ($result as $row) {
   echo $row['id'];
}
as_object
用途 − 将返回类型设置为对象而不是关联数组
参数 − 无
返回 − 返回当前对象
例如,
$query = DB::query('SELECT * FROM employee', DB::SELECT);
$result = $query->as_object()->execute();
foreach ($result as $row) {
   echo $row->id;
}

// 让 ORM 模型对象返回
$result = $query->as_object('Model_Employee')->execute();
查询生成器 API
基于查询生成器 (Query_Builder) 的类提供动态构建 SQL 查询的选项。它有四个类,每个类用于选择 (Query_Builder_Select)、插入 (Query_Builder_Insert)、更新 (Query_Builder_Update) 和删除 (Query_Builder_Delete) 查询。这些类派生自 Query_Builder_Where 类(生成条件的选项),而该类本身又派生自 Query_Builder,是所有类的基础。
让我们看看 Query_Builder 类提供的方法。
select
用途 − 生成选择查询的列。
参数 −
$columns − 列的列表,可选
返回 −返回当前实例
例如,
$query = DB::select('name') // 选择 `name`
$query = DB::select(array('first_name', 'name')) // 选择 `first_name` 作为 `name`
from
用途 − 生成选择查询的表详细信息
参数 −
$tables − 表列表
返回 −返回当前实例
例如,
$query = DB::select('name')->from('employee') // 从 `employee` 中选择 `name`
where
用途 − 生成 select、insert 和 update 查询的条件
参数 −
$column − 列名或数组 ($column, $alias);
$op −逻辑运算符,=、!=、IN、BETWEEN 和 LIKE,可选;
$value − 列值
返回 − 返回当前实例
例如,
$query = DB::select('name')->from('employee')
$query = $query->where('name', '=', 'Jon');
// select `name` from `employee` where `name` = `Jon`;
类似方法
类似方法有 where_open()、and_where_open()、or_where_open()、where_close()、and_where_close() 和 or_where_close()。它们与 where() 方法类似,只是在条件周围添加了额外的关键字和括号。以下是示例代码。
$query = DB::select('*')->from('employee');
$query->where('email', 'like', '%@gmail.com');
$query->or_where_open();
$query->where('name', 'Jon');
$query->and_where('surname', 'Peter');
$query->or_where_close();
// SELECT * FROM `employee` WHERE `email` LIKE "%gmail.com" OR
   (`name` = "Jon" AND `surname` = "Peter")
join
用途 − 生成选择查询的表连接
参数 −
$table − 表名或数组 ($table, $alias);
$type − 连接类型 (LEFT、RIGHT、INNER 等)
返回 − 返回当前实例
示例
$query = DB::select('name')->from('employee')->join('employee_salary')
// select `name` from `employee` JOIN `employee_salary`
on
用途 − 生成选择查询中的连接条件
参数 −
$c1 − 表名或数组中带有别名的表名;
$op − 逻辑运算符;
$c2 − 数组中带有别名的表名
返回 − 返回当前实例
例如,
$query = DB::select('name')->from('employee')->join('employee_salary')
$query = $query->on('employee.employee_id', '=', 'employee_salary.employee_id')
// select `name` from `employee` JOIN `employee_salary` on
// `employee.employee_id` = `employee_salary.employee_id`
类似方法
相关方法是 and_on() 和 or_on()。它们与 on() 类似,只是在连接周围添加了额外的关键字和括号。
group_by
用途 − 生成分组查询
参数 − $columns − 用于对结果进行分组的列名称
返回 − 返回当前实例
例如,
$query = DB::select('name')->from('employee')
$query = $query->group_by('name');
// select `name` from `employee` group by `name`
having
用途 − 生成 SQL 查询的 group by 条件
参数 − $column − 列名或数组 ($column, $alias ); $op − 逻辑运算符,=, !=, IN, BETWEEN 和 LIKE,可选; $value − 列值
返回 − 返回当前实例
示例
$query = DB::select('name')->from('employee')
$query = $query->group_by('name');
$query = $query->having('name', '!=', 'Jon');
// 从 `employee` 组中按 `name` 选择 `name` having `name` != `Jon`
类似方法
类似方法是 having_open()、and_having_open()、or_having_open()、having_close()、and_having_close() 和 or_having_close()。它们与 having() 方法类似,只是在条件周围添加了额外的关键字和括号。
重置
用途 − 重置查询
参数 − 无
返回 −返回当前实例
例如,
$query = DB::select('name')->from('employee')
$query->reset()
$query = DB::select('name')->from('employee_salary')
// 从 `employee_salary` 中选择 `name`
DBUtil 类
DBUtil 类提供了管理和执行常规数据库操作的选项。一些重要方法如下 −
- set_connection - 设置默认连接
DBUtil::set_connection('new_database');
- create_database - 创建数据库。
DBUtil::create_database('my_database');
- drop_database - 删除数据库。
DBUtil::drop_database('my_database');
- table_exists - 检查给定表是否存在。
if(DBUtil::table_exists('my_table')) {
    // 表存在
} else {
    // 表不存在,创建它!
}
- drop_table - 删除表。
DBUtil::drop_table('my_table');
- create_table - 创建表。
\DBUtil::create_table (
   'users',
   array (
      'id' => array('type' => 'int', 'auto_increment' => true),
      'name' => array('type' => 'text'),
   ),
);
Orm 工具包
FuelPHP 使用基于流行的 Active record 模式 的 ORM 概念提供高级数据库层。该工具包包含在应用程序中,但默认情况下未配置。它捆绑为一个包,包名称为 orm。我们可以在主配置文件 fuel/app/config/config.php 中添加以下配置来加载 orm 工具包。
'always_load' => array (
   'packages' => array (
      'orm',
   ),
),
创建模型
Orm 提供了基础模型类 Orm\Model。我们需要使用 orm 模型扩展我们的模型才能使用 ORM 功能。以下是示例代码。
class Model_Employee extends Orm\Model {}
配置
Orm 提供了一组设置来配置模型以使用 ORM 功能。它们如下 −
connection − 在模型中设置静态 _connection 属性以指定连接名称。
class Model_Employee extends Orm\Model {
    protected static $_connection = "production";
}
表名 −在模型中设置一个静态的_table_name属性,指定后端表的表名。
class Model_Employee extends Orm\Model {
    protected static $_table_name = 'employee';
}
primary key − 在模型中设置一个静态的_primary_key属性,指定后端表的主键。
class Model_Employee extends Orm\Model {
    protected static $_primary_key = array('id');
}
Columns − 在模型中设置一个静态的_properties属性,指定后端表的列。支持data_type、label、validation、form elememts等。
class Model_Employee extends Orm\Model {
   protected static $_properties = array (
      'id',
      'name' => array (
         'data_type' => 'varchar',
         'label' => 'Employee Name',
         'validation' => array (
            'required',
            'min_length' => array(3),
            'max_length' > array(80)
         ),

         'form' => array (
            'type' => 'text'
         ),
      ),

      'age' => array (
         'data_type' => 'int',
         'label' => 'Employee Age',
         'validation' => array (
            'required',
         ),

         'form' => array (
            'type' => 'text'
         ),
      ),
   );
}
条件 − 设置静态 _conditions 属性来设置条件和排序选项。
class Model_Employee extends Orm\Model {
   protected static $_conditions = array (
      'order_by' => array('id' => 'desc'),
      'where' => array (
         array('is_active', > true),
      ),
   );
}
Observers − Orm 提供基于观察者的事件系统,用于向特定事件添加行为。要添加行为,首先在模型中设置 _observers 属性。然后,将行为定义为类,并将其与事件一起设置在 _observers 属性中。如果未指定事件,则将为所有事件调用该行为。我们也可以指定多个行为。
class Model_Employee {
   protected static $_observers = array (
      'example',  // will call Observer_Example class for all events
      'Orm\Observer_CreatedOn' => array (
         'events' => array('before_insert'),
         // 只会在 before_insert 事件中调用 Orm\Observer_CreatedOn
      )
   );
}
Create
一旦我们配置了模型,我们就可以立即开始使用这些方法。 Orm 提供了一个 save 方法来将对象保存到数据库中。我们可以使用配置的属性设置数据,如下所示 −
// 选项 1
$new = new Model_Employee();
$new->name = 'Jon';
$new->save();

// 选项 2,使用 forge 而不是 new
$new = Model_Employee::forge();
$new->name = 'Jon';
$new->save();

// 选项 3,使用数组作为属性
$props = array('name' => 'Jon');
$new = Model_Employee::forge($props);
$new>save();
Read
Orm 提供了一种方法 find,用于从数据库中获取数据并绑定到对象中。 find 方法的工作方式取决于输入参数。 让我们看看不同的选项 −
按主键 − 指定主键通过匹配配置表的主键返回记录。
$employee = Model_Employee::find(1);
第一条/最后一条记录 − 指定'first'或'last'将分别获取第一条记录或最后一条记录。 我们也可以传递 order by 选项。
$entry = Model_Employee::find('first');
$entry = Model_Article::find('last', array('order_by' => 'id'));
全部 − 指定"全部"将从配置的表中获取所有记录。我们可以指定按选项排序以及条件。
$entry = Model_Employee::find('all');
$entry = Model_Article::find ('all', array (
   'where' => array (
      array ('name', 'Jon'),
   ),
   'order_by' => array ('id' => 'desc'),
));
我们可以使用基本数据库工具包的查询 API 以及模型来实现高级搜索选项,如下所示。
$query = Model_Employee::query()->where('category_id', 1)->order_by('date', 'desc');
$number_of_employees = $query->count();
$latest_employee = $query->max('id');
$young_employee = $query->min('age');
$newest_employee = $query->get_one();
$employees = $query->limit(15)->get();
更新
更新模型与创建相同,只不过不是创建新模型,而是使用 find 方法获取要更新的模型,更新属性,然后调用 save 方法,如下所示。
$entry = Model_Employee:find(4);
$entry->name = 'Peter';
$entry->save();
删除
Orm 提供了一个 delete 方法来删除模型。只需获取对象并调用 delete 方法即可。
$entry = Model_Employee:find(4);
$entry->delete();
工作示例
让我们在本章中创建一个工作示例,以了解模型和数据库。
创建数据库
使用以下命令在 MySQL 服务器中创建一个新数据库。
create database tutorialspoint_fueldb
然后,使用以下命令在数据库内创建一个表。
create table employee(id int primary key, name varchar(20), age int not null);
配置数据库
让我们使用数据库配置文件 *fuel/app/config/db.php 配置数据库。添加以下更改以连接 MySQL 服务器。
<?php
   return array (
      'development' => array (
         'type'           => 'mysqli',
         'connection'     => array (
            'hostname'       => 'localhost',
            'port'           => '3306',
            'database'       => 'tutorialspoint_fueldb',
            'username'       => 'root',
            'password'       => 'pass',
            'persistent'     => false,
            'compress'       => false,
         ),

         'identifier'     => '`',
         'table_prefix'   => '',
         'charset'        => 'utf8',
         'enable_cache'   => true,
         'profiling'      => false,
         'readonly'       => false,
      ),

      'production' => array (
         'type'           => 'mysqli',
         'connection'     => array (
            'hostname'       => 'localhost',
            'port'           => '3306',
            'database'       => 'tutorialspoint_fueldb',
            'username'       => 'root',
            'password'       => 'pass',
            'persistent'     => false,
            'compress'       => false,
         ),

         'identifier'     => '`',
         'table_prefix'   => '',
         'charset'        => 'utf8',
         'enable_cache'   => true,
         'profiling'      => false,
         'readonly'       => false,
      ),
   );
包含 ORM 包
更新主配置文件 fuel/app/config/config.php,通过添加以下配置来包含 ORM 包。
'always_load' => array (
   'packages' => array (
      'orm'
   ),
),
现在,您的应用程序中已启用 ORM
创建 Employee 模型
在模型文件夹 "fuel/app/classes/model" 下创建一个新模型 Employee。其定义如下。
Employee.php
<?php
   class Model_Employee extends Orm\Model {
      protected static $_connection = 'production';
      protected static $_table_name = 'employee';
      protected static $_primary_key = array('id');
      protected static $_properties = array (
         'id',
         'name' => array (
            'data_type' => 'varchar',
            'label' => 'Employee Name',
            'form' => array (
               'type' => 'text'
            ),
         ),

         'age' => array (
            'data_type' => 'int',
            'label' => 'Employee Age',
            'form' => array (
               'type' => 'text'
            ),
         ),
      );
   }
创建操作
在位于 fuel/app/classes/controller/employee.php 的员工控制器中创建新操作 action_model,如下所示。
class Controller_Employee extends Controller {
   public function action_model() {

    // 基于 db 的 sql 命令删除所有员工
    $query = db::query('delete from `employee`');
    $query->execute('production');

    // 基于 orm 的查询添加新员工
    $model = new model_employee();
    $model->name = "john";
    $model->age = 25;
    $model->save();
    $model = new model_employee();
    $model->name = "peter";
    $model->age = 20;
    $model->save();

    // 基于 orm 的查询获取所有员工数据
    $data = array();
    $data['emps'] = model_employee::find('all');
    return response::forge(view::forge('employee/model', $data));
   }
}
创建视图
现在,创建一个位于"fuel/app/views/employee"的视图文件model.php。在文件中添加以下更改。
<ul>
   <?php
      foreach($emps as $emp) {
   ?>
   <li><?php echo $emp['name']; ?></li>

   <?php
   }
   ?>
</ul>
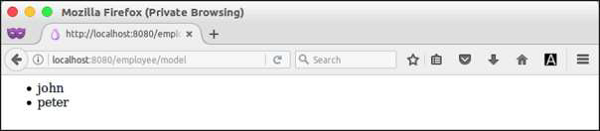
现在,请求 URL,http://localhost:8080/employee/model,它将产生以下结果。
结果