FuelPHP - 主题
主题用于为应用程序启用多种外观和感觉。它为用户/开发人员提供了在不影响应用程序功能的情况下更改应用程序外观和感觉的选项。一个应用程序可以有一个或多个主题。每个主题都位于自己的文件夹中。让我们在本章中学习如何创建主题。
主题配置
FuelPHP 为主题提供了一个单独的配置文件 fuel/app/config/themes.php。所有主题相关设置都在此文件中配置。一些主要主题设置如下 −
active − 活动主题的名称
fallback −如果未找到活动主题,则后备主题的名称
paths − 搜索和查找主题的路径数组
assets_folder − 通常,资产需要位于 DOCPATH 内,以便可以通过 Web 访问。它指的是 DOCPATH 内主题的资产文件夹
view_ext − 主题视图文件的扩展
info_file_name − 包含有关主题的扩展信息的文件
require_info_file − 是否需要主题信息文件,info_file_name
use_modules −是否使用当前模块
主题文件的简单配置如下。
<?php
   return array (
      'active' => 'tpthemes',
      'fallback' => 'tpthemes',
      'paths' => array (
         APPPATH.'themes',
      ),
      'assets_folder' => 'assets',
      'view_ext' => '.html',
      'require_info_file' => false,
      'info_file_name' => 'themeinfo.php',
      'use_modules' => false,
   );
这里我们设置了,
- 活动主题和后备主题的名称为 tpthemes
- 主题文件夹的路径为 fuel/app/themes/
- 资产文件夹的路径为 /public/assets/tpthemes/
主题类
配置完成后,我们可以使用 FuelPHP 提供的类 Theme 来实现主题的功能。让我们在本章中了解 Theme 类中可用的方法。
instance
instance 方法可以创建一个新主题。它有以下两个参数,
$name − 主题名称(可选)
$config −主题配置数组(与配置部分中看到的相同)
两个参数都是可选的。如果未指定任何参数,它会尝试从配置文件中获取默认主题。如果指定了主题名称,它会尝试从配置文件中获取其他设置。如果还指定了配置,那么它将使用用户指定的设置,而不是配置文件中的设置。
$theme = \Theme::instance();
$theme = \Theme::instance('tpthemes');
$theme = \Theme::instance ('mytheme', array (
   'active' => 'mytheme', 'view_ext' => '.php'));
forge
forge 与 instance 类似,只不过它只有配置数组。
$theme = \Theme::forge (array(
   'active'   => 'tpthemes',
   'fallback' => 'tpthemes',
   'view_ext' => '.php',
));
view
view 方法在后台使用 View::forge()。两个 API 类似,只是 view 方法在主题文件夹 fuel/app/themes/tpthemes/ 中搜索视图文件,而不是 fuel/app/views/ 文件夹。
$theme = \Theme::instance();
$view = $theme->view('template/index');
// *fuel/app/themes/tpthemes/template/index.php
presenter
presenter 方法在后台使用 Presenter::forge()。两个 API 类似,只是 presenter 方法在主题文件夹 fuel/app/themes/tpthemes/ 中搜索视图文件,而不是 fuel/app/views/ 文件夹。
$theme = \Theme::instance();
$presenter = $theme->presenter('template/index');
asset_path
asset_path 方法返回相对于当前选定主题的请求资产的路径。
$theme = \Theme::instance();

// public/assets/tpthemes/css/style.css
$style = \Html::css($theme->asset_path('css/style.css'));
add_path
add_path 方法允许在运行时添加主题路径。
$theme = \Theme::instance();
$theme->add_path(DOCROOT.'newthemes');
add_paths
add_paths 方法允许在运行时添加多个主题路径。
$theme = \Theme::instance();
$theme->add_path(DOCROOT.'newthemes');
active
active 方法允许设置活动主题。
$theme = \Theme::instance();
$active = $theme->active('newtheme');
fallback
fallback 方法允许设置后备主题。
$theme = \Theme::instance();
$fallback = $theme->fallback('custom');
get_template
get_template 方法将返回当前加载的主题模板的 View 实例。
$theme = \Theme::instance();
$theme->get_template()->set('body', '主题可以改变应用的外观和感觉');
set_template
set_template 方法允许为页面设置主题模板。
$theme = \Theme::instance();
$theme->set_template('layouts/index')->set('body', 'set theme template');
find
如果找到主题的路径,find 返回 true,否则返回 false。
$theme = \Theme::instance();
$path = $theme->find('newtheme')
all
all 方法返回所有主题路径中的所有主题的数组。
$theme = \Theme::instance();
$themes = $theme->all();
get_info
get_info 方法从主题信息数组中返回特定变量。如果未指定主题,则使用活动主题的信息数组。
$theme = \Theme::instance();
$var = $theme->get_info('color', 'green', 'newtheme');
这里,获取颜色的方法在'newtheme'中定义。如果没有定义,那么它将使用'green'作为默认颜色。
set_info
set_info 方法在活动主题或后备主题中设置一个变量。
$theme->set_info('color', 'green', 'fallback');
set_partial
set_partial 方法允许为页面模板的命名部分设置视图部分。通常,它是通过 HMVC 调用完成的。
$theme = \Theme::instance();
$theme->set_template('layouts/homepage');
$theme->set_partial('navbar', 'homepage/navbar');
get_partial
get_partial 方法允许获取页面模板的命名部分中先前设置的部分的视图实例。
$theme = \Theme::instance();
$theme->set_partial('sidebar', 'partials/menu');
$theme->get_partial('sidebar', 'partials/menu')->set('class', 'menu green');
工作示例
让我们在员工应用程序中添加主题支持。
步骤 1 − 添加新的主题配置文件 fuel/app/config/theme.php,内容如下。
<?php
   return array (
      'active' => 'tpthemes',
      'fallback' => 'tpthemes',
      'paths' => array (APPPATH.'themes', ),
      'assets_folder' => 'assets',
      'view_ext' => '.html',
      'require_info_file' => false,
      'info_file_name' => 'themeinfo.php',
      'use_modules' => false,
   );
步骤 2 − 为主题 tpthemes 添加新的资源文件夹 public/assets/tpthemes/css。
cd /go/to/app/root/path
mkdir -p public/assets/tpthemes/css
步骤 3 − 下载最新的 bootstrap 并将 bootstrap.min.css 放在 public/assets/tpthemes/css 下
步骤 4 − 在 fuel/app/themes 文件夹下添加新文件夹 tpthemes。
cd /go/to/app/root/path
mkdir -p fuel/app/themes/tpthemes
步骤 5 −在fuel/app/themes/tpthemes/layout/下添加新的布局模板bootstrap.html,并添加如下代码。
<!DOCTYPE html>
<html lang = "en">
   <head>
      <title>Theme example</title>
      <meta charset = "utf-8">
      <meta name = "viewport" content = "width = device-width, initial-scale = 1">
      <!-- Bootstrap core CSS -->
      <?php echo \Theme::instance()->asset->css('bootstrap.min.css'); ?>
   </head>

   <body>
      <?php echo $header; ?>
      <div class = "container">
         <div class = "row">
            <div class = "col-sm-12">
               <?php echo $content; ?>
            </div>
         </div>
      </div>
   </body>

</html>
这里我们使用了主题实例和资源方法来获取引导文件的路径。我们定义了两个变量,header 和 content。header 被定义用来动态设置 header 详细信息。content 被定义用来动态设置页面的实际内容。
步骤 6 − 在 fuel/app/themes/tpthemes/partials 中添加新的 header 模板 header.php,如下所示。
<div class = "jumbotron text-center">
   <h1>Theme support in fuelphp</h1>
   <p>bootstrap based template</p>
</div>
步骤 7 − 在 fuel/app/classes/controller/themesample.php 创建一个新控制器 ThemeSample,并在 action_index 创建一个新控制器 action,如下所示。
<?php
   class Controller_ThemeSample extends \Controller {
      public function before() {
         $this->theme = \Theme::instance();
         $this->theme->set_template('layouts/bootstrap');
         $header = $this->theme->view('partials/header');
         $this->theme->get_template()->set('header', $header);
      }
      public function action_index() {
         $content = $this->theme
         ->view('themesample/index')
         ->set('message', 'This data comes from action page');
         $this->theme
         ->get_template()
         ->set('content', $content);
      }
      public function after($response) {
         if (empty($response) or  ! $response instanceof Response) {
            $response = \Response::forge(\Theme::instance()->render());
         }
         return parent::after($response);
      }
   }
在这里,我们使用 before 和 after 方法,使用 Theme 类的方法对主题进行初始化。使用的一些方法包括 instance、get_template、set_template 和 view。
步骤 8 − 最后,在 fuel/app/themes/tpthemes/themesample 中添加索引操作的视图 index.php,如下所示。
<p>The data comes from *fuel/app/themes/tpthemes/themesample/index.html* file.</p>
<p>
   <?php echo $message; ?>
</p>
这里我们定义了一个变量,message,需要在控制器中动态设置。
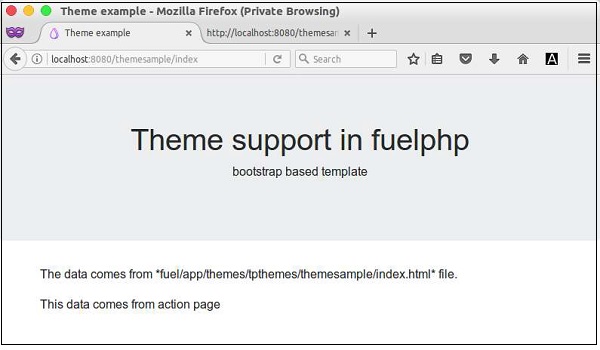
我们创建了一个新的主题,tpthemes,并在ThemeSample控制器中使用它。现在让我们通过请求 URL http://localhost:8080/themesample/index 来检查结果。结果如下。