
GWT - Composite 小部件
简介
Composite 复合小部件是一种可以包装另一个小部件的小部件,隐藏被包装的小部件的方法。当添加到面板时,复合小部件的行为与它包装的小部件被添加时的行为完全相同。复合类可用于从单个面板中包含的多个其他小部件的集合中创建单个小部件。
类声明
以下是 com.google.gwt.user.client.ui.Composite 类的声明 −
public abstract class Composite
    extends Widget
类构造函数
| Sr.No. | 构造函数 &描述 |
|---|---|
| 1 |
Composite() |
类方法
| Sr.No. | 函数名称 &描述 |
|---|---|
| 1 |
protected Widget getWidget() 提供子类对定义此组合的最顶层小部件的访问。 |
| 2 |
protected void initWidget(Widget widget) 将小部件设置为由组合包装。 |
| 3 |
boolean isAttached() 确定此小部件当前是否附加到浏览器的文档(即,此小部件与底层浏览器之间存在一条完整的小部件链文档)。 |
| 4 |
protected void onAttach() 当小部件附加到浏览器文档时,将调用此方法。 |
| 5 |
void onBrowserEvent(Event event) 每当收到浏览器事件时触发。 |
| 6 |
protected void onDetach() 当小部件从浏览器文档分离时,将调用此方法。 |
| 7 |
protected void setWidget(Widget widget) 已弃用。改用 initWidget(Widget) |
继承的方法
该类继承了以下类的方法 −
com.google.gwt.user.client.ui.UIObject
com.google.gwt.user.client.ui.Widget
java.lang.Object
复合小部件示例
此示例将带您通过简单的步骤展示 GWT 中复合小部件的用法。按照以下步骤更新我们在 GWT - 创建应用程序 一章中创建的 GWT 应用程序 −
| 步骤 | 描述 |
|---|---|
| 1 | 在 com.tutorialspoint 包下创建一个名为 HelloWorld 的项目,如 GWT - 创建应用程序 一章中所述。 |
| 2 | 修改 HelloWorld.gwt.xml、HelloWorld.css、HelloWorld.html 和 HelloWorld.java,如下所述。其余文件保持不变。 |
| 3 | 编译并运行应用程序以验证实现逻辑的结果。 |
以下是修改后的模块描述符src/com.tutorialspoint/HelloWorld.gwt.xml的内容。
<?xml version = "1.0" encoding = "UTF-8"?>
<module rename-to = 'helloworld'>
   <!-- Inherit the core Web Toolkit stuff.                        -->
   <inherits name = 'com.google.gwt.user.User'/>

   <!-- Inherit the default GWT style sheet.                       -->
   <inherits name = 'com.google.gwt.user.theme.clean.Clean'/>

   <!-- Specify the app entry point class.                         -->
   <entry-point class = 'com.tutorialspoint.client.HelloWorld'/>

   <!-- Specify the paths for translatable code                    -->
   <source path = 'client'/>
   <source path = 'shared'/>

</module>
以下是修改后的样式表文件war/HelloWorld.css的内容。
body {
   text-align: center;
   font-family: verdana, sans-serif;
}

h1 {
   font-size: 2em;
   font-weight: bold;
   color: #777777;
   margin: 40px 0px 70px;
   text-align: center;
}
以下是修改后的 HTML 主机文件 war/HelloWorld.html 的内容。
<html>
   <head>
      <title>Hello World</title>
      <link rel = "stylesheet" href = "HelloWorld.css"/>
      <script language = "javascript" src = "helloworld/helloworld.nocache.js">
      </script>
   </head>

   <body>
      <h1>Composite Widget Demonstration</h1>
      <div id = "gwtContainer"></div>
   </body>
</html>
让我们来看看 Java 文件 src/com.tutorialspoint/HelloWorld.java 的以下内容,它将演示如何使用 Composite 小部件。
package com.tutorialspoint.client;

import com.google.gwt.core.client.EntryPoint;
import com.google.gwt.event.dom.client.ClickEvent;
import com.google.gwt.event.dom.client.ClickHandler;
import com.google.gwt.user.client.ui.CheckBox;
import com.google.gwt.user.client.ui.Composite;
import com.google.gwt.user.client.ui.DecoratorPanel;
import com.google.gwt.user.client.ui.RootPanel;
import com.google.gwt.user.client.ui.TextBox;
import com.google.gwt.user.client.ui.VerticalPanel;

public class HelloWorld implements EntryPoint {

   /**
   * A composite of a TextBox and a CheckBox that optionally enables it.
   */
   private static class OptionalTextBox extends Composite implements
   ClickHandler {

      private TextBox textBox = new TextBox();
      private CheckBox checkBox = new CheckBox();

      /**
      * Constructs an OptionalTextBox with the given caption
      * on the check.
      * @param caption the caption to be displayed with the check box
      */
      public OptionalTextBox(String caption) {
         // 使用垂直面板将复选框放置在文本框上方。
         VerticalPanel panel = new VerticalPanel();
         // panel.setBorderWidth(1);
         panel.setSpacing(10);
         panel.add(checkBox);
         panel.add(textBox);

         textBox.setWidth("200");
         // 设置复选框的标题,并默认选中。
         checkBox.setText(caption);
         checkBox.setValue(true);
         checkBox.addClickHandler(this);

         DecoratorPanel decoratorPanel = new DecoratorPanel();

         decoratorPanel.add(panel);
         // 所有复合体都必须在其构造函数中调用 initWidget()。
         initWidget(decoratorPanel);
      }

      public void onClick(ClickEvent event) {
         if (event.getSource() == checkBox) {
            // When the check box is clicked,
            //update the text box's enabled state.
            textBox.setEnabled(checkBox.getValue());
         }
      }
   }

   public void onModuleLoad() {
      // 创建一个可选文本框并将其添加到根面板。
      OptionalTextBox otb = new OptionalTextBox("Check this to enable me");
      RootPanel.get().add(otb);
   }
}
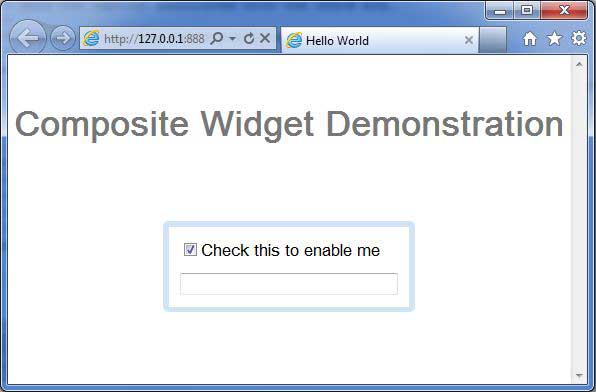
完成所有更改后,让我们像在 GWT - 创建应用程序 一章中一样,在开发模式下编译并运行应用程序。如果您的应用程序一切正常,这将产生以下结果 −
 gwt_layout_panels.html
