GWT - 国际化
GWT 提供了三种方式来国际化 GWT 应用程序,我们将演示项目中最常用的静态字符串国际化。
| Sr.No. | 技术和说明 |
|---|---|
| 1 |
静态字符串国际化 这种技术最为普遍,运行时所需的开销非常小;是一种非常有效的翻译常量和参数化字符串的技术;最容易实现。 静态字符串国际化使用标准 Java 属性文件来存储翻译的字符串和参数化消息,并创建强类型 Java 接口来检索它们的值。 |
| 2 |
动态字符串国际化 这种技术非常灵活,但比静态字符串国际化慢。主机页面包含本地化字符串,因此,当我们添加新的语言环境时,不需要重新编译应用程序。如果要将 GWT 应用程序与现有的服务器端本地化系统集成,则应使用此技术。 |
| 3 |
可本地化接口 此技术是三种技术中最强大的。实现 Localizable 允许我们创建自定义类型的本地化版本。这是一种高级国际化技术。 |
国际化 GWT 应用程序的工作流程
步骤 1 - 创建属性文件
创建包含要在应用程序中使用的消息的属性文件。我们在示例中创建了一个 HelloWorldMessages.properties 文件。
enterName = 输入您的姓名
clickMe = 点击我
applicationTitle = 应用程序国际化演示
greeting = 你好 {0}
创建包含特定于语言环境的翻译值的属性文件。我们在示例中创建了一个 HelloWorldMessages_de.properties 文件。此文件包含德语翻译。_de 指定德语语言环境,我们将在我们的应用程序中支持德语。
如果您使用 Eclipse 创建属性文件,则将文件的编码更改为 UTF-8。选择该文件,然后右键单击以打开其属性窗口。选择文本文件编码为 其他 UTF-8。应用并保存更改。
输入名称 = Geben Sie Ihren Namen
clickMe = 点击米奇
applicationTitle = Anwendung Internationalisierung Demonstration
问候语 = 你好{0}
第 2 步 - 将 i18n 模块添加到模块描述符 XML 文件
更新模块文件HelloWorld.gwt.xml以包含对德语区域设置的支持
<?xml version = "1.0" encoding = "UTF-8"?>
<module rename-to = 'helloworld'>
...
<extend-property name = "locale" values="de" />
...
</module>
步骤 3 - 创建与属性文件等效的接口
通过扩展 GWT 的 Messages 接口来创建 HelloWorldMessages.java 接口,以包含对内部化的支持。它应包含与属性文件中的键相同的方法名称。占位符将被字符串参数替换。
public interface HelloWorldMessages extends Messages {
@DefaultMessage("Enter your name")
String enterName();
@DefaultMessage("Click Me")
String clickMe();
@DefaultMessage("Application Internalization Demonstration")
String applicationTitle();
@DefaultMessage("Hello {0}")
String greeting(String name);
}
步骤 4 - 在 UI 组件中使用消息接口。
使用 HelloWorld 中的 HelloWorldMessages 对象获取消息。
public class HelloWorld implements EntryPoint {
/* create an object of HelloWorldMessages interface
using GWT.create() method */
private HelloWorldMessages messages =
GWT.create(HelloWorldMessages.class);
public void onModuleLoad() {
...
Label titleLabel = new Label(messages.applicationTitle());
//Add title to the application
RootPanel.get("gwtAppTitle").add(titleLabel);
...
}
}
国际化 - 完整示例
此示例将带您完成一些简单的步骤,以演示 GWT 应用程序的国际化功能。
按照以下步骤更新我们在 GWT - 创建应用程序 一章中创建的 GWT 应用程序 −
步骤
描述
1
在 com.tutorialspoint 包下创建一个名为 HelloWorld 的项目,如 GWT - 创建应用程序 一章中所述。
2
修改HelloWorld.gwt.xml、HelloWorld.css、HelloWorld.html 和 HelloWorld.java 如下所述。其余文件保持不变。
3
编译并运行应用程序以验证实施逻辑的结果。
以下是修改后的模块描述符 src/com.tutorialspoint/HelloWorld.gwt.xml 的内容。
<?xml version = "1.0" encoding = "UTF-8"?>
<module rename-to = 'helloworld'>
<!-- Inherit the core Web Toolkit stuff. -->
<inherits name = 'com.google.gwt.user.User'/>
<!-- Inherit the default GWT style sheet. -->
<inherits name = 'com.google.gwt.user.theme.clean.Clean'/>
<!-- Specify the app entry point class. -->
<entry-point class = 'com.tutorialspoint.client.HelloWorld'/>
<extend-property name = "locale" values="de" />
<!-- Specify the paths for translatable code -->
<source path = 'client'/>
<source path = 'shared'/>
</module>
以下是修改后的样式表文件war/HelloWorld.css的内容。
body {
text-align: center;
font-family: verdana, sans-serif;
}
h1 {
font-size: 2em;
font-weight: bold;
color: #777777;
margin: 40px 0px 70px;
text-align: center;
}
以下是修改后的 HTML 主机文件 war/HelloWorld.html 的内容。
<html>
<head>
<title>Hello World</title>
<link rel = "stylesheet" href = "HelloWorld.css"/>
<script language = "javascript" src = "helloworld/helloworld.nocache.js">
</script>
</head>
<body>
<h1 id = "gwtAppTitle"></h1>
<div id = "gwtContainer"></div>
</body>
</html>
现在在 src/com.tutorialspoint/client 包中创建 HelloWorldMessages.properties 文件,并将以下内容放入其中
enterName = Enter your name
clickMe = Click Me
applicationTitle = Application Internationalization Demonstration
greeting = Hello {0}
现在在 src/com.tutorialspoint/client 包中创建 HelloWorldMessages_de.properties 文件,并将以下内容放入其中
enterName = Geben Sie Ihren Namen
clickMe = Klick mich
applicationTitle = Anwendung Internationalisierung Demonstration
greeting = Hallo {0}
现在在 src/com.tutorialspoint/client 包中创建 HelloWorldMessages.java 类,并将以下内容放入其中
package com.tutorialspoint.client;
import com.google.gwt.i18n.client.Messages;
public interface HelloWorldMessages extends Messages {
@DefaultMessage("Enter your name")
String enterName();
@DefaultMessage("Click Me")
String clickMe();
@DefaultMessage("Application Internationalization Demonstration")
String applicationTitle();
@DefaultMessage("Hello {0}")
String greeting(String name);
}
让我们获得 Java 文件 src/com.tutorialspoint/HelloWorld.java 的以下内容,我们将使用它来演示 GWT 代码的国际化功能。
package com.tutorialspoint.client;
import com.google.gwt.core.client.EntryPoint;
import com.google.gwt.core.client.GWT;
import com.google.gwt.event.dom.client.ClickEvent;
import com.google.gwt.event.dom.client.ClickHandler;
import com.google.gwt.event.dom.client.KeyCodes;
import com.google.gwt.event.dom.client.KeyUpEvent;
import com.google.gwt.event.dom.client.KeyUpHandler;
import com.google.gwt.user.client.Window;
import com.google.gwt.user.client.ui.Button;
import com.google.gwt.user.client.ui.DecoratorPanel;
import com.google.gwt.user.client.ui.HasHorizontalAlignment;
import com.google.gwt.user.client.ui.HorizontalPanel;
import com.google.gwt.user.client.ui.Label;
import com.google.gwt.user.client.ui.RootPanel;
import com.google.gwt.user.client.ui.TextBox;
import com.google.gwt.user.client.ui.VerticalPanel;
public class HelloWorld implements EntryPoint {
/* create an object of HelloWorldMessages interface
using GWT.create() method */
private HelloWorldMessages messages =
GWT.create(HelloWorldMessages.class);
public void onModuleLoad() {
/*create UI */
final TextBox txtName = new TextBox();
txtName.setWidth("200");
txtName.addKeyUpHandler(new KeyUpHandler() {
@Override
public void onKeyUp(KeyUpEvent event) {
if(event.getNativeKeyCode() == KeyCodes.KEY_ENTER){
Window.alert(getGreeting(txtName.getValue()));
}
}
});
Label lblName = new Label(messages.enterName() + ": ");
Button buttonMessage = new Button(messages.clickMe() + "!");
buttonMessage.addClickHandler(new ClickHandler() {
@Override
public void onClick(ClickEvent event) {
Window.alert(getGreeting(txtName.getValue()));
}
});
HorizontalPanel hPanel = new HorizontalPanel();
hPanel.add(lblName);
hPanel.add(txtName);
VerticalPanel vPanel = new VerticalPanel();
vPanel.setSpacing(10);
vPanel.add(hPanel);
vPanel.add(buttonMessage);
vPanel.setCellHorizontalAlignment(buttonMessage,
HasHorizontalAlignment.ALIGN_RIGHT);
DecoratorPanel panel = new DecoratorPanel();
panel.add(vPanel);
Label titleLabel = new Label(messages.applicationTitle());
//Add title to the application
RootPanel.get("gwtAppTitle").add(titleLabel);
// 将小部件添加到根面板。
RootPanel.get("gwtContainer").add(panel);
}
public String getGreeting(String name){
return messages.greeting(name + "!");
}
}
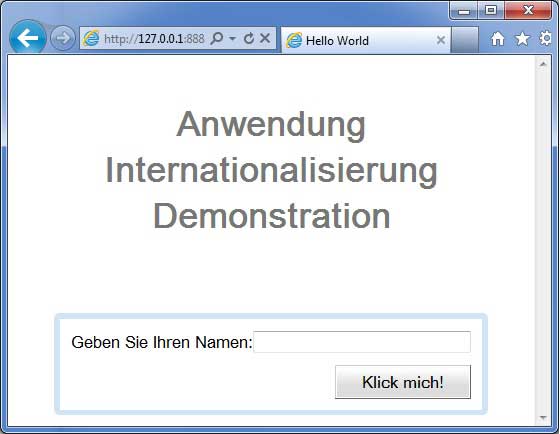
完成所有更改后,让我们像在 GWT - 创建应用程序 一章中一样,在开发模式下编译并运行应用程序。如果您的应用程序一切正常,则将产生以下结果 −
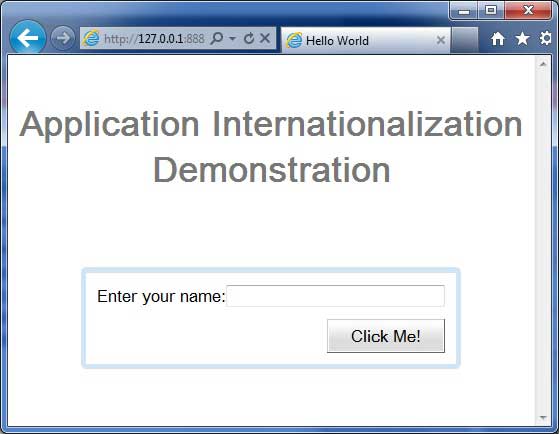
现在更新 URL 以包含 locale=de。设置 URL − http://127.0.0.1:8888/HelloWorld.html?gwt.codesvr=127.0.0.1:9997&locale=de。如果您的应用程序一切正常,这将产生以下结果 −