
GWT - DialogBox 小部件
简介
DialogBox 小部件表示一种弹出窗口形式,其顶部有一个标题区域,用户可以拖动它。与 PopupPanel 不同,即使尚未添加小部件,对 PopupPanel.setWidth(String) 和 PopupPanel.setHeight(String) 的调用也会设置对话框本身的宽度和高度。
类声明
以下是 com.google.gwt.user.client.ui.DialogBox 类的声明 −
public class DialogBox
   extends DecoratedPopupPanel
      implements HasHTML, HasSafeHtml, MouseListener
类构造函数
| Sr.No. | 构造函数 &描述 |
|---|---|
| 1 |
DialogBox() 创建一个空对话框。 |
| 2 |
DialogBox(boolean autoHide) 创建一个空对话框,指定其 auto-hide 属性。 |
| 3 |
DialogBox(boolean autoHide, boolean modal) 创建一个空对话框,指定其 auto-hide 和 modal属性。 |
类方法
| Sr.No. | 函数名称 &描述 |
|---|---|
| 1 |
protected void beginDragging(MouseDownEvent event) 鼠标在标题区域按下时调用,通过打开事件捕获开始拖动循环。 |
| 2 |
protected void continueDragging(MouseMoveEvent event) 鼠标在标题区域移动时调用,如果由 beginDragging(com.google.gwt.event .dom.client.MouseDownEvent) 启动,则继续拖动。 |
| 3 |
protected void doAttachChildren() 如果小部件包含一个或多个不在逻辑小部件层次结构中的子小部件(子小部件仅在 DOM 级别上物理连接),则必须重写此方法并为其每个子小部件调用 Widget.on Attach()。 |
| 4 |
protected void doDetachChildren() 如果小部件包含一个或多个不在逻辑小部件层次结构中的子小部件(子小部件仅在 DOM 级别上物理连接),则必须重写此方法并为其每个子小部件调用 Widget.onDetach()。 |
| 5 |
protected void endDragging(MouseUpEvent event) 鼠标在标题区域上移开时调用,通过结束事件捕获来结束拖动。 |
| 6 |
DialogBox.Caption getCaption() 提供对对话框标题的访问。 |
| 7 |
java.lang.String getHTML() 以 HTML 格式获取此对象的内容。 |
| 8 |
java.lang.String getText() 获取此对象的文本。 |
| 9 |
void hide() 隐藏弹出窗口并将其与页面分离。 |
| 10 |
void onBrowserEvent(Event event) 每当收到浏览器事件时触发。 |
| 11 |
protected void onEnsureDebugId(java.lang.String baseID) 受影响的元素:-caption = DialogBox 顶部的文本。-content = 内容周围的容器。 |
| 12 |
void on Mouse Down(Widget sender, int x, int y) 已弃用。改用开始拖动 (com.google.gwt.event.dom. client.Mouse Down 事件) 并获取 Caption() |
| 13 |
void on Mouse Enter(Widget sender) 已弃用。改用 Has Mouse Over Handlers。添加 Mouse Over Handler (com.google.gwt.event.dom. client.Mouse Over Handler) |
| 14 |
void onMouseLeave(Widget sender) 已弃用。改用 Has Mouse Out Handlers.add Mouse Out Handler (com.google.gwt.event.dom. client.Mouse Out Handler) |
| 15 |
void onMouseMove(Widget sender, int x, int y) 已弃用。改用 continueDragging(com.google.gwt.event.dom. client.MouseMoveEvent) 和 getCaption() |
| 16 |
void onMouseUp(Widget sender, int x, int y) 已弃用。改用 endDragging(com.google.gwt.event.dom. client.MouseUpEvent) 和 getCaption() |
| 17 |
protected void onPreviewNativeEvent(Event.NativePreviewEvent event) |
| 18 |
void setHTML(SafeHtml html) 设置标题内的 html 字符串。 |
| 19 |
void setHTML(java.lang.String html) 设置标题内的 html 字符串标题。 |
| 20 |
void setText(java.lang.String text) 设置标题内的文本。 |
| 21 |
void show() 显示弹出窗口并将其附加到页面。 |
继承的方法
该类继承了以下类的方法 −
com.google.gwt.user.client.ui.UIObject
com.google.gwt.user.client.ui.Widget
com.google.gwt.user.client.ui.Panel
com.google.gwt.user.client.ui.SimplePanel
com.google.gwt.user.client.ui.PopupPanel
com.google.gwt.user.client.ui.DecoratedPopupPanel
java.lang.Object
DialogBox Widget 示例
此示例将带您通过简单的步骤展示 GWT 中 DialogBox Widget 的使用方法。按照以下步骤更新我们在 GWT - 创建应用程序 一章中创建的 GWT 应用程序 −
| 步骤 | 描述 |
|---|---|
| 1 | 在 com.tutorialspoint 包下创建一个名为 HelloWorld 的项目,如 GWT - 创建应用程序 一章中所述。 |
| 2 | 修改 HelloWorld.gwt.xml、HelloWorld.css、HelloWorld.html 和 HelloWorld.java,如下所述。其余文件保持不变。 |
| 3 | 编译并运行应用程序以验证实现逻辑的结果。 |
以下是修改后的模块描述符src/com.tutorialspoint/HelloWorld.gwt.xml的内容。
<?xml version = "1.0" encoding = "UTF-8"?>
<module rename-to = 'helloworld'>
   <!-- Inherit the core Web Toolkit stuff.                        -->
   <inherits name = 'com.google.gwt.user.User'/>

   <!-- Inherit the default GWT style sheet.                       -->
   <inherits name = 'com.google.gwt.user.theme.clean.Clean'/>

   <!-- Specify the app entry point class.                         -->
   <entry-point class = 'com.tutorialspoint.client.HelloWorld'/>

   <!-- Specify the paths for translatable code                    -->
   <source path = 'client'/>
   <source path = 'shared'/>

</module>
以下是修改后的样式表文件war/HelloWorld.css的内容。
body {
   text-align: center;
   font-family: verdana, sans-serif;
}

h1 {
   font-size: 2em;
   font-weight: bold;
   color: #777777;
   margin: 40px 0px 70px;
   text-align: center;
}

.gwt-DialogBox .Caption {
   background: #e3e8f3 url(images/hborder.png) repeat-x 0px -2003px;
   padding: 4px 4px 4px 8px;
   cursor: default;
   border-bottom: 1px solid #bbbbbb;
   border-top: 5px solid #d0e4f6;
}

.gwt-DialogBox .dialogContent {
}

.gwt-DialogBox .dialogMiddleCenter {
   padding: 3px;
   background: white;
}

.gwt-DialogBox .dialogBottomCenter {
   background: url(images/hborder.png) repeat-x 0px -4px;
   -background: url(images/hborder_ie6.png) repeat-x 0px -4px;
}

.gwt-DialogBox .dialogMiddleLeft {
   background: url(images/vborder.png) repeat-y;
}

.gwt-DialogBox .dialogMiddleRight {
   background: url(images/vborder.png) repeat-y -4px 0px;
   -background: url(images/vborder_ie6.png) repeat-y -4px 0px;
}

.gwt-DialogBox .dialogTopLeftInner {
   width: 5px;
   zoom: 1;
}

.gwt-DialogBox .dialogTopRightInner {
   width: 8px;
   zoom: 1;
}

.gwt-DialogBox .dialogBottomLeftInner {
   width: 5px;
   height: 8px;
   zoom: 1;
}

.gwt-DialogBox .dialogBottomRightInner {
   width: 5px;
   height: 8px;
   zoom: 1;
}

.gwt-DialogBox .dialogTopLeft {
   background: url(images/corner.png) no-repeat -13px 0px;
   -background: url(images/corner_ie6.png) no-repeat -13px 0px;
}

.gwt-DialogBox .dialogTopRight {
   background: url(images/corner.png) no-repeat -18px 0px;
   -background: url(images/corner_ie6.png) no-repeat -18px 0px;
}

.gwt-DialogBox .dialogBottomLeft {
   background: url(images/corner.png) no-repeat 0px -15px;
   -background: url(images/corner_ie6.png) no-repeat 0px -15px;
}

.gwt-DialogBox .dialogBottomRight {
   background: url(images/corner.png) no-repeat -5px -15px;
   -background: url(images/corner_ie6.png) no-repeat -5px -15px;
}

html>body .gwt-DialogBox {
}

* html .gwt-DialogBox .dialogTopLeftInner {
   width: 5px;
   overflow: hidden;
}

* html .gwt-DialogBox .dialogTopRightInner {
   width: 8px;
   overflow: hidden;
}

* html .gwt-DialogBox .dialogBottomLeftInner {
   width: 5px;
   height: 8px;
   overflow: hidden;
}

* html .gwt-DialogBox .dialogBottomRightInner {
   width: 8px;
   height: 8px;
   overflow: hidden;
}
以下是修改后的 HTML 主机文件 war/HelloWorld.html 的内容。
<html>
   <head>
      <title>Hello World</title>
      <link rel = "stylesheet" href = "HelloWorld.css"/>
      <script language = "javascript" src = "helloworld/helloworld.nocache.js">
      </script>
   </head>

   <body>
      <h1>DialogBox Widget Demonstration</h1>
      <div id = "gwtContainer"></div>
   </body>
</html>
让我们来看看 Java 文件 src/com.tutorialspoint/HelloWorld.java 的以下内容,它将演示如何使用 DialogBox 小部件。
package com.tutorialspoint.client;

import com.google.gwt.core.client.EntryPoint;
import com.google.gwt.event.dom.client.ClickEvent;
import com.google.gwt.event.dom.client.ClickHandler;
import com.google.gwt.user.client.Window;
import com.google.gwt.user.client.ui.Button;
import com.google.gwt.user.client.ui.DialogBox;
import com.google.gwt.user.client.ui.HasHorizontalAlignment;
import com.google.gwt.user.client.ui.Label;
import com.google.gwt.user.client.ui.RootPanel;
import com.google.gwt.user.client.ui.VerticalPanel;

public class HelloWorld implements EntryPoint {

   private static class MyDialog extends DialogBox {

      public MyDialog() {
        // 设置对话框的标题。
        setText("My First Dialog");

        // 启用动画。
        setAnimationEnabled(true);

        // 启用玻璃背景。
        setGlassEnabled(true);

        // DialogBox 是一个 SimplePanel,因此您必须将其小部件
        // 属性设置为您希望其内容的任何内容。
         Button ok = new Button("OK");
         ok.addClickHandler(new ClickHandler() {
            public void onClick(ClickEvent event) {
               MyDialog.this.hide();
            }
         });

         Label label = new Label("This is a simple dialog box.");

         VerticalPanel panel = new VerticalPanel();
         panel.setHeight("100");
         panel.setWidth("300");
         panel.setSpacing(10);
         panel.setHorizontalAlignment(HasHorizontalAlignment.ALIGN_CENTER);
         panel.add(label);
         panel.add(ok);

         setWidget(panel);
      }
   }

   public void onModuleLoad() {
      Button b = new Button("Click me");
      b.addClickHandler(new ClickHandler() {
         @Override
         public void onClick(ClickEvent event) {
            // Instantiate the dialog box and show it.
            MyDialog myDialog = new MyDialog();

            int left = Window.getClientWidth()/ 2;
            int top = Window.getClientHeight()/ 2;
            myDialog.setPopupPosition(left, top);
            myDialog.show();
         }
      });

      RootPanel.get().add(b);
   }
}
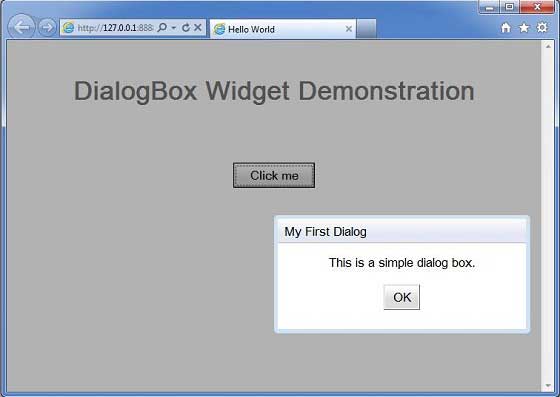
完成所有更改后,让我们像在 GWT - 创建应用程序 一章中一样,在开发模式下编译并运行应用程序。如果您的应用程序一切正常,这将产生以下结果 −
 gwt_layout_panels.html
