
GWT - FlexTable 小部件
简介
FlexTable 小部件表示一个灵活的表格,可根据需要创建单元格。它可以是锯齿状的(即每行可以包含不同数量的单元格),并且可以将单个单元格设置为跨越多行或多列。
类声明
以下是 com.google.gwt.user.client.ui.FlowPanel 类的声明 −
public class FlexTable
   extends HTMLTable
类构造函数
| Sr.No. | 构造函数和说明 |
|---|---|
| 1 |
FlexTable() 空 Flex Table 的构造函数。 |
类方法
| Sr.No. | 函数名称和说明描述 |
|---|---|
| 1 |
void addCell(int row) 将单元格附加到指定行。 |
| 2 |
int getCellCount(int row) 获取给定行上的单元格数量。 |
| 3 |
FlexTable.FlexCellFormatter getFlexCellFormatter() 显式获取 FlexTable.FlexCellFormatter。 |
| 4 |
int getRowCount() 获取行数。 |
| 5 |
void insertCell(int beforeRow, int beforeColumn) 将单元格插入 FlexTable。 |
| 6 |
int insertRow(int beforeRow) 将行插入 FlexTable。 |
| 7 |
protected void prepareCell(int row, int column) 确保单元格存在。 |
| 8 |
protected void prepareRow(int row) 确保行存在。 |
| 9 |
void removeAllRows() 删除此表中的所有行。 |
| 10 |
void removeCell(int row, int col) 从表中删除指定的单元格。 |
| 11 |
void removeCells(int row, int column, int num) 从表中的一行中删除多个单元格。 |
| 12 |
void removeRow(int row) 从表中删除指定的行。 |
继承的方法
该类继承了以下类的方法 −
com.google.gwt.user.client.ui.UIObject
com.google.gwt.user.client.ui.Widget
com.google.gwt.user.client.ui.Panel
com.google.gwt.user.client.ui.HTMLTable
java.lang.Object
FlexTable Widget 示例
此示例将带您通过简单的步骤展示 GWT 中 FlexTable Widget 的使用方法。按照以下步骤更新我们在 GWT - 创建应用程序 一章中创建的 GWT 应用程序 −
| 步骤 | 描述 |
|---|---|
| 1 | 在 com.tutorialspoint 包下创建一个名为 HelloWorld 的项目,如 GWT - 创建应用程序 一章中所述。 |
| 2 | 修改 HelloWorld.gwt.xml、HelloWorld.css、HelloWorld.html 和 HelloWorld.java,如下所述。其余文件保持不变。 |
| 3 | 编译并运行应用程序以验证实现逻辑的结果。 |
以下是修改后的模块描述符src/com.tutorialspoint/HelloWorld.gwt.xml的内容。
<?xml version = "1.0" encoding = "UTF-8"?>
<module rename-to = 'helloworld'>
   <!-- Inherit the core Web Toolkit stuff.                        -->
   <inherits name = 'com.google.gwt.user.User'/>

   <!-- Inherit the default GWT style sheet.                       -->
   <inherits name = 'com.google.gwt.user.theme.clean.Clean'/>

   <!-- Specify the app entry point class.                         -->
   <entry-point class = 'com.tutorialspoint.client.HelloWorld'/>

   <!-- Specify the paths for translatable code                    -->
   <source path = 'client'/>
   <source path = 'shared'/>

</module>
以下是修改后的样式表文件war/HelloWorld.css的内容。
body {
   text-align: center;
   font-family: verdana, sans-serif;
}

h1 {
   font-size: 2em;
   font-weight: bold;
   color: #777777;
   margin: 40px 0px 70px;
   text-align: center;
}
.flexTable td {
   border: 1px solid #BBBBBB;
   padding: 3px;
}

.flexTable-buttonPanel td {
   border: 0px;
}

.fixedWidthButton {
   width: 150px;
}
以下是修改后的 HTML 主机文件 war/HelloWorld.html 的内容。
<html>
   <head>
      <title>Hello World</title>
      <link rel = "stylesheet" href = "HelloWorld.css"/>
      <script language = "javascript" src = "helloworld/helloworld.nocache.js">
      </script>
   </head>

   <body>
      <h1>FlexTable Widget Demonstration</h1>
      <div id = "gwtContainer"></div>
   </body>
</html>
让我们来看看 Java 文件 src/com.tutorialspoint/HelloWorld.java 的以下内容,它将演示如何使用 FlexTable 小部件。
package com.tutorialspoint.client;

import com.google.gwt.core.client.EntryPoint;
import com.google.gwt.event.dom.client.ClickEvent;
import com.google.gwt.event.dom.client.ClickHandler;
import com.google.gwt.user.client.ui.Button;
import com.google.gwt.user.client.ui.DecoratorPanel;
import com.google.gwt.user.client.ui.FlexTable;
import com.google.gwt.user.client.ui.FlexTable.FlexCellFormatter;
import com.google.gwt.user.client.ui.HasHorizontalAlignment;
import com.google.gwt.user.client.ui.HasVerticalAlignment;
import com.google.gwt.user.client.ui.Image;
import com.google.gwt.user.client.ui.RootPanel;
import com.google.gwt.user.client.ui.VerticalPanel;

public class HelloWorld implements EntryPoint {

   public void onModuleLoad() {
      // Create a Flex Table
      final FlexTable flexTable = new FlexTable();
      FlexCellFormatter cellFormatter = flexTable.getFlexCellFormatter();
      flexTable.addStyleName("flexTable");
      flexTable.setWidth("32em");
      flexTable.setCellSpacing(5);
      flexTable.setCellPadding(3);

      // Add some text
      cellFormatter.setHorizontalAlignment(
      0, 1, HasHorizontalAlignment.ALIGN_LEFT);
      flexTable.setHTML(0, 0, "This is a FlexTable that supports"
         +" <b>colspans</b> and <b>rowspans</b>."
         +" You can use it to format your page"
         +" or as a special purpose table.");
      cellFormatter.setColSpan(0, 0, 2);

      // 添加一个按钮,向表中添加更多行
      Button addRowButton = new Button("Add a Row");
      addRowButton.addClickHandler(new ClickHandler() {
         @Override
         public void onClick(ClickEvent event) {
            addRow(flexTable);
         }
      });

      addRowButton.addStyleName("fixedWidthButton");

      // 添加一个按钮,向表中添加更多行
      Button removeRowButton = new Button("Remove a Row");
      removeRowButton.addClickHandler(new ClickHandler() {
         @Override
         public void onClick(ClickEvent event) {
            removeRow(flexTable);
         }
      });

      removeRowButton.addStyleName("fixedWidthButton");

      VerticalPanel buttonPanel = new VerticalPanel();
      buttonPanel.setStyleName("flexTable-buttonPanel");
      buttonPanel.add(addRowButton);
      buttonPanel.add(removeRowButton);
      flexTable.setWidget(0, 1, buttonPanel);
      cellFormatter.setVerticalAlignment(0, 1,
      HasVerticalAlignment.ALIGN_TOP);

      // Add two rows to start
      addRow(flexTable);
      addRow(flexTable);

      // 将小部件添加到根面板。
      RootPanel.get().add(flexTable);
   }

   /**
    * Add a row to the flex table.
    */
   private void addRow(FlexTable flexTable) {
      int numRows = flexTable.getRowCount();
      flexTable.setWidget(numRows, 0,
      new Image("http://www.tutorialspoint.com/images/gwt-mini.png"));
      flexTable.setWidget(numRows, 1,
      new Image("http://www.tutorialspoint.com/images/gwt-mini.png"));
      flexTable.getFlexCellFormatter().setRowSpan(0, 1, numRows + 1);
   }

   /**
    * Remove a row from the flex table.
    */
   private void removeRow(FlexTable flexTable) {
      int numRows = flexTable.getRowCount();
      if (numRows > 1) {
         flexTable.removeRow(numRows - 1);
         flexTable.getFlexCellFormatter().setRowSpan(0, 1, numRows - 1);
      }
   }
}
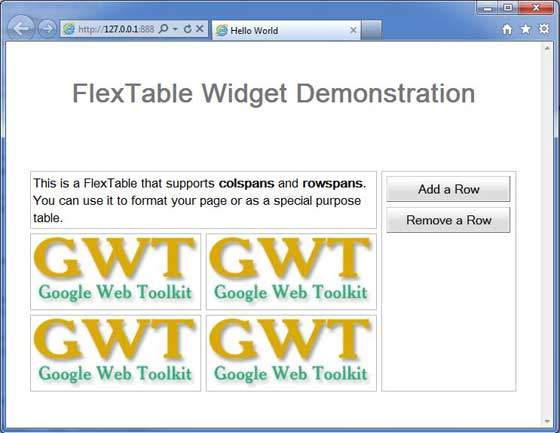
完成所有更改后,让我们像在 GWT - 创建应用程序 一章中一样,在开发模式下编译并运行应用程序。如果您的应用程序一切正常,这将产生以下结果 −
 gwt_layout_panels.html
