
GWT - MenuBar 小部件
简介
MenuBar 小部件表示标准菜单栏小部件。菜单栏可以包含任意数量的菜单项,每个菜单项都可以触发命令或打开级联菜单栏。
类声明
以下是 com.google.gwt.user.client.ui.MenuBar 类的声明 −
public class MenuBar
   extends Widget
      implements PopupListener, HasAnimation,
	     HasCloseHandlers<PopupPanel>
CSS 样式规则
以下默认 CSS 样式规则将应用于所有 MenuBar 小部件。您可以根据需要覆盖它。
.gwt-MenuBar {}

.gwt-MenuBar-horizontal {}

.gwt-MenuBar-vertical{}

.gwt-MenuBar .gwt-MenuItem {}

.gwt-MenuBar .gwt-MenuItem-selected {}

.gwt-MenuBar .gwt-MenuItemSeparator {}

.gwt-MenuBar .gwt-MenuItemSeparator .menuSeparatorInner {}

.gwt-MenuBarPopup .menuPopupTopLeft {}

.gwt-MenuBarPopup .menuPopupTopLeftInner {}

.gwt-MenuBarPopup .menuPopupTopCenter {}

.gwt-MenuBarPopup .menuPopupTopCenterInner {}

.gwt-MenuBarPopup .menuPopupTopRight {}

.gwt-MenuBarPopup .menuPopupTopRightInner {}

.gwt-MenuBarPopup .menuPopupMiddleLeft {}

.gwt-MenuBarPopup .menuPopupMiddleLeftInner {}

.gwt-MenuBarPopup .menuPopupMiddleCenter {}

.gwt-MenuBarPopup .menuPopupMiddleCenterInner {}

.gwt-MenuBarPopup .menuPopupMiddleRight {}

.gwt-MenuBarPopup .menuPopupMiddleRightInner {}

.gwt-MenuBarPopup .menuPopupBottomLeft {}

.gwt-MenuBarPopup .menuPopupBottomLeftInner {}

.gwt-MenuBarPopup .menuPopupBottomCenter {}

.gwt-MenuBarPopup .menuPopupBottomCenterInner {}

.gwt-MenuBarPopup .menuPopupBottomRight {}

.gwt-MenuBarPopup .menuPopupBottomRightInner {}
类构造函数
| Sr.No. | 构造函数 &描述 |
|---|---|
| 1 |
MenuBar() 创建一个空的水平菜单栏。 |
| 2 |
MenuBar(boolean vertical) 创建一个空的菜单栏。 |
| 3 |
MenuBar(boolean vertical, MenuBar.MenuBarImages images) 已弃用。由 MenuBar(boolean, Resources) 替换 |
| 4 |
MenuBar(boolean vertical, MenuBar.Resources resources) 创建一个使用指定 ClientBundle 作为菜单图像的空菜单栏。 |
| 5 |
MenuBar(MenuBar.MenuBarImages images) 已弃用。由 MenuBar(Resources) 替换 |
| 6 |
MenuBar(MenuBar.Resources resources) 创建一个空的水平菜单栏,使用指定的 ClientBundle 作为菜单图像。 |
类方法
| Sr.No. | 函数名称 &描述 |
|---|---|
| 1 |
HandlerRegistration addCloseHandler(CloseHandler<PopupPanel> handler) 添加 CloseEvent 处理程序。 |
| 2 |
MenuItem addItem(MenuItem item) 向栏中添加菜单项。 |
| 3 |
MenuItem addItem(SafeHtml html, Command cmd) 向包含 SafeHtml 的栏中添加菜单项,当菜单项被添加时,将触发给定的命令选定。 |
| 4 |
MenuItem addItem(SafeHtml html, MenuBar popup) 向菜单栏添加菜单项,选中后将打开指定菜单。 |
| 5 |
MenuItem addItem(java.lang.String text, boolean asHTML, Command cmd) 向菜单栏添加菜单项,选中后将触发给定命令。 |
| 6 |
MenuItem addItem(java.lang.String text, boolean asHTML, MenuBar popup) 向菜单栏添加一个菜单项,选择该菜单项时将打开指定的菜单。 |
| 7 |
MenuItem addItem(java.lang.String text, Command cmd) 向菜单栏添加一个菜单项,选择该菜单项时将触发给定的命令。 |
| 8 |
MenuItem addItem(java.lang.String text, MenuBar popup) 向菜单栏添加一个菜单项,选择该菜单项时将打开指定的菜单。 |
| 9 |
MenuItemSeparator addSeparator() 向 MenuBar 添加一条细线以分隔 MenuItem 的各个部分。 |
| 10 |
MenuItemSeparator addSeparator(MenuItemSeparator Separator) 向 MenuBar 添加一条细线以分隔 MenuItem 的各个部分。 |
| 11 |
void clearItems() 从此菜单栏中删除所有菜单项。 |
| 12 |
void closeAllChildren(boolean focus) 关闭此菜单和所有子菜单弹出窗口。 |
| 13 |
void focus() 将焦点放在此 MenuBar 上。 |
| 14 |
boolean getAutoOpen() 获取当鼠标移到此菜单栏上时,其子菜单是否会打开。 |
| 15 |
int getItemIndex(MenuItem item) 获取菜单项的索引。 |
| 16 |
protected java.util.List 返回包含菜单栏中菜单项对象的列表。 |
| 17 |
protected MenuItem getSelectedItem() 返回用户当前选择(突出显示)的菜单项。 |
| 18 |
int getSeparatorIndex(MenuItemSeparator item) 获取菜单项的索引。 MenuItemSeparator。 |
| 19 |
MenuItem insertItem(MenuItem item, int beforeIndex) 在特定索引处将菜单项添加到栏中。 |
| 20 |
MenuItemSeparator insertSeparator(int beforeIndex) 在 MenuBar 中添加一条细线,以分隔指定索引处的 MenuItem 部分。 |
| 21 |
MenuItemSeparator insertSeparator(MenuItemSeparator Separator, int beforeIndex) 在 MenuBar 中添加一条细线,以分隔指定索引处的 MenuItem 部分。 |
| 22 |
boolean isAnimationEnabled() 如果启用了动画,则返回 true,否则返回 false。 |
| 23 |
boolean isFocusOnHoverEnabled() 检查此小部件在鼠标悬停在其上时是否会窃取键盘焦点。 |
| 24 |
void moveSelectionDown() 将菜单选择向下移动到下一个项目。 |
| 25 |
void moveSelectionUp() 将菜单选择向上移动到上一个项目。 |
| 26 |
void onBrowserEvent(Event event) 每当收到浏览器事件时触发。 |
| 27 |
protected void onDetach() 当小部件与浏览器分离时,将调用此方法文档。 |
| 28 |
protected void onEnsureDebugId(java.lang.String baseID) 受影响的元素:-item# = 指定索引处的 MenuItem。 |
| 29 |
void onPopupClosed(PopupPanel sender, boolean autoClosed) 已弃用。改用 addCloseHandler(CloseHandler) |
| 30 |
void removeItem(MenuItem item) 从菜单栏中移除指定的菜单项。 |
| 31 |
void removeSeparator(MenuItemSeparator Separator) 从菜单栏中移除指定的 MenuItemSeparator。 |
| 32 |
void selectItem(MenuItem item) 选择给定的 MenuItem,该菜单项必须是此菜单项的直接子项菜单栏。 |
| 33 |
void setAnimationEnabled(boolean enable) 启用或禁用动画。 |
| 34 |
void setAutoOpen(boolean autoOpen) 设置当鼠标移到菜单栏上时,菜单栏的子菜单是否打开。 |
| 35 |
void setFocusOnHoverEnabled(boolean enabled) 当鼠标悬停在菜单栏上时,启用或禁用自动对焦。 |
继承的方法
该类继承了以下类的方法 −
com.google.gwt.user.client.ui.UIObject
com.google.gwt.user.client.ui.Widget
java.lang.Object
MenuBar 小部件示例
此示例将带您通过简单的步骤展示 GWT 中 MenuBar 小部件的用法。按照以下步骤更新我们在 GWT - 创建应用程序 一章中创建的 GWT 应用程序 −
| 步骤 | 描述 |
|---|---|
| 1 | 在 com.tutorialspoint 包下创建一个名为 HelloWorld 的项目,如 GWT - 创建应用程序 一章中所述。 |
| 2 | 修改 HelloWorld.gwt.xml、HelloWorld.css、HelloWorld.html 和 HelloWorld.java,如下所述。其余文件保持不变。 |
| 3 | 编译并运行应用程序以验证实现逻辑的结果。 |
以下是修改后的模块描述符src/com.tutorialspoint/HelloWorld.gwt.xml的内容。
<?xml version = "1.0" encoding = "UTF-8"?>
<module rename-to = 'helloworld'>
   <!-- Inherit the core Web Toolkit stuff.                        -->
   <inherits name = 'com.google.gwt.user.User'/>

   <!-- Inherit the default GWT style sheet.                       -->
   <inherits name = 'com.google.gwt.user.theme.clean.Clean'/>

   <!-- Specify the app entry point class.                         -->
   <entry-point class = 'com.tutorialspoint.client.HelloWorld'/>

   <!-- Specify the paths for translatable code                    -->
   <source path = 'client'/>
   <source path = 'shared'/>

</module>
以下是修改后的样式表文件war/HelloWorld.css的内容。
body {
   text-align: center;
   font-family: verdana, sans-serif;
}

h1 {
   font-size: 2em;
   font-weight: bold;
   color: #777777;
   margin: 40px 0px 70px;
   text-align: center;
}

.gwt-MenuBar {
   cursor: default;
}

.gwt-MenuBar .gwt-MenuItem {
   cursor: default;
   font-family: Arial Unicode MS, Arial, sans-serif;
   font-size: 12px;
}

.gwt-MenuBar .gwt-MenuItem-selected {
   background: #E3E8F3;
}

.gwt-MenuBar-horizontal {
   background: #e3e8f3 url(images/hborder.png) repeat-x 0px -2003px;
   border: 1px solid #e0e0e0;
}

.gwt-MenuBar-horizontal .gwt-MenuItem {
   padding: 5px 10px;
   vertical-align: bottom;
   color: #000;
   font-weight: bold;
}

.gwt-MenuBar-horizontal .gwt-MenuItemSeparator {
   width: 1px;
   padding: 0px;
   margin: 0px;
   border: 0px;
   border-left: 1px solid #ccc;
   background: white;
}

.gwt-MenuBar-horizontal .gwt-MenuItemSeparator .menuSeparatorInner {
   width: 1px;
   height: 1px;
   background: white;
}

.gwt-MenuBar-vertical {
   margin-top: 0px;
   margin-left: 0px;
   background: white;
}

.gwt-MenuBar-vertical table {
   border-collapse: collapse;
}

.gwt-MenuBar-vertical .gwt-MenuItem {
   padding: 2px 40px 2px 1px;
}

.gwt-MenuBar-vertical .gwt-MenuItemSeparator {
   padding: 2px 0px;
}

.gwt-MenuBar-vertical .gwt-MenuItemSeparator .menuSeparatorInner {
   height: 1px;
   padding: 0px;
   border: 0px;
   border-top: 1px solid #ccc;
   overflow: hidden;
}

.gwt-MenuBar-vertical .subMenuIcon {
   padding-right: 4px;
}

.gwt-MenuBar-vertical .subMenuIcon-selected {
   background: #E3E8F3;
}

.gwt-MenuBarPopup {
   margin: 0px 0px 0px 3px;
}

.gwt-MenuBarPopup .menuPopupTopLeftInner {
   width: 5px;
   height: 5px;
   zoom: 1;
}

.gwt-MenuBarPopup .menuPopupTopRightInner {
   width: 8px;
   height: 5px;
   zoom: 1;
}

.gwt-MenuBarPopup .menuPopupBottomLeftInner {
   width: 5px;
   height: 8px;
   zoom: 1;
}

.gwt-MenuBarPopup .menuPopupBottomRightInner {
   width: 8px;
   height: 8px;
   zoom: 1;
}

.gwt-MenuBarPopup .menuPopupTopLeft {
   background: url(images/corner.png) no-repeat 0px -36px;
   -background: url(images/corner_ie6.png) no-repeat 0px -36px;
}

.gwt-MenuBarPopup .menuPopupTopRight {
   background: url(images/corner.png) no-repeat -5px -36px;
   -background: url(images/corner_ie6.png) no-repeat -5px -36px;
}

.gwt-MenuBarPopup .menuPopupBottomLeft {
   background: url(images/corner.png) no-repeat 0px -41px;
   -background: url(images/corner_ie6.png) no-repeat 0px -41px;
}

.gwt-MenuBarPopup .menuPopupBottomRight {
   background: url(images/corner.png) no-repeat -5px -41px;
   -background: url(images/corner_ie6.png) no-repeat -5px -41px;
}

html > body .gwt-MenuBarPopup {
}

* html .gwt-MenuBarPopup .menuPopupTopLeftInner {
   width: 5px;
   height: 5px;
   overflow: hidden;
}

* html .gwt-MenuBarPopup .menuPopupTopRightInner {
   width: 8px;
   height: 5px;
   overflow: hidden;
}

* html .gwt-MenuBarPopup .menuPopupBottomLeftInner {
   width: 5px;
   height: 8px;
   overflow: hidden;
}

* html .gwt-MenuBarPopup .menuPopupBottomRightInner {
   width: 8px;
   height: 8px;
   overflow: hidden;
}
以下是修改后的 HTML 主机文件 war/HelloWorld.html 的内容。
<html>
   <head>
      <title>Hello World</title>
      <link rel = "stylesheet" href = "HelloWorld.css"/>
      <script language = "javascript" src = "helloworld/helloworld.nocache.js">
      </script>
   </head>

   <body>
      <h1>MenuBar Widget Demonstration</h1>
      <div id = "gwtContainer"></div>
   </body>
</html>
让我们来看看 Java 文件 src/com.tutorialspoint/HelloWorld.java 的以下内容,它将演示如何使用 MenuBar 小部件。
package com.tutorialspoint.client;

import com.google.gwt.core.client.EntryPoint;
import com.google.gwt.user.client.Command;
import com.google.gwt.user.client.Window;
import com.google.gwt.user.client.ui.MenuBar;
import com.google.gwt.user.client.ui.MenuItem;
import com.google.gwt.user.client.ui.RootPanel;

public class HelloWorld implements EntryPoint {

   private void showSelectedMenuItem(String menuItemName){
      Window.alert("Menu item: "+menuItemName+" selected");
   }

   public void onModuleLoad() {

    // 创建菜单栏
    MenuBar menu = new MenuBar();
    menu.setAutoOpen(true);
    menu.setWidth("100px");
    menu.setAnimationEnabled(true);

    // 创建文件菜单
    MenuBar fileMenu = new MenuBar(true);
    fileMenu.setAnimationEnabled(true);

    fileMenu.addItem("New", new Command() {
         @Override
         public void execute() {
            showSelectedMenuItem("New");
         }
      });

      fileMenu.addItem("Open", new Command() {
         @Override
         public void execute() {
            showSelectedMenuItem("Open");
         }
      });

      fileMenu.addSeparator();
      fileMenu.addItem("Exit", new Command() {
         @Override
         public void execute() {
            showSelectedMenuItem("Exit");
         }
      });

      // 创建编辑菜单
      MenuBar editMenu = new MenuBar(true);
      editMenu.setAnimationEnabled(true);

      editMenu.addItem("Undo", new Command() {
         @Override
         public void execute() {
            showSelectedMenuItem("Undo");
         }
      });

      editMenu.addItem("Redo", new Command() {
         @Override
         public void execute() {
            showSelectedMenuItem("Redo");
         }
      });

      editMenu.addItem("Cut", new Command() {
         @Override
         public void execute() {
            showSelectedMenuItem("Cut");
         }
      });

      editMenu.addItem("Copy", new Command() {
         @Override
         public void execute() {
            showSelectedMenuItem("Copy");
         }
      });

      editMenu.addItem("Paste", new Command() {
      @Override
         public void execute() {
            showSelectedMenuItem("Paste");
         }
      });

      menu.addItem(new MenuItem("File", fileMenu));
      menu.addSeparator();
      menu.addItem(new MenuItem("Edit", editMenu));

      //将菜单添加到根面板
      RootPanel.get("gwtContainer").add(menu);
   }
}
完成所有更改后,让我们像在 GWT - 创建应用程序 一章中一样,在开发模式下编译并运行应用程序。如果您的应用程序一切正常,将产生以下结果 −
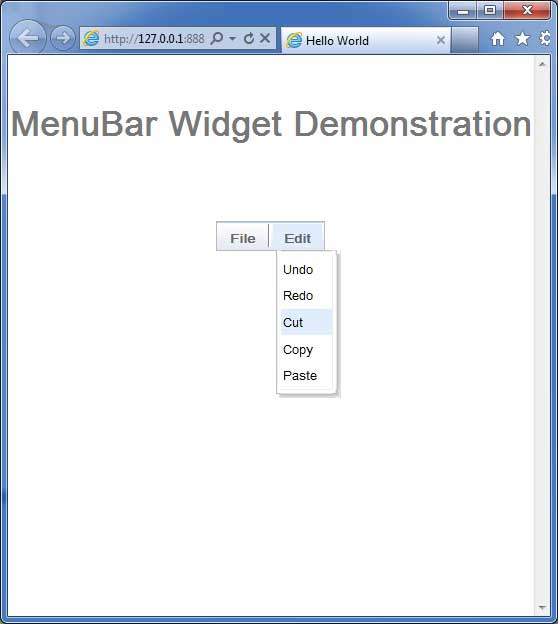
选择菜单栏中的任何值,都会弹出一条显示所选值的警告消息。
 gwt_complex_widgets.html
