
Android 中的 Padding 概念
Android 中的 Padding 是什么?
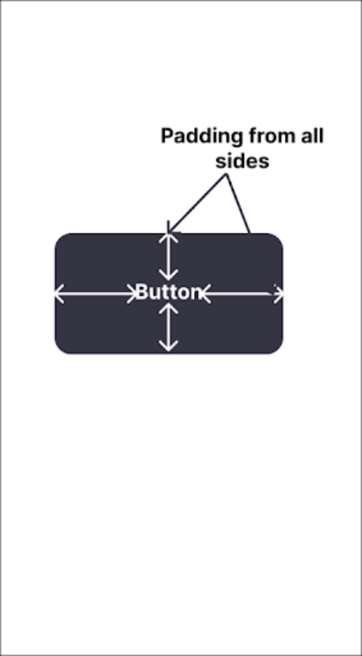
Padding 是我们需要显示的内容与其边框之间的空间。Padding 用于在内容中创建额外的空间。
我们可以从任意特定的边为小部件添加 Padding。我们可以根据需要从左、右、上或下添加内边距。
在本文中,我们将了解如何在 Android 应用程序中为不同的小部件使用内边距属性。
语法
android:padding="Size in dp"
说明− 上述内边距语法用于指定视图所有侧面的内边距。
android:paddingStart="Size in dp"

android:paddingLeft="Size in dp"
说明− 上述内边距语法用于指定从左侧开始的内边距。我们可以使用 paddingStart 或 paddingLeft 为视图添加从左侧开始的内边距。
android:paddingEnd="Size in dp"

android:paddingRight="Size in dp"
说明 − 上述 padding 语法用于指定从右侧开始的内边距。我们可以使用 paddingEnd 或 paddingRight 从右侧为视图添加内边距。
android:paddingTop="Size in dp"
说明 − 上述 padding 语法用于指定从视图顶部开始的内边距。
android:paddingBottom="Size in dp"
说明 − 上述 padding 语法用于指定从视图底部开始的内边距。
示例
我们将创建一个简单的应用程序,其中我们将简单地显示一个按钮,并逐一为其添加所有侧面的内边距并进行测试。
步骤 1:在 Android Studio 中创建新项目
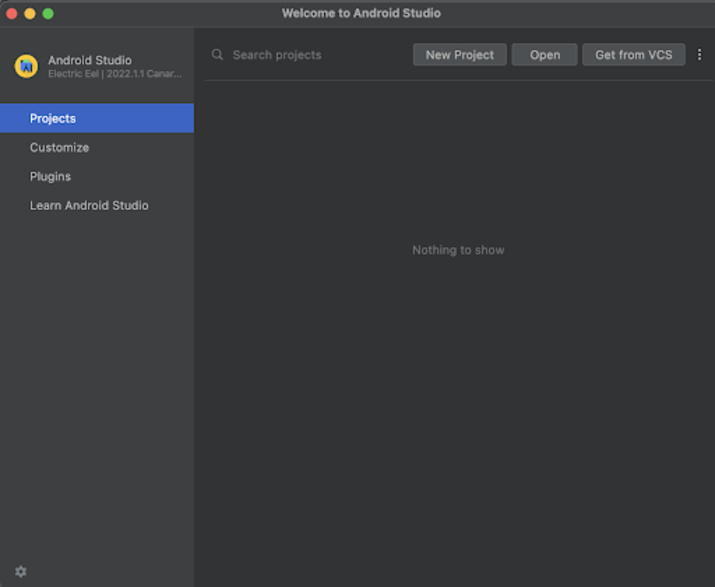
按照以下屏幕所示导航到 Android Studio。在下面的屏幕中,点击"新建项目"以创建一个新的 Android Studio 项目。
点击"新建项目"后,您将看到以下屏幕。
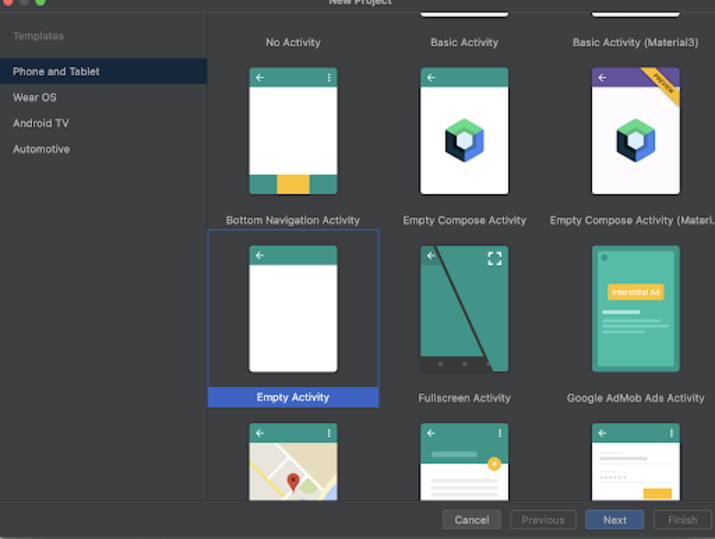
在此屏幕中,我们只需选择"空活动"并点击"下一步"。点击"下一步"后,您将看到以下屏幕。
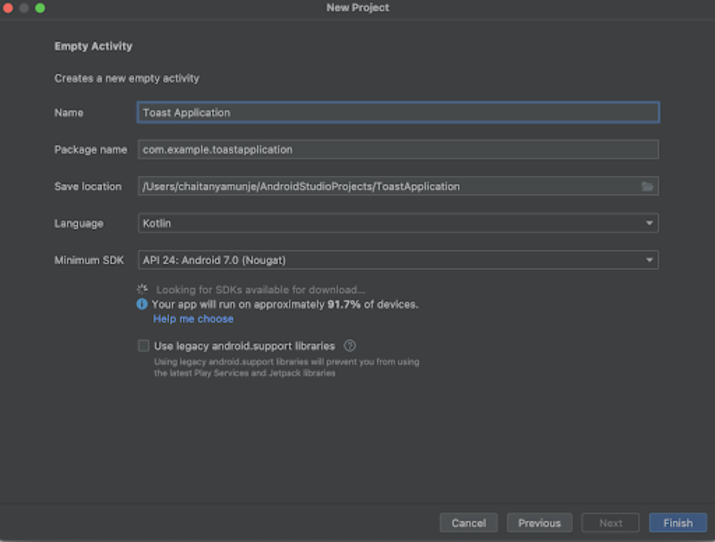
在此屏幕中,我们只需指定项目名称即可。然后,软件包名称将自动生成。
注意- 确保选择"语言"为 Kotlin。
指定所有详细信息后,点击"完成"即可创建一个新的 Android Studio 项目。
项目创建完成后,我们将看到两个打开的文件,即 activity_main.xml 和 MainActivity.kt 文件。
步骤 2:使用 activity_main.xml
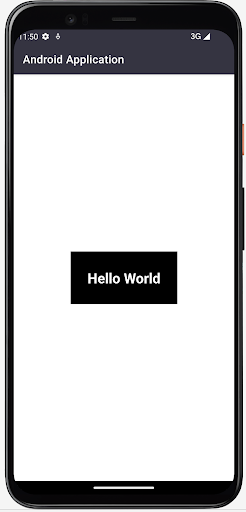
示例 1:全方位填充
Android 中的填充概念
 <?xml version="1.0" encoding="utf-8"?>
<RelativeLayout xmlns:android="http://schemas.android.com/apk/res/android"
   xmlns:app="http://schemas.android.com/apk/res-auto"
   xmlns:tools="http://schemas.android.com/tools"
   android:layout_width="match_parent"
   android:layout_height="match_parent"
   tools:context=".MainActivity">

   <!-- creating a simple text view -->
   <TextView
      android:id="@+id/idBtn"
      android:layout_width="wrap_content"
      android:layout_height="wrap_content"
      android:layout_centerInParent="true"
      android:layout_margin="20dp"
      android:background="#FF000000"
      android:padding="30dp"
      android:text="Hello World"
      android:textColor="#FFFFFFFF"
      android:textSize="25sp"
      android:textStyle="bold" />

</RelativeLayout>
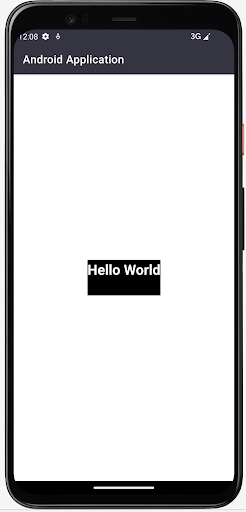
说明− 在上述代码中,根元素是 Android 中的相对布局。此布局是一个视图组,用于将其中的所有元素彼此对齐。我们可以借助 id 或位置来相对对齐相对布局中的所有元素。
在这个相对布局中,我们创建了一个 Textview。我们为这个文本视图指定了背景颜色,然后从各个方向为其文本添加内边距。
示例 2:从左侧填充
Working with activity_main.xml file.
 <?xml version="1.0" encoding="utf-8"?>
<RelativeLayout xmlns:android="http://schemas.android.com/apk/res/android"
   xmlns:app="http://schemas.android.com/apk/res-auto"
   xmlns:tools="http://schemas.android.com/tools"
   android:layout_width="match_parent"
   android:layout_height="match_parent"
   tools:context=".MainActivity">

   <!-- creating a simple text view -->
   <TextView
      android:id="@+id/idBtn"
      android:layout_width="wrap_content"
      android:layout_height="wrap_content"
      android:layout_centerInParent="true"
      android:layout_margin="20dp"
      android:background="#FF000000"
      android:paddingLeft="30dp"
      android:text="Hello World"
      android:textColor="#FFFFFFFF"
      android:textSize="25sp"
      android:textStyle="bold" />

</RelativeLayout>
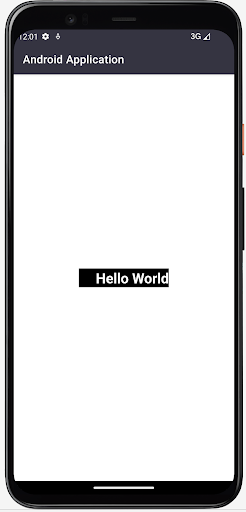
说明− 在上述代码中,根元素是 Android 中的相对布局。此布局是一个视图组,用于将其中的所有元素彼此对齐。我们可以借助 id 或位置来相对对齐相对布局中的所有元素。
在这个相对布局中,我们创建了一个 Textview。我们为这个文本视图指定了背景颜色,然后从左侧为其文本添加了内边距。
示例 3:从右侧填充
使用 activity_main.xml 文件。
语法
 <?xml version="1.0" encoding="utf-8"?>
<RelativeLayout xmlns:android="http://schemas.android.com/apk/res/android"
   xmlns:app="http://schemas.android.com/apk/res-auto"
   xmlns:tools="http://schemas.android.com/tools"
   android:layout_width="match_parent"
   android:layout_height="match_parent"
   tools:context=".MainActivity">

   <!-- creating a simple text view -->
   <TextView
      android:id="@+id/idBtn"
      android:layout_width="wrap_content"
      android:layout_height="wrap_content"
      android:layout_centerInParent="true"
      android:layout_margin="20dp"
      android:background="#FF000000"
      android:paddingRight="30dp"
      android:text="Hello World"
      android:textColor="#FFFFFFFF"
      android:textSize="25sp"
      android:textStyle="bold" />

</RelativeLayout>
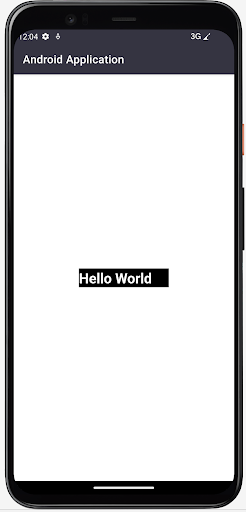
说明− 在上述代码中,根元素是 Android 中的相对布局。此布局是一个视图组,用于将其中的所有元素彼此对齐。我们可以借助 id 或位置来相对对齐相对布局中的所有元素。
在这个相对布局中,我们创建了一个 Textview。我们为这个文本视图指定了背景颜色,然后从右侧为其文本添加了内边距。
示例 4:从顶部添加内边距
使用 activity_main.xml 文件。
语法
 <?xml version="1.0" encoding="utf-8"?>
<RelativeLayout xmlns:android="http://schemas.android.com/apk/res/android"
   xmlns:app="http://schemas.android.com/apk/res-auto"
   xmlns:tools="http://schemas.android.com/tools"
   android:layout_width="match_parent"
   android:layout_height="match_parent"
   tools:context=".MainActivity">

   <!-- creating a simple text vixew -->
   <TextView
      android:id="@+id/idBtn"
      android:layout_width="wrap_content"
      android:layout_height="wrap_content"
      android:layout_centerInParent="true"
      android:layout_margin="20dp"
      android:background="#FF000000"
      android:paddingTop="30dp"
      android:text="Hello World"
      android:textColor="#FFFFFFFF"
      android:textSize="25sp"
      android:textStyle="bold" />

</RelativeLayout>
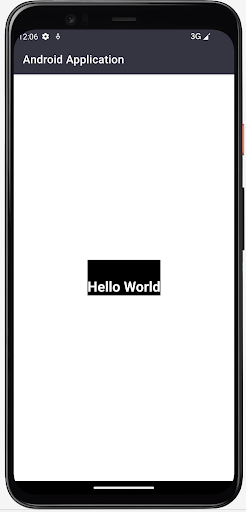
说明− 在上述代码中,根元素是 Android 中的相对布局。此布局是一个视图组,用于将其中的所有元素彼此对齐。我们可以借助 ID 或位置来相对对齐相对布局中的所有元素。
在这个相对布局中,我们创建了一个 Textview。我们为该文本视图指定了背景颜色,然后从顶部为其文本添加了内边距。
示例 5:从底部添加内边距
使用 activity_main.xml 文件。
语法
 <?xml version="1.0" encoding="utf-8"?>
<RelativeLayout xmlns:android="http://schemas.android.com/apk/res/android"
   xmlns:app="http://schemas.android.com/apk/res-auto"
   xmlns:tools="http://schemas.android.com/tools"
   android:layout_width="match_parent"
   android:layout_height="match_parent"
   tools:context=".MainActivity">

   <!-- creating a simple text vixew -->
   <TextView
      android:id="@+id/idBtn"
      android:layout_width="wrap_content"
      android:layout_height="wrap_content"
      android:layout_centerInParent="true"
      android:layout_margin="20dp"
      android:background="#FF000000"
      android:paddingBottom="30dp"
      android:text="Hello World"
      android:textColor="#FFFFFFFF"
      android:textSize="25sp"
      android:textStyle="bold" />

</RelativeLayout>
说明− 在上述代码中,根元素是 Android 中的相对布局。此布局是一个视图组,用于将其中的所有元素彼此对齐。我们可以借助 id 或位置来相对对齐相对布局中的所有元素。
在这个相对布局中,我们创建了一个 Textview。我们为这个文本视图指定了背景颜色,然后从底部为其文本添加了内边距 (padding)。
总结
在以上教程中,我们了解了 Android 中的内边距是什么,以及如何在应用程序中使用它来在小部件的内容和边框之间添加间距。

