
如何在 Ubuntu 16.04 上为 Nginx 生成和配置自签名 TSL/SSL 证书
在本文中,我们将学习如何在 Ubuntu 16.04 上为 Nginx 生成和配置自签名 SSL/TSL 证书。TSL 是传输层安全协议 (TSL) 的前身,用于保护加密数据包中的正常流量,确保从服务器到客户端的流量不会被外部入侵者拦截。该证书还将帮助用户验证其访问的网站身份是否正确。
如果我们没有与网站或服务器实例关联的正确域名,则可以使用自签名证书。
先决条件
完成此演示需要满足以下要求。
- 拥有机器 sudo 权限的非 root 用户。
- 已安装 Nginx Web 服务器。
在服务器上安装 OpenSSL 软件包
我们需要在服务器上安装 OpenSSL 软件包,以下是在 Ubuntu 16.04 上安装 SSL 的命令
$ sudo apt-get install openssl
输出:正在读取软件包列表... 完成
正在构建依赖项树
正在读取状态信息...完成
以下软件包已自动安装,现在不再需要:
libyaml-0-2 python-crypto python-ecdsa python-jinja2 python-markupsafe python-paramiko python-pkg-resources python-setuptools python-six python-yaml sshpass
使用"sudo apt autoremove"删除它们。
建议安装的软件包:
ca-certificates
将安装以下新软件包:
openssl
已升级 0 个软件包,新安装 1 个软件包,需要删除 0 个软件包,未升级 13 个软件包。
需要获取 491 kB 的压缩包。
此操作后,将占用 956 kB 的额外磁盘空间。
获取:1 http://in.archive.ubuntu.com/ubuntu xenial-updates/main amd64 openssl amd64 1.0.2g-1ubuntu4.1 [491 kB]
已获取 491 kB,耗时 1 秒(283 kB/秒)
正在选择之前未选择的软件包 openssl。
(正在读取数据库... 当前安装了 92688 个文件和目录。)
准备解压 .../openssl_1.0.2g-1ubuntu4.1_amd64.deb...
正在解压 openssl (1.0.2g-1ubuntu4.1)...
正在处理 man-db (2.7.5-1) 的触发器...
正在设置 openssl (1.0.2g-1ubuntu4.1)...
创建自签名 SSL 证书
SSL 将使用公钥和私钥的组合进行工作,其中 SSL 密钥将位于服务器上,用于加密发送给访问服务器的客户端的数据。SSL 将与请求内容的公共或客户端共享,并将用于解密与 SSL 密钥关联的数据。
以下是使用 OpenSSL 创建自签名证书和密钥对的命令。
$sudo openssl req -x509 -nodes -days 365 -newkeyrsa:2048 -keyout /etc/ssl/private/nginx-demosite.key -out /etc/ssl/certs/nginx-demosite.crt
Output:
Generating a 2048 bit RSA private key
...................
...................
..........+++ .....
...+++
writing new private key to '/etc/ssl/private/nginx-demosite.key'
----- You are about to be asked to enter information that will be incorporated into your certificate request.
What you are about to enter is what is called a Distinguished Name or a DN.
There are quite a few fields but you can leave some blank For some fields there will be a default value,
If you enter '.', the field will be left blank. -----
Country Name (2 letter code) [AU]:IN
State or Province Name (full name) [Some-State]:TELENGANA
Locality Name (eg, city) []:HYDERABAD
Organization Name (eg, company) [Internet Widgits Pty Ltd]:demosite.com
Organizational Unit Name (eg, section) []:demo
Common Name (e.g. server FQDN or YOUR name) []: demosite
Email Address []:admin@demosite.com
由于上述命令将生成带有证书的两个密钥文件,因此它会询问一些与我们将要生成的证书相关的信息。
以下是上述命令中使用的选项的说明 –
openssl - > This is a command line tool to create the certificates and keys.
-req - > X.509 is a public key infrastructure standard for the SSL the ‘req’ is the sub command which allows to specify the standards for the SSL, the –x509 specifies that we want to generate self-signed certificate instead of generating the certificate signed.
-nodes - > As we want to read the Nginx to read the certificate file with our any password or user interventions, if we don’t use this command the it will ask for a passphrase.
-days 35 -> This will set the validity of the certificate for one year.
-newkey rsa:2048 - > This option specifies that we will generate a new certificate and key with 2048 bit encryption.
-keyout -> This will tell the OpenSSL to place private key which is generated.
-out -> This will tell the OpenSSL to place the certificate file which is generated.
生成 SSL 密钥后,我们将使用 Diffie-Hellman 组来强化 SSL 证书。
以下是强化 SSL 证书的命令。
$sudo openssl dhparam -out /etc/ssl/certs/dhparam.pem 2048
Output: Generating DH parameters, 2048 bit long safe prime, generator 2
This is going to take a long time
.................................................+.+...............+.......................................................
........................+.......................................................................+..........................
......................+......................................... ..........................................................
...........................................................................................................................
.....................................................+..............+.......+..........+.................................+.
..................................................................................+.................................+.....+
......................+...............................+...................................................................................................................................................+............................................................................................................+.......................................................................................................+.....................+............................................................... ….
使用自签名 SSL 证书配置 Nginx
由于所有证书和密钥均已生成并保存在 /etc/ssl 目录中,因此我们需要修改 Nginx 配置文件才能使用这些生成的文件。
我们需要更改一些配置,这些配置需要在配置文件中进行调整。
包含 SSL 证书和密钥文件的 SSL 代码片段
$ sudo vi /etc/nginx/snippets/selfsigned.conf
输出: ssl_certificate /etc/ssl/certs/nginx-demosite.crt; ssl_certificate_key /etc/ssl/private/nginx-demosite.key;
代码片段包含强 SSL 设置,可在后续配置中与任何证书全局使用。
$ sudo vi /etc/nginx/snippets/ssl-params.conf
Output:
ssl_protocols TLSv1 TLSv1.1 TLSv1.2;
ssl_prefer_server_ciphers on;
ssl_ciphers "EECDH+AESGCM:EDH+AESGCM:AES256+EECDH:AES256+EDH";
ssl_ecdh_curve secp384r1;
ssl_session_cache shared:SSL:10m;
ssl_session_tickets off;
ssl_stapling on;
ssl_stapling_verify on;
resolver 8.8.8.8 8.8.4.4 valid=300s;
resolver_timeout 5s;
# Disable preloading HSTS for now. You can use the commented out header line that includes
# the "preload" directive if you understand the implications.
#add_header Strict-Transport-Security "max-age=63072000; includeSubdomains; preload";
add_header Strict-Transport-Security "max-age=63072000; includeSubdomains";
add_header X-Frame-Options DENY;
add_header X-Content-Type-Options nosniff;
ssl_dhparam /etc/ssl/certs/dhparam.pem;
调整 Nginx 服务器块以处理 SSL 请求。
所有代码片段均已准备就绪,我们现在将在 Nginx 配置文件中启用 SSL。
$ sudo vi /etc/nginx/sites-available/default-ssl
Output:server {
   listen 443 ssl http2 default_server;
   listen [::]:443 ssl http2 default_server;
   server_name IP addrres or demositename;
   include snippets/self-signed.conf;
   include snippets/ssl-params.conf;
   location / {
      # First attempt to serve request as file, then
      # as directory, then fall back to displaying a 404.
      try_files $uri $uri/ =404;
   }
}
在服务器上应用 Nginx 更改
由于我们已经更改了 Nginx 的配置并添加了代码片段,我们将测试 nginx 配置文件。
以下是检查 Nginx 语法错误的命令。
$ sudo nginx –t
Output:nginx: [warn] "ssl_stapling" ignored, issuer certificate not found
nginx: the configuration file /etc/nginx/nginx.conf syntax is ok
nginx: configuration file /etc/nginx/nginx.conf test is successful
所有 Nginx 配置似乎均正确无误,我们现在将重新启动 Nginx,以便将配置应用到服务器上。
$ sudo systemclt restart nginx.
配置防火墙以允许 SSL
以下是检查防火墙状态的命令
$ sudo ufw status
Output: Status: active
To Action From
-- ------ ----
Nginx HTTP ALLOW Anywhere
OpenSSH ALLOW Anywhere
Nginx HTTP (v6) ALLOW Anywhere (v6)
OpenSSH (v6) ALLOW Anywhere (v6)
首先,我们将列出防火墙中所有可用的配置文件。以下是列出应用程序配置文件的命令列表。
$ sudo ufw app list
输出:可用的应用程序:
Nginx Full
Nginx HTTP
Nginx HTTPS
OpenSSH
由于"Nginx Full"配置文件不被允许,我们将允许"Nginx Full"配置文件并从防火墙中删除"Nginx HTTP"配置文件,并在删除所有"Nginx Full"配置文件后检查防火墙的状态。
$ sudo ufw allow 'Nginx Full'
Rule added
Rule added (v6)

$ sudo ufw delete allow 'Nginx HTTP'
Rule deleted
Rule deleted (v6)

$ sudo ufw status
Output: Status: active
To Action From
-- ------ ----
OpenSSH ALLOW Anywhere
Nginx Full ALLOW Anywhere
OpenSSH (v6) ALLOW Anywhere (v6)
Nginx Full (v6) ALLOW Anywhere (v6)
测试 Nginx 加密配置
打开任意浏览器,尝试使用系统 IP 地址(https://IP 地址)访问服务器。
https://ip 地址或 DNS 名称
访问网站后,我们会看到一条警告消息,提示证书无效,因为该证书是自签名的。
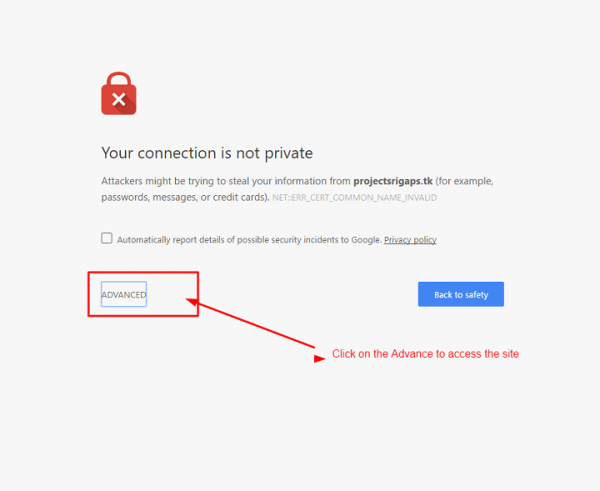
由于 SSL 证书未经数字签名,我们需要点击"高级"才能继续。
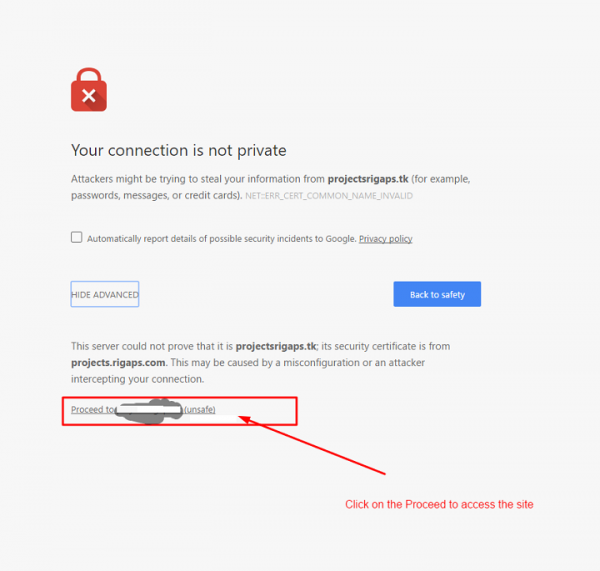
点击"继续(不安全)"即可访问网站。
完成此设置后,我们可以创建自己的自签名 SSL/TSL 证书,并配置 Nginx 使用 SSL 配置,同时我们还可以使用强加密技术确保客户端连接和处理请求的安全,从而防止入侵者访问数据。

