Flex - 自定义控件
Flex 提供两种创建自定义组件的方法。
- 使用 ActionScript
- 使用 MXML
使用 ActionScript
您可以通过扩展现有组件来创建组件。要使用 Flash Builder 创建组件,请单击 文件 > 新建 > ActionScript 类。
输入如下所示的详细信息 −
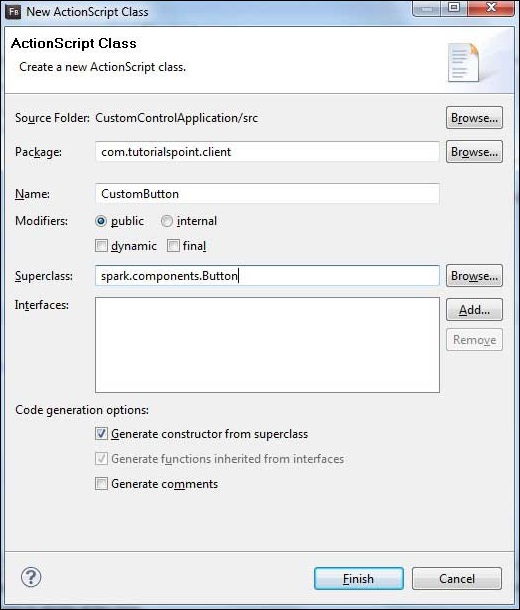
Flash Builder 将创建以下 CustomButton.as 文件。
package com.tutorialspoint.client {
   import spark.components.Button;

   public class CustomButton extends Button {
      public function CustomButton() {
         super();
      }
   }
}
使用 MXML
您可以通过扩展现有组件来创建组件。要使用 Flash Builder 创建组件,请单击文件 > 新建 > MXML 组件。
输入如下所示的详细信息。
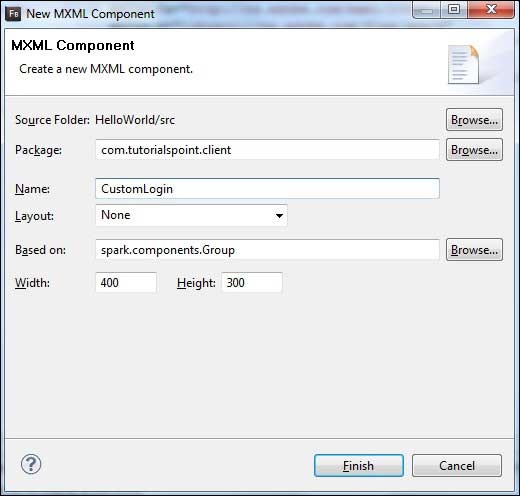
Flash Builder 将创建以下 CustomLogin.mxml 文件。
<?xml version = "1.0" encoding = "utf-8"?>
<s:Group xmlns:fx = "http://ns.adobe.com/mxml/2009"
   xmlns:s = "library://ns.adobe.com/flex/spark"
   xmlns:mx = "library://ns.adobe.com/flex/mx"
   width = "400" height = "300">
</s:Group>
让我们按照以下步骤在 Flex 应用程序中测试自定义控件 −
| 步骤 | 描述 |
|---|---|
| 1 | 在 com.tutorialspoint.client 包下创建一个名为 HelloWorld 的项目,如 Flex - 创建应用程序 一章中所述。 |
| 2 | 按照下面的说明修改 HelloWorld.mxml。保持其余文件不变。 |
| 3 | 按照上述说明创建 CustomLogin.mxml 和 CustomButton.as 组件。按照以下说明修改这些文件。保持其余文件不变。 |
| 4 | 编译并运行应用程序以确保业务逻辑按要求运行。 |
以下是修改后的 mxml 文件 src/com.tutorialspoint/client/CustomLogin.mxml 的内容。
<?xml version = "1.0" encoding = "utf-8"?>
<s:Group xmlns:fx = "http://ns.adobe.com/mxml/2009"
   xmlns:s = "library://ns.adobe.com/flex/spark"
   xmlns:mx = "library://ns.adobe.com/flex/mx" width = "400" height = "300">

   <s:Form>
      <s:FormItem label = "UserName:">
         <s:TextInput width = "200" />
      </s:FormItem>

      <s:FormItem label = "Password:">
         <s:TextInput width = "200" displayAsPassword = "true" />
      </s:FormItem>

      <s:FormItem>
         <s:Button label = "Login" />
      </s:FormItem>
   </s:Form>
</s:Group>
以下是修改后的 mxml 文件 src/com.tutorialspoint/client/CustomButton.as 的内容。
package com.tutorialspoint.client {
   import spark.components.Button;

   public class CustomButton extends Button {

      public function CustomButton() {
         super();
         this.setStyle("color","green");
         this.label = "Submit";
      }
   }
}
以下是修改后的 mxml 文件 src/com.tutorialspoint/client/HelloWorld.mxml 的内容。
<?xml version = "1.0" encoding = "utf-8"?>
<s:Application xmlns:fx = "http://ns.adobe.com/mxml/2009"
   xmlns:s = "library://ns.adobe.com/flex/spark"
   xmlns:mx = "library://ns.adobe.com/flex/mx"
   xmlns:client = "com.tutorialspoint.client.*"
   initialize = "application_initializeHandler(event)">

   <fx:Style source = "/com/tutorialspoint/client/Style.css" />
   <fx:Script>
      <![CDATA[
        import mx.events.FlexEvent;

        protected function application_initializeHandler(event:FlexEvent):void {
           //create a new custom button
           var customButton: CustomButton = new CustomButton();
           asPanel.addElement(customButton);
        }

      ]]>
   </fx:Script>

   <s:BorderContainer width = "630" height = "480" id = "mainContainer"
      styleName = "container">
      <s:VGroup width = "100%" height = "100%" gap = "10"
         horizontalAlign = "center" verticalAlign = "middle">
         <s:Label id = "lblHeader" text = "Custom Controls Demonstration"
            fontSize = "40" color = "0x777777" styleName = "heading" />

         <s:Panel title = "Using MXML Component" width = "400" height = "200">
            <client:CustomLogin>
            </client:CustomLogin>
         </s:Panel>

         <s:Panel  title = "Using AS Component" width = "400" height = "100">
            <s:VGroup id = "asPanel" width = "100%" height = "100%" gap = "10"
               horizontalAlign = "center" verticalAlign = "middle">
            </s:VGroup>
         </s:Panel>
      </s:VGroup>
   </s:BorderContainer>
</s:Application>
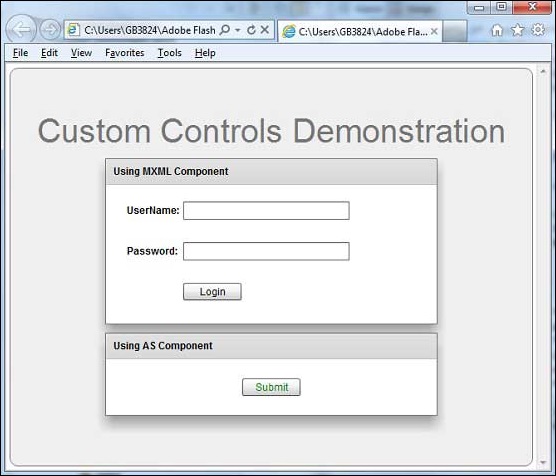
完成所有更改后,让我们像在 Flex - 创建应用程序 一章中一样,以正常模式编译并运行应用程序。如果您的应用程序一切正常,它将产生以下结果:[ 在线试用 ]