Flex - 数据绑定
什么是数据绑定?
数据绑定是将一个对象的数据绑定到另一个对象的过程。它需要一个源属性、一个目标属性和一个触发事件,该事件指示何时将数据从源复制到目标。
Flex 提供以下三种数据绑定方式
- MXML 脚本中的花括号语法 ({})
- <fx:binding> MXML 中的标签
- ActionScript 中的 BindingUtils
数据绑定 – 在 MXML 中使用花括号
以下示例演示了如何使用花括号指定源到目标的数据绑定。
<s:TextInput id = "txtInput1" />
<s:TextInput id = "txtInput2" text = "{txtInput1.text}" />
数据绑定 – 使用 <fx:Binding> MXML 中的标签
以下示例演示如何使用
<fx:Binding source = "txtInput1.text" destination = "txtInput2.text" />
<s:TextInput id = "txtInput1" />
<s:TextInput id = "txtInput2" />
数据绑定 – 在 ActionScript 中使用 BindingUtils
以下示例演示如何使用 BindingUtils 指定源与目标之间的数据绑定。
<fx:Script>
   <![CDATA[
      import mx.binding.utils.BindingUtils;
      import mx.events.FlexEvent;

      protected function txtInput2_preinitializeHandler(event:FlexEvent):void {
         BindingUtils.bindProperty(txtInput2,"text",txtInput1, "text");
      }
   ]]>
</fx:Script>

<s:TextInput id = "txtInput1" />
<s:TextInput id = "txtInput2"
   preinitialize = "txtInput2_preinitializeHandler(event)" />
Flex 数据绑定示例
让我们按照下面给出的步骤,通过创建一个测试应用程序来查看 Flex 应用程序中皮肤的实际效果 −
| 步骤 | 描述 |
|---|---|
| 1 | 在包com.tutorialspoint.client下创建一个名为 HelloWorld 的项目,如 Flex - 创建应用程序 一章中所述。 |
| 2 | 按照下面的说明修改 HelloWorld.mxml。保持其余文件不变。 |
| 3 | 编译并运行应用程序以确保业务逻辑按要求运行。 |
以下是修改后的 HelloWorld.mxml 文件src/com/tutorialspoint/client/HelloWorld.mxml的内容。
<?xml version = "1.0" encoding = "utf-8"?>
<s:Application xmlns:fx = "http://ns.adobe.com/mxml/2009"
xmlns:s = "library://ns.adobe.com/flex/spark"
xmlns:mx = "library://ns.adobe.com/flex/mx
width = "100%" height = "100%" minWidth = "500" minHeight = "500">
<fx:Style source = "/com/tutorialspoint/client/Style.css" />
<fx:Script>
<![CDATA[
import mx.binding.utils.BindingUtils;
import mx.events.FlexEvent;
protected function txtInput6_preinitializeHandler(event:FlexEvent):void {
BindingUtils.bindProperty(txtInput6,"text",txtInput5, "text");
}
]]>
</fx:Script>
<fx:Binding source = "txtInput3.text" destination = "txtInput4.text" />
<s:BorderContainer width = "500" height = "550" id = "mainContainer"
styleName = "container">
<s:VGroup width = "100%" height = "100%" gap = "50" horizontalAlign = "center"
verticalAlign = "middle">
<s:Label id = "lblHeader" text = "Data Binding Demonstration"
fontSize = "40" color = "0x777777" styleName = "heading" />
<s:Panel title = "Example #1 (Using Curly Braces,\{\})" width = "400"
height = "100" >
<s:layout>
<s:VerticalLayout paddingTop = "10" paddingLeft = "10" />
</s:layout>
<s:HGroup >
<s:Label text = "Type here: " width = "100" paddingTop = "6" />
<s:TextInput id = "txtInput1" />
</s:HGroup>
<s:HGroup >
<s:Label text = "Copied text: " width = "100" paddingTop = "6" />
<s:TextInput id = "txtInput2" text = "{txtInput1.text}" />
</s:HGroup>
</s:Panel>
<s:Panel title = "Example #2 (Using <fx:Binding>)" width = "400"
height = "100" >
<s:layout>
<s:VerticalLayout paddingTop = "10" paddingLeft = "10" />
</s:layout>
<s:HGroup >
<s:Label text = "Type here: " width = "100" paddingTop = "6" />
<s:TextInput id = "txtInput3" />
</s:HGroup>
<s:HGroup >
<s:Label text = "Copied text: " width = "100" paddingTop = "6" />
<s:Label id = "txtInput4" />
</s:HGroup>
</s:Panel>
<s:Panel title = "Example #3 (Using BindingUtils)" width = "400"
height = "100" >
<s:layout>
<s:VerticalLayout paddingTop = "10" paddingLeft = "10" />
</s:layout>
<s:HGroup >
<s:Label text = "Type here: " width = "100" paddingTop = "6" />
<s:TextInput id = "txtInput5" />
</s:HGroup>
<s:HGroup >
<s:Label text = "Copied text: " width = "100" paddingTop = "6" />
<s:TextInput enabled = "false" id = "txtInput6"
preinitialize = "txtInput6_preinitializeHandler(event)" />
</s:HGroup>
</s:Panel>
</s:VGroup>
</s:BorderContainer>
</s:Application>
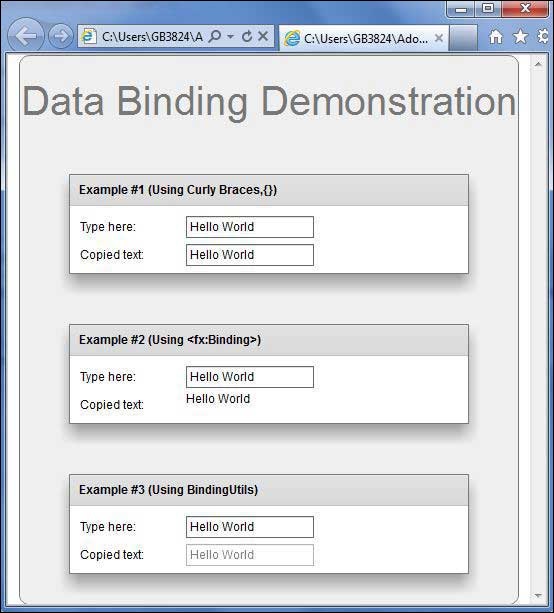
完成所有更改后,让我们像在 Flex - 创建应用程序 一章中一样,以正常模式编译并运行应用程序。如果您的应用程序一切正常,它将产生以下结果:[ 在线试用 ]