
GraphQL - 缓存
缓存是将数据存储在名为缓存的临时存储区域的过程。当您返回最近访问的页面时,浏览器可以从缓存而不是原始服务器获取这些文件。这可以节省您的时间,并减轻网络额外流量的负担。
与 GraphQL 交互的客户端应用程序负责在其端缓存数据。一种可能的模式是保留一个字段,如 id,作为全局唯一标识符。
InMemory Cache
InMemoryCache 是一种规范化的数据存储,常用于 GraphQL 客户端应用程序,无需使用其他库(如 Redux)。
下面给出了将 InMemoryCache 与 ApolloClient 结合使用的示例代码 −
import {ApolloClient, HttpLink, InMemoryCache} from 'apollo-boost'
const cache = new InMemoryCache();

const client = new ApolloClient({
    link: new HttpLink(),
    cache
});
InMemoryCache 构造函数采用具有属性的可选配置对象来自定义缓存。
| Sr.No. | 参数 &描述 |
|---|---|
| 1 | addTypename 一个布尔值,用于确定是否将 __typename 添加到文档(默认值:true) |
| 2 | dataIdFromObject 一个函数,它接受一个数据对象并返回一个唯一标识符,该标识符将在规范化存储中的数据时使用 |
| 3 | fragmentMatcher 默认情况下,InMemoryCache 使用启发式片段匹配器 |
| 4 | cacheRedirects 在请求发生之前将查询重定向到缓存中的另一个条目的函数映射。 |
插图
我们将在 ReactJS 中创建一个包含两个选项卡的单页应用程序 - 一个用于主页选项卡,另一个用于学生选项卡。学生选项卡将从 GraphQL 服务器 API 加载数据。当用户从主页选项卡导航到学生选项卡时,应用程序将查询学生数据。结果数据将由应用程序缓存。
我们还将使用 getTime 字段查询服务器时间以验证页面是否已缓存。如果从缓存返回数据,页面将显示发送到服务器的第一个请求的时间。如果数据是向服务器发出的新请求的结果,它将始终显示来自服务器的最新时间。
设置服务器
以下是设置服务器的步骤 −
步骤 1 − 下载并安装项目所需的依赖项
创建文件夹 cache-server-app。从终端将目录更改为 cache-server-app。按照环境设置章节中说明的步骤 3 到 5 进行操作。
步骤 2 − 创建架构
在项目文件夹 cache-server-app 中添加 schema.graphql 文件并添加以下代码 −
type Query {
   students:[Student]
   getTime:String
}

type Student {
   id:ID!
   firstName:String
   lastName:String
   fullName:String
}
第 3 步 − 添加解析器
在项目文件夹中创建文件 resolvers.js,并添加以下代码 −
const db = require('./db')

const Query = {
      students:() => db.students.list(),
      getTime:() => {
      const today = new Date();
      var h = today.getHours();
      var m = today.getMinutes();
      var s = today.getSeconds();
      return `${h}:${m}:${s}`;
   }
}
module.exports = {Query}
第 4 步 − 运行应用程序
创建一个 server.js 文件。请参阅环境设置章节中的第 8 步。在终端中执行命令 npm start。服务器将在 9000 端口上启动并运行。在这里,我们将使用 GraphiQL 作为客户端来测试应用程序。
打开浏览器并输入 URL http://localhost:9000/graphiql。在编辑器中输入以下查询 −
{
   getTime
   students {
      id
      firstName
   }
}
示例响应显示学生姓名和服务器时间。
{
   "data": {
      "getTime": "22:18:42",
      "students": [
         {
            "id": "S1001",
            "firstName": "Mohtashim"
         },
         {
            "id": "S1002",
            "firstName": "Kannan"
         },
         {
            "id": "S1003",
            "firstName": "Kiran"
         }
      ]
   }
}
设置 ReactJS 客户端
为客户端打开一个新终端。在执行客户端应用程序之前,应保持服务器终端运行。React 应用程序将在端口号 3000 上运行,服务器应用程序将在端口号 9000 上运行。
步骤 1 − 创建 React 应用程序
在客户端终端中,输入以下命令 −
npx create-react-app hello-world-client
这将安装典型 React 应用程序所需的一切。npx 实用程序 和 create-react-app 工具创建一个名为 hello-world-client 的项目。安装完成后,在 VSCode 中打开项目。
使用以下命令安装 React 的路由器模块 - npm install react-router-dom。
第 2 步 − 启动 hello-world-client
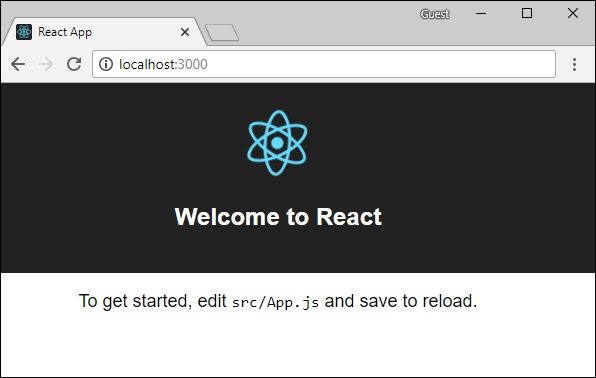
将终端中的当前文件夹路径更改为 hello-world-client。输入 npm start 以启动项目。这将在端口 3000 运行开发服务器,并自动打开浏览器并加载索引页。
这在下面给出的屏幕截图中显示 −
第 3 步 − 安装 Apollo 客户端库
要安装 Apollo 客户端,请打开一个新终端并位于当前项目文件夹路径中。输入以下命令 −
npm install apollo-boost graphql
这将下载客户端的 graphql 库以及 Apollo Boost 包。我们可以通过输入 npm view apollo-boost dependency 来交叉验证这一点。这将有许多依赖项,如下所示 −
{
   'apollo-cache': '^1.1.15',
   'apollo-cache-inmemory': '^1.2.8',
   'apollo-client': '^2.4.0',
   'apollo-link': '^1.0.6',
   'apollo-link-error': '^1.0.3',
   'apollo-link-http': '^1.3.1',
   'apollo-link-state': '^0.4.0',
   'graphql-tag': '^2.4.2'
}
我们可以清楚地看到 apollo-client 库已安装。
第 4 步 − 修改 index.js 文件中的 App 组件
对于简单的 React 应用程序,您只需将 index.js 保留在 src 文件夹中,将 index.html 保留在 public 文件夹中;所有其他自动生成的文件都可以删除。
目录结构如下 −
hello-world-client /
   -->node_modules
   -->public
      index.html
   -->src
      index.js
      students.js
   -->package.json
添加一个包含学生组件的附加文件 students.js。学生详细信息通过学生组件获取。在应用程序组件中,我们使用 HashRouter。
以下是 React 应用程序中的 index.js −
import React, {Component} from 'react';
import ReactDOM from 'react-dom';
import {HashRouter, Route, Link} from 'react-router-dom'

//components
import Students from './students'
class App extends Component {
   render() {
      return(
         <div><h1>Home !!</h1>
         <h2>Welcome to React Application !! </h2>
         </div>
      )
   }
}

function getTime() {
   var d = new Date();
   return d.getHours()+":"+d.getMinutes()+":"+d.getSeconds()
}

const routes = <HashRouter>
   <div>
      <h4>Time from react app:{getTime()}</h4>
      <header>
         <h1>  <Link to="/">Home</Link>
         <Link to = "/students">Students</Link>  </h1>
      </header>
      <Route exact path = "/students" component = {Students}></Route>
      <Route exact path = "/" component = {App}></Route>
   </div>
</HashRouter>

ReactDOM.render(routes, document.querySelector("#root"))
第 5 步 − 在 Students.js 中编辑学生组件
在学生组件中,我们将使用以下两种方法来加载数据 −
获取 API (loadStudents_noCache) − 每次单击学生选项卡时,这将触发新请求。
Apollo 客户端 (loadWithApolloclient) − 这将从缓存中获取数据。
添加一个函数 loadWithApolloclient,该函数从服务器查询学生和时间。此函数将启用缓存。在这里我们使用 gql 函数来解析查询。
async loadWithApolloclient() {
   const query = gql`{
      getTime
      students {
         id
         firstName
      }
   }`;

   const {data} = await  client.query({query})
   return data;
}
Fetch API 是一个用于获取资源的简单接口。与旧版 XMLHttpRequest 相比,Fetch 可以更轻松地发出 Web 请求并处理响应。以下方法显示了如何使用 fetch api 直接加载数据 −
async  loadStudents_noCache() {
      const response = await fetch('http://localhost:9000/graphql', {
      method:'POST',
      headers:{'content-type':'application/json'},
      body:JSON.stringify({query:`{
         getTime
         students {
            id
            firstName
         }
      }`})
   })

   const rsponseBody = await response.json();
   return rsponseBody.data;
}
在 StudentsComponent 的构造函数中,调用 loadWithApolloClient 方法。完整的 Student.js 文件如下 −
import React, {Component} from 'react';
import { Link} from 'react-router-dom'

//Apollo Client
import {ApolloClient, HttpLink, InMemoryCache} from 'apollo-boost'
import gql from 'graphql-tag'
const client = new ApolloClient({
   link: new HttpLink({uri:`http://localhost:9000/graphql`}),
   cache:new InMemoryCache()
})

class Students extends Component {
   constructor(props) {
      super(props);
      this.state = {
         students:[{id:1,firstName:'test'}],
         serverTime:''
      }
      this.loadWithApolloclient().then(data => {
         this.setState({
            students:data.students,
            serverTime:data.getTime
         })
      })
   }

   async  loadStudents_noCache() {
      const response = await fetch('http://localhost:9000/graphql', {
         method:'POST',
         headers:{'content-type':'application/json'},
         body:JSON.stringify({query:`{
            getTime
            students {
               id
               firstName
            }
         }`})
      })
      const rsponseBody =  await response.json();
      return rsponseBody.data;
   }

   async loadWithApolloclient() {
      console.log("inside apollo client function")
      const query = gql`{
         getTime
         students {
            id
            firstName
         }
      }`;
      const {data} = await  client.query({query})
      return data;
   }

   render() {
      return(
         <div>
            <h3>Time from GraphQL server :{this.state.serverTime}</h3>
            <p>Following Students Found </p>
            <div>
               <ul>
                  {
                     this.state.students.map(s => {
                        return(
                           <li key = {s.id}>
                              {s.firstName}
                           </li>
                        )
                     })
                  }
               </ul>
            </div>
         </div>
      )
   }
}
export default Students
第 6 步 − 使用 npm start
运行 React 应用程序您可以通过从主页选项卡切换到学生选项卡来测试 React 应用程序。一旦学生选项卡从服务器加载了数据。它将缓存数据。您可以通过多次从主页切换到学生选项卡来测试它。输出将如下所示 −
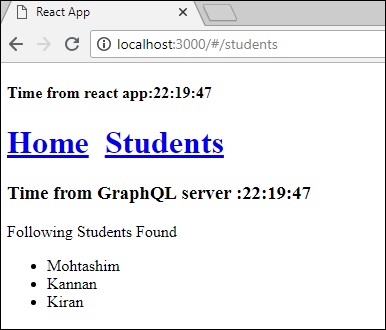
如果您首先通过输入 URL http://localhost:3000/#/students 加载了学生页面,您会发现 React 应用程序和 GraphQL 的加载时间大致相同。之后,如果您切换到主页视图并返回到 GraphQL 服务器,时间不会改变。这表明数据已缓存。
第 7 步 − 将 loadWithApolloclient 调用更改为 loadStudents_noCache
如果在 StudentComponent 的构造函数中将 load 方法更改为 loadStudents_noCache,则输出将不会缓存数据。这显示了缓存和非缓存之间的区别。
this.loadStudents_noCache().then(data => {
   this.setState({
      students:data.students,
      serverTime:data.getTime
   })
})
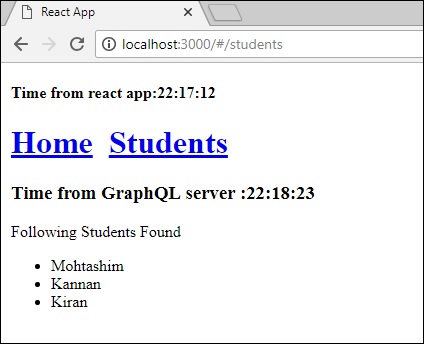
从上面的输出可以清楚地看出,如果您在选项卡之间来回切换,来自 graphql 服务器的时间将始终是最新的,这意味着数据不会被缓存。

