
TurboGears - Genshi 模板语言
Genshi 是一种基于 XML 的模板语言。它类似于 Kid,后者曾是 TurboGears 早期版本的模板引擎。Genshi 和 Kid 都受到其他知名模板语言(如 HSLT、TAL 和 PHP)的启发。
Genshi 模板由处理指令组成。这些指令是模板中的元素和属性。Genshi 指令在命名空间 http://genshi.edgewall.org/ 中定义。因此,需要在模板的根元素中声明此命名空间。
<html xmlns = "http://www.w3.org/1999/xhtml"
   xmlns:py = "http://genshi.edgewall.org/"
   lang = "en">
...
</html>
上述声明意味着默认命名空间设置为 XHTML,并且 Genshi 指令具有"py"前缀。
Genshi 指令
Genshi 中定义了许多指令。以下列表列举了 Genshi 指令 −
- py:if
- py:choose
- py:for
- py:def
- py:match
- py:with
- py:replace
- py:content
- py:attrs
- py:strip
条件部分
Genshi 提供了两个用于条件呈现内容的指令− py:if 和 py:choose。
py:if
仅当 if 子句 中的表达式求值为 true 时,才会呈现此指令元素的内容。假设模板上下文中的数据为 {'foo':True, 'bar':'Hello'>,则以下指令 −
<div>
   <b py:if = "foo">${bar}</b>
</div>
将导致
Hello
但是,如果 'foo' 设置为 False,则不会呈现此输出。
此指令也可用作元素。在这种情况下,<py:if> 必须由相应的 </py:if> 关闭>
<div>
   <py:if test = "foo">
      <b>${bar}</b>
   </py:if>
</div>
py:choose
使用 py:choose 结合 py:when 和 py:otherwise 指令可以实现高级条件处理。此功能类似于 C/C++ 中的 switch – case 构造。
使用 py:when 替代方案标识的不同值检查 py:choose 指令中的表达式,并将呈现相应的内容。可以以 py:otherwise 指令的形式提供默认替代方案。
<div py:choose = "foo">
   <span py:when = "0">0</span>
   <span py:when = "1">1</span>
   <span py:otherwise = "">2</span>
</div>
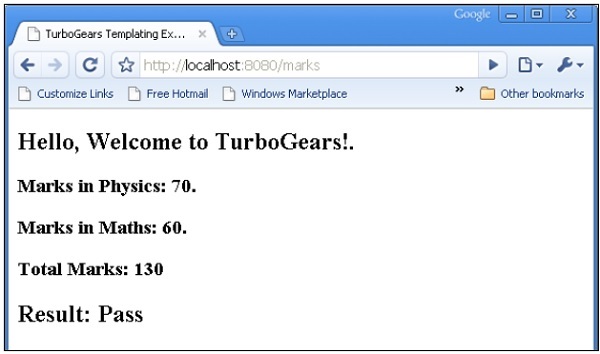
以下示例说明了 py:choose 和 py:when 指令的使用。HTML 表单将数据发布到 /marks URL。marks() 函数将分数和结果以字典对象的形式重定向到 total.html 模板。result Pass/Fail 的条件显示是通过使用 py:choose 和 py:when 指令实现的。
输入分数 (marks.html) 的 HTML 脚本如下 −
<html>
   <body>
      <form action = "http://localhost:8080/marks" method = "post">
         <p>Marks in Physics:</p>
         <p><input type = "text" name = "phy" /></p>
         <p>Marks in Maths:</p>
         <p><input type = "text" name = "maths" /></p>
         <p><input type = "submit" value = "submit" /></p>
      </form>
   </body>
</html>
root.py 的完整代码如下。marks() 控制器将标记和结果发送到 total.html 模板 −
from hello.lib.base import BaseController
from tg import expose, request

class RootController(BaseController):
   @expose("hello.templates.marks")
      def marksform(self):
      return {}

   @expose("hello.templates.total")
      def marks(self, **kw):
      phy = kw['phy']
      maths = kw['maths']
      ttl = int(phy)+int(maths)
      avg = ttl/2

      if avg ≥ 50:
         mydata = {'phy':phy, 'maths':maths, 'total':ttl, 'result':2}
      else:
         mydata = {'phy':phy, 'maths':maths, 'total':ttl,'result':1}

      return mydata
templates 文件夹中的 total.html 接收字典数据,并有条件地在 html 输出中解析它,如下所示 −
<html xmlns = "http://www.w3.org/1999/xhtml"
   xmlns:py = "http://genshi.edgewall.org/"
   lang = "en">

   <head>
      <title>TurboGears Templating Example</title>
   </head>

   <body>
      <h2>Hello, Welcome to TurboGears!.</h2>
      <h3>Marks in Physics: ${phy}.</h3>
      <h3>Marks in Maths: ${maths}.</h3>
      <h3>Total Marks: ${total}</h3>

      <div py:choose = "result">
         <span py:when = "1"><h2>Result: Fail</h2></span>
         <span py:when = "2"><h2>Result: Pass</h2></span>
      </div>

   </body>
</html>
启动服务器(如果尚未运行)
Gearbox 服务器 –reload –debug
在浏览器中输入 http://localhost::8080/marksform −
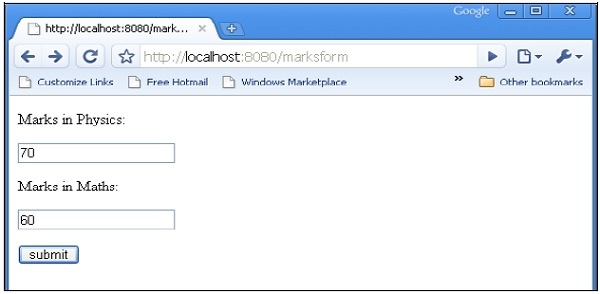
total.html 将呈现以下输出 −
py:for
py:for 指令中的元素针对可迭代对象(通常是 Python List 对象)中的每个项目重复。如果模板上下文中存在 items = [1,2,3],则可以通过以下 py:for 指令 − 对其进行迭代
<ul>
<li py:for = "item in items">${item}</li>
</ul>
将呈现以下输出 −
1
2
3
以下示例显示了使用 py:for 指令在 total.html 模板中呈现的 HTML 表单数据,也可以按如下方式使用 −
<py:for each = "item in items">
<li>${item}</li>
</py:for>
HTML 表单脚本
<html>
   <body>

      <form action = "http://localhost:8080/loop" method="post">
         <p>Marks in Physics:</p>
         <p><input type = "text" name = "phy" /></p>
         <p>Marks in Chemistry:</p>
         <p><input type = "text" name = "che" /></p>
         <p>Marks in Maths:</p>
         <p><input type = "text" name = "maths" /></p>
         <p><input type = "submit" value = "submit" /></p>
      </form>

   </body>
</html>
loop() 控制器读取表单数据并以列表对象的形式将其发送到 total.template。
from hello.lib.base import BaseController
from tg import expose, request

class RootController(BaseController):
   @expose("hello.templates.marks")
   def marksform(self):
   return {}

   @expose("hello.templates.temp")
   def loop(self, **kw):
      phy = kw['phy']
      maths = kw['maths']
      che = kw['che']
      l1 = []
      l1.append(phy)
      l1.append(che)
      l1.append(maths)

   return ({'subjects':['physics', 'Chemistry', 'Mathematics'], 'marks':l1})
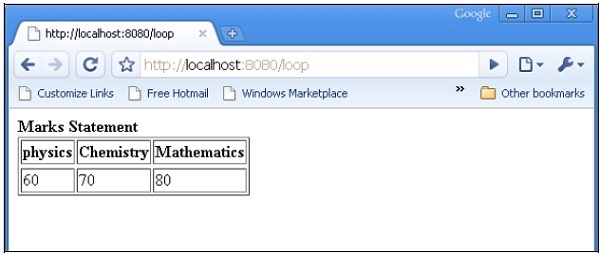
temp.html 模板使用 py:for 循环以表格形式呈现 dict 对象的内容。
<html xmlns = "http://www.w3.org/1999/xhtml"
   xmlns:py = "http://genshi.edgewall.org/" lang = "en">

   <body>
      <b>Marks Statement</b>
      <table border = '1'>
         <thead>
            <py:for each = "key in subjects"><th>${key}</th></py:for>
         </thead>
         <tr>
            <py:for each = "key in marks"><td>${key}</td></py:for>
         </tr>
      </table>
   </body>
</html>
启动服务器(如果尚未运行)
gearbox server –reload –debug
在浏览器中输入 http://localhost::8080/marksform。
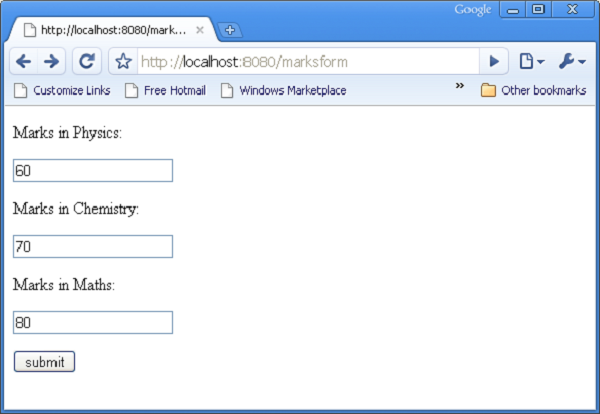
提交上述表单后,浏览器中将显示以下输出。
py:def
此指令用于创建宏。宏是可重复使用的模板代码片段。与 Python 函数非常相似,它有一个名称,并且可以选择包含参数。此宏的输出可以插入到模板中的任何位置。
py:def 指令遵循以下语法 −
<p py:def = "greeting(name)">
   Hello, ${name}!
</p>
此宏可以使用变量值呈现为"name"参数。
${greeting('world')}
${greeting('everybody)}
此指令还可以与另一个版本的语法一起使用,如下所示 −
<py:def function = "greeting(name)">
<p>Hello, ${name}! </p>
</py:def>
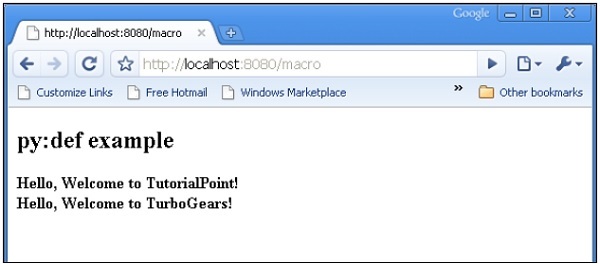
在以下示例中,root.py 中的 macro() 控制器将一个带有两个键 name1 和 name2 的 dict 对象发送到 macro.html 模板。
from hello.lib.base import BaseController
from tg import expose, request

class RootController(BaseController):
   @expose('hello.templates.macro')
   def macro(self):
      return {'name1':'TutorialPoint', 'name2':'TurboGears'}
此 macro.html 模板包含名为 Greeting 的宏的定义。它用于为从控制器接收的数据生成问候消息。
<html xmlns = "http://www.w3.org/1999/xhtml"
   xmlns:py = "http://genshi.edgewall.org/"
   lang = "en">

   <body>
      <h2>py:def example</h2>

      <div>
         <div py:def = "greeting(name)">
            Hello, Welcome to ${name}!
         </div>

         <b>
            ${greeting(name1)}
            ${greeting(name2)}
         </b>

      </div>
   </body>
</html>
使用 gearbox 启动服务器
gearbox serve –reload –debug
通过在浏览器中输入以下 URL 来调用 macro() 控制器 −
http://localhost:8080/macro
以下输出将在浏览器中呈现 −
py:with
此指令允许您将表达式分配给局部变量。这些局部变量使表达式内部更简洁、更高效。
假设在模板的上下文数据中给出了 x = 50,以下将是 py:with 指令 −
<div>
   <span py:with = "y = 50; z = x+y">$x $y $z</span>
</div>
它将产生以下输出 −
50 50 100
py:with 指令的替代版本也可用 −
<div>
<py:with = "y = 50; z = x+y">$x $y $z</py:with>
</div>
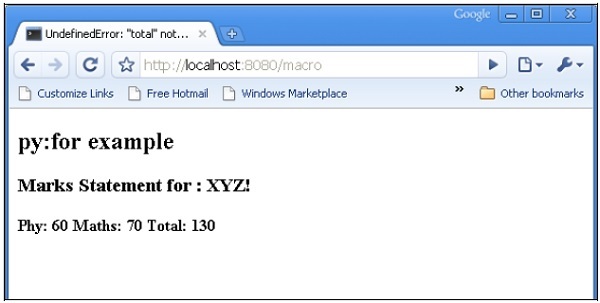
在下面的例子中,macro() 控制器返回一个带有 name、phy 和 maths 的 dict 对象 keys.
from hello.lib.base import BaseController
from tg import expose, request

class RootController(BaseController):
   @expose('hello.templates.macro')
   def macro(self):
      return {'name':'XYZ', 'phy':60, 'maths':70}
模板 macro.html 使用 py:with 指令添加物理和数学键的值。
<html xmlns = "http://www.w3.org/1999/xhtml"
   xmlns:py = "http://genshi.edgewall.org/"
   lang = "en">

   <body>
      <h2>py:with example</h2>
      <h3>Marks Statement for : ${name}!</h3>

      <b>Phy: $phy Maths: $maths
         <span py:with = "ttl = phy+maths">Total: $ttl</span>
      </b>

   </body>

</html>
浏览器将响应 URL http://localhost:8080/macro 呈现以下输出
结构操作指令
py:attrs 指令可添加、修改或删除元素中的属性。
<ul>
<li py:attrs = "foo">Bar</li>
</ul>
如果 foo = {'class':'collapse'> 存在于模板上下文中,则上述代码片段将呈现。
<ul>
<li class = "collapse">Bar</li>
</ul>
py:content 指令将任何嵌套内容替换为对表达式求值的结果 −
<ul>
   <li py:content = "bar">Hello</li>
</ul>
假设上下文数据中的 bar = 'Bye',则会产生
<ul>
<li>Bye</li>
</ul>
py:replace 指令将元素本身替换为表达式的求值结果 −
<div>
<span py:replace = "bar">Hello</span>
</div>
假设上下文数据中的 bar = 'Bye',则会产生
<div>
Bye
</div>

