
Angular7 - 组件
Angular 7 开发的主要部分是在组件中完成的。 组件基本上是与组件的 .html 文件交互的类,该文件显示在浏览器上。 我们已经在前面的一章中看到了文件结构。
文件结构有app组件,它由以下文件组成 −
- app.component.css
- app.component.html
- app.component.spec.ts
- app.component.ts
- app.module.ts
如果您在项目设置过程中选择了角度路由,与路由相关的文件也会被添加,文件如下 −
- app-routing.module.ts
上面的文件是我们使用 angular-cli 命令创建新项目时默认创建的。
如果打开 app.module.ts 文件,它会包含一些导入的库以及一个分配给应用程序组件的声明,如下所示 −
import { BrowserModule } from '@angular/platform-browser';
import { NgModule } from '@angular/core';
import { AppRoutingModule } from './app-routing.module';
import { AppComponent } from './app.component';

@NgModule({
   declarations: [
      AppComponent
   ],
   imports: [
      BrowserModule,
      AppRoutingModule
   ],
   providers: [],
   bootstrap: [AppComponent]
})
export class AppModule { }
声明包括我们已经导入的 AppComponent 变量。 这将成为父组件。
现在,angular-cli 有一个命令来创建您自己的组件。 但是,默认创建的应用程序组件将始终保留为父组件,而创建的下一个组件将形成子组件。
现在让我们运行命令来使用以下代码行创建组件 −
ng g component new-cmp
当您在命令行中运行上述命令时,您将收到以下输出 −
C:\projectA7\angular7-app>ng g component new-cmp
CREATE src/app/new-cmp/new-cmp.component.html (26 bytes)
CREATE src/app/new-cmp/new-cmp.component.spec.ts (629 bytes)
CREATE src/app/new-cmp/new-cmp.component.ts (272 bytes)
CREATE src/app/new-cmp/new-cmp.component.css (0 bytes)
UPDATE src/app/app.module.ts (477 bytes)
现在,如果我们检查文件结构,我们将在 src/app 文件夹下创建 new-cmp 新文件夹。
在new-cmp文件夹中创建以下文件 −
- new-cmp.component.css − css file for the new component is created.
- new-cmp.component.html − html file is created.
- new-cmp.component.spec.ts − this can be used for unit testing.
- new-cmp.component.ts − here, we can define the module, properties, etc.
将更改添加到 app.module.ts 文件中,如下所示 −
import { BrowserModule } from '@angular/platform-browser';
import { NgModule } from '@angular/core';
import { AppRoutingModule } from './app-routing.module';
import { AppComponent } from './app.component';
import { NewCmpComponent } from './new-cmp/new-cmp.component';

// 包括我们创建的 new-cmp 组件
@NgModule({
   declarations: [
      AppComponent,
      NewCmpComponent
      // 这里它被添加到声明中并将充当子组件
   ],
   imports: [
      BrowserModule,
      AppRoutingModule
   ],
   providers: [],
      bootstrap: [AppComponent]
      //for bootstrap the AppComponent the main app component is given.
})
export class AppModule { }
new-cmp.component.ts文件生成如下 −,
import { Component, OnInit } from '@angular/core'; // here angular/core is imported.

@Component({
   // this is a declarator which starts with @ sign.
   // The component word marked in bold needs to be the same.
   selector: 'app-new-cmp', // selector to be used inside .html file.
   templateUrl: './new-cmp.component.html',
   // reference to the html file created in the new component.
   styleUrls: ['./new-cmp.component.css'] // reference to the style file.
})
export class NewCmpComponent implements OnInit {
   constructor() { }
   ngOnInit() { }
}
如果您看到上面的 new-cmp.component.ts 文件,它会创建一个名为 NewCmpComponent 的新类,该类实现 OnInit,其中有一个构造函数和一个名为 ngOnInit() 的方法。 ngOnInit 在类执行时默认被调用。
让我们检查一下流程是如何工作的。 现在,默认创建的应用程序组件成为父组件。 任何稍后添加的组件都会成为子组件。
当我们在"http://localhost:4200/"浏览器中点击网址时,它首先执行如下所示的index.html文件 −
<html lang = "en">

   <head>
      <meta charset = "utf-8">
      <title>Angular7App</title>
      <base href = "/">
      <meta name = "viewport" content = "width = device-width, initial-scale = 1">
      <link rel = "icon" type = "image/x-icon" href = "favicon.ico">
   </head>
   <body>
      <app-root></app-root>
   </body>

</html>
上面是正常的html文件,我们在浏览器中看不到任何打印的内容。 我们将看一下正文部分中的标签。
<app-root></app-root>
这是 Angular 默认创建的根标签。 此标记在 main.ts 文件中具有引用。
import { enableProdMode } from '@angular/core';
import { platformBrowserDynamic } from '@angular/platform-browser-dynamic';
import { AppModule } from './app/app.module';
import { environment } from './environments/environment';

if (environment.production) {
   enableProdMode();
}
platformBrowserDynamic().bootstrapModule(AppModule).catch(err => console.error(err));
AppModule是从主父模块的app中导入的,同样给bootstrap Module,使得appmodule加载。
现在让我们看看app.module.ts文件 −
import { BrowserModule } from '@angular/platform-browser';
import { NgModule } from '@angular/core';
import { AppRoutingModule } from './app-routing.module';
import { AppComponent } from './app.component';
import { NewCmpComponent } from './new-cmp/new-cmp.component';

@NgModule({
   declarations: [
      AppComponent,
      NewCmpComponent
   ],
   imports: [
      BrowserModule,
      AppRoutingModule '
   ],
   providers: [],
   bootstrap: [AppComponent]
})
export class AppModule { }
这里,AppComponent是给定的名称,即存储app.component.ts引用的变量,并且该变量也给了引导程序。 现在让我们看看 app.component.ts 文件。
import { Component } from '@angular/core';
@Component({
   selector: 'app-root',
   templateUrl: './app.component.html',
   styleUrls: ['./app.component.css']
})
export class AppComponent {
   title = 'Angular 7';
}
Angular 核心被导入并称为组件,并且在声明器中使用相同的组件 −
@Component({
   selector: 'app-root',
   templateUrl: './app.component.html',
   styleUrls: ['./app.component.css']
})
在选择器的声明符引用中,给出了 templateUrl 和 styleUrl。 这里的选择器只不过是放置在我们上面看到的index.html 文件中的标记。
AppComponent 类有一个名为 title 的变量,该变量显示在浏览器中。 @Component 使用名为 app.component.html 的 templateUrl,如下所示 −
<!--以下内容只是占位符,可以替换。-->
<div style = "text-align:center">
   <h1> Welcome to {{ title }}! </h1>
</div>
它只有 html 代码和大括号中的变量标题。 它被替换为 app.component.ts 文件中存在的值。 这称为绑定。 我们将在后续章节中讨论绑定的概念。
现在我们已经创建了一个名为 new-cmp 的新组件。 当运行命令创建新组件时,同样的内容会包含在 app.module.ts 文件中。
app.module.ts 具有对创建的新组件的引用。
现在让我们检查在 new-cmp 中创建的新文件。
new-cmp.component.ts
import { Component, OnInit } from '@angular/core';
@Component({
   selector: 'app-new-cmp',
   templateUrl: './new-cmp.component.html',
   styleUrls: ['./new-cmp.component.css']
})
export class NewCmpComponent implements OnInit {
   constructor() { }
   ngOnInit() { }
}
在这里,我们也必须导入核心。 组件的引用在声明符中使用。
声明符具有名为 app-new-cmp 的选择器以及 templateUrl 和 styleUrl。
名为new-cmp.component.html的.html如下 −
<p>
   new-cmp works!
</p>
如上所示,我们有 html 代码,即 p 标签。 样式文件是空的,因为我们目前不需要任何样式。 但是当我们运行该项目时,我们没有看到与新组件相关的任何内容显示在浏览器中。
浏览器显示以下屏幕 −
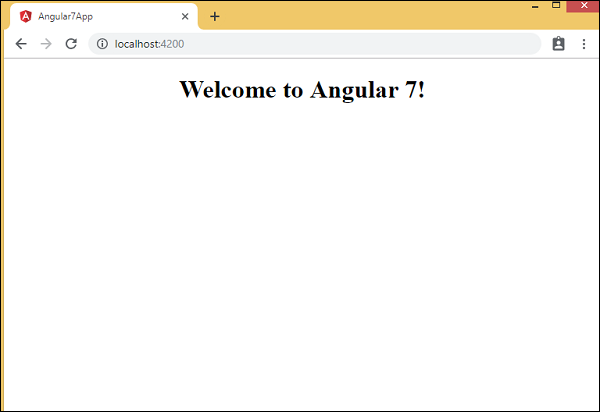
我们没有看到任何与正在显示的新组件相关的内容。 创建的新组件有一个 .html 文件,其中包含以下详细信息 −
<p>
   new-cmp works!
<p>
但是我们在浏览器中没有得到相同的结果。 现在让我们看看使新组件内容显示在浏览器中所需的更改。
选择器"app-new-cmp"是为来自new-cmp.component.ts的新组件创建的,如下所示 −
import { Component, OnInit } from '@angular/core';

@Component({
   selector: 'app-new-cmp',
   templateUrl: './new-cmp.component.html',
   styleUrls: ['./new-cmp.component.css']
})
export class NewCmpComponent implements OnInit {
   constructor() { }
   ngOnInit() { }
}
需要在app.component.html中添加选择器,即app-new-cmp,即默认创建的主父级,如下 −
<!--以下内容只是占位符,可以替换。-->
<div style = "text-align:center">
   <h1>
      Welcome to {{ title }}!
   </h1>
</div>
<app-new-cmp7></app-new-cmp>
添加 <app-new-cmp></app-new-cmp> 标签后,.html 文件中存在的所有内容(即创建的新组件的 new-cmp.component.html)将与父组件数据一起显示在浏览器上。
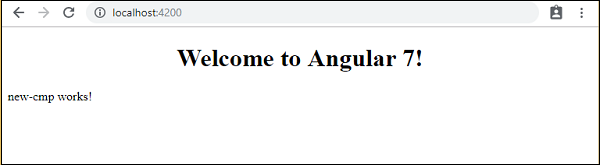
让我们向创建的新组件添加更多详细信息,并查看浏览器中的显示内容。
new-cmp.component.ts
import { Component, OnInit } from '@angular/core';

@Component({
   selector: 'app-new-cmp',
   templateUrl: './new-cmp.component.html',
   styleUrls: ['./new-cmp.component.css']
})
export class NewCmpComponent implements OnInit {
   newcomponent = "Entered in new component created";
   constructor() { }
   ngOnInit() { }
}
在类中,我们添加了一个名为newcomponent的变量,其值为"Entered in new component created"。
将上述变量添加到new-cmp.component.html文件中,如下 −
<p>
   {{newcomponent}}
</p>
<p>
   new-cmp works!
</p>
现在,由于我们已将 <app-new-cmp></app-new-cmp> 选择器包含在 app.component.html(即父组件的 .html)中,因此 new-cmp.component.html 文件中的内容将显示在浏览器上。 我们还将在 new-cmp.component.css 文件中为新组件添加一些 css,如下所示 −
p {
   color: blue;
   font-size: 25px;
}
因此我们为 p 标签添加了蓝色和字体大小为 25px。
浏览器中将显示以下屏幕 −
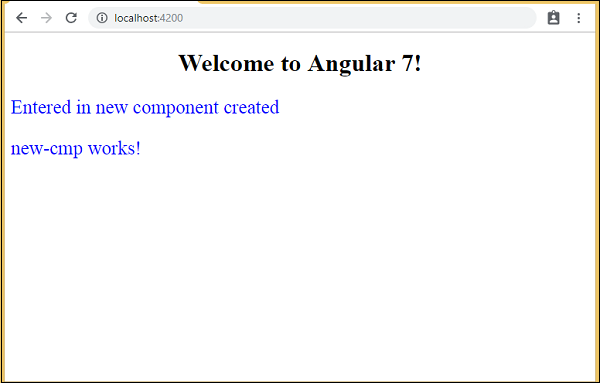
同样,我们可以根据我们的要求创建组件并使用 app.component.html 文件中的选择器链接相同的组件。

