Angular7 - 管道
在本章中,我们将讨论 Angular 7 中的管道。管道之前在 Angular1 中称为过滤器,从 Angular2 开始称为管道。
| 字符用于转换数据。 以下是相同的语法 −
{{ Welcome to Angular 7 | lowercase}}
它接受整数、字符串、数组和日期作为输入,并用 | 分隔 转换为需要的格式并在浏览器中显示。
让我们考虑一些使用管道的示例。 在这里,我们要显示大写的文本。 这可以使用管道来完成,如下所示 −
在app.component.ts文件中,我们定义了title变量如下 −
app.component.ts
import { Component } from '@angular/core';
@Component({
   selector: 'app-root',
   templateUrl: './app.component.html',
   styleUrls: ['./app.component.css']
})
export class AppComponent {
   title = 'Angular 7 Project!';
}
以下代码行进入 app.component.html 文件 −
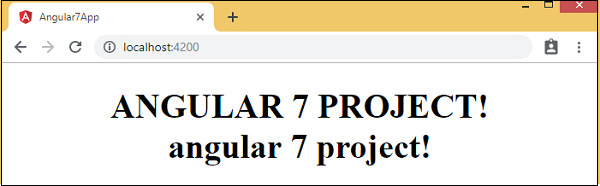
<b>{{title | uppercase}}</b><br/>
<b>{{title | lowercase}}</b>
浏览器显示如以下屏幕截图所示 −
这里有一些带有角度的内置管道 −
- Lowercasepipe
- Uppercasepipe
- Datepipe
- Currencypipe
- Jsonpipe
- Percentpipe
- Decimalpipe
- Slicepipe
我们已经看到了小写和大写的管道。 现在让我们看看其他管道是如何工作的。 以下代码行将帮助我们在 app.component.ts 文件中定义所需的变量 −
import { Component } from '@angular/core';
@Component({
   selector: 'app-root',
   templateUrl: './app.component.html',
   styleUrls: ['./app.component.css']
})
export class AppComponent {
   title = 'Angular 7 Project!';
   todaydate = new Date();
   jsonval = {name:'Rox', age:'25', address:{a1:'Mumbai', a2:'Karnataka'}};
   months = ["Jan", "Feb", "Mar", "April", "May", "Jun", "July", "Aug",
      "Sept", "Oct", "Nov", "Dec"];
}
我们将使用 app.component.html 文件中的管道,如下所示 −
<!--以下内容只是占位符,可以替换。-->
<div style = "width:100%;">
   <div style = "width:40%;float:left;border:solid 1px black;">
      <h1>Uppercase Pipe</h1>
      <b>{{title | uppercase}}</b>
      <br/>

      <h1>Lowercase Pipe</h1>
      <b>{{title | lowercase}}</b>
      <h1>Currency Pipe</h1>
      <b>{{6589.23 | currency:"USD"}}</b>
      <br/>

      <b>{{6589.23 | currency:"USD":true}}</b>
      // Boolean true is used to get the sign of the currency.
      <h1>Date pipe</h1>
      <b>{{todaydate | date:'d/M/y'}}</b>
      <br/>

      <b>{{todaydate | date:'shortTime'}}</b>
      <h1>Decimal Pipe</h1>
      <b>{{ 454.78787814 | number: '3.4-4' }}</b>
      // 3 is for main integer, 4 -4 are for integers to be displayed.
   </div>

   <div style = "width:40%;float:left;border:solid 1px black;"<
      <h1<Json Pipe</h1>
      <b>{{ jsonval | json }}</b>
      <h1>Percent Pipe</h1>
      <b>{{00.54565 | percent}}</b>
      <h1>Slice Pipe</h1>
      <b>{{months | slice:2:6}}</b>
      // here 2 and 6 refers to the start and the end index
   </div>
</div>
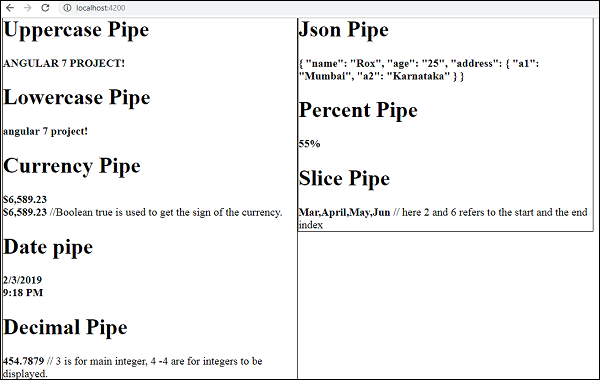
以下屏幕截图显示了每个管道的输出 −
如何创建自定义管道?
为了创建自定义管道,我们创建了一个新的 ts 文件。 在这里,我们要创建 sqrt 自定义管道。 我们为该文件指定了相同的名称,如下所示 −
app.sqrt.ts
import {Pipe, PipeTransform} from '@angular/core';
@Pipe ({
   name : 'sqrt'
})
export class SqrtPipe implements PipeTransform {
   transform(val : number) : number {
      return Math.sqrt(val);
   }
}
要创建自定义管道,我们必须从 Angular/core 导入 Pipe 和 Pipe Transform。 在 @Pipe 指令中,我们必须为管道指定名称,该名称将在 .html 文件中使用。 由于我们正在创建 sqrt 管道,因此我们将其命名为 sqrt。
当我们继续进行时,我们必须创建类,类名为 SqrtPipe。 此类将实现 PipeTransform。
类中定义的transform方法将以参数作为数字,并返回开平方根后的数字。
由于我们创建了一个新文件,因此我们需要在 app.module.ts 中添加相同的内容。 这是按如下方式完成的 −
import { BrowserModule } from '@angular/platform-browser';
import { NgModule } from '@angular/core';
import { AppRoutingModule } from './app-routing.module';
import { AppComponent } from './app.component';
import { NewCmpComponent } from './new-cmp/new-cmp.component';
import { ChangeTextDirective } from './change-text.directive';
import { SqrtPipe } from './app.sqrt';

@NgModule({
   declarations: [
      SqrtPipe,
      AppComponent,
      NewCmpComponent,
      ChangeTextDirective
   ],
   imports: [
      BrowserModule,
      AppRoutingModule
   ],
   providers: [],
   bootstrap: [AppComponent]
})
export class AppModule { }
我们创建了app.sqrt.ts类。 我们必须在 app.module.ts 中导入相同的内容并指定文件的路径。 它还必须包含在声明中,如上所示。
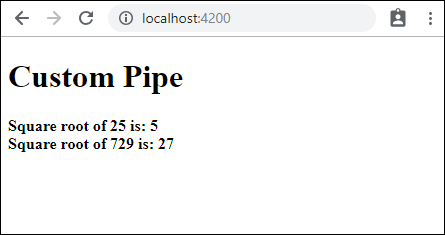
现在让我们看看对 app.component.html 文件中的 sqrt 管道进行的调用。
<h1>Custom Pipe</h1>
<b>Square root of 25 is: {{25 | sqrt}}</b>
<br/>
<b>Square root of 729 is: {{729 | sqrt}}</b>
以下是输出 −