Spring Boot - 构建 RESTful Web 服务
Spring Boot 为企业应用构建 RESTful Web Services 提供了很好的支持。 本章将详细解释使用 Spring Boot 构建 RESTful Web 服务。
注意 − 为了构建 RESTful Web 服务,我们需要将 Spring Boot Starter Web 依赖添加到构建配置文件中。
如果您是 Maven 用户,请使用以下代码在 pom.xml 文件中添加以下依赖项 −
<dependency>
   <groupId>org.springframework.boot</groupId>
   <artifactId>spring-boot-starter-web</artifactId>
</dependency>
如果您是 Gradle 用户,请使用以下代码在 build.gradle 文件中添加以下依赖项。
compile('org.springframework.boot:spring-boot-starter-web')
完整构建配置文件Maven build – pom.xml的代码如下 −
<?xml version = "1.0" encoding = "UTF-8"?>
<project xmlns = "http://maven.apache.org/POM/4.0.0"
   xmlns:xsi = "http://www.w3.org/2001/XMLSchema-instance"
   xsi:schemaLocation = "http://maven.apache.org/POM/4.0.0
   http://maven.apache.org/xsd/maven-4.0.0.xsd">

   <modelVersion>4.0.0</modelVersion>
   <groupId>com.tutorialspoint</groupId>
   <artifactId>demo</artifactId>
   <version>0.0.1-SNAPSHOT</version>
   <packaging>jar</packaging>
   <name>demo</name>
   <description>Demo project for Spring Boot</description>

   <parent>
      <groupId>org.springframework.boot</groupId>
      <artifactId>spring-boot-starter-parent</artifactId>
      <version>1.5.8.RELEASE</version>
      <relativePath/>
   </parent>

   <properties>
      <project.build.sourceEncoding>UTF-8</project.build.sourceEncoding>
      <project.reporting.outputEncoding>UTF-8</project.reporting.outputEncoding>
      <java.version>1.8</java.version>
   </properties>

   <dependencies>
      <dependency>
         <groupId>org.springframework.boot</groupId>
         <artifactId>spring-boot-starter-web</artifactId>
      </dependency>
      <dependency>
         <groupId>org.springframework.boot</groupId>
         <artifactId>spring-boot-starter-test</artifactId>
         <scope>test</scope>
      </dependency>
   </dependencies>

   <build>
      <plugins>
         <plugin>
            <groupId>org.springframework.boot</groupId>
            <artifactId>spring-boot-maven-plugin</artifactId>
         </plugin>
      </plugins>
   </build>

</project>
完整构建配置文件Gradle Build – build.gradle的代码如下 −
buildscript {
   ext {
      springBootVersion = '1.5.8.RELEASE'
   }
   repositories {
      mavenCentral()
   }
   dependencies {
      classpath("org.springframework.boot:spring-boot-gradle-plugin:${springBootVersion}")
   }
}

apply plugin: 'java'
apply plugin: 'eclipse'
apply plugin: 'org.springframework.boot'

group = 'com.tutorialspoint'
version = '0.0.1-SNAPSHOT'
sourceCompatibility = 1.8

repositories {
   mavenCentral()
}
dependencies {
   compile('org.springframework.boot:spring-boot-starter-web')
   testCompile('org.springframework.boot:spring-boot-starter-test')
}
在继续构建 RESTful Web 服务之前,建议您了解以下注解 −
Rest 控制器
@RestController 注解用于定义 RESTful Web 服务。 它提供 JSON、XML 和自定义响应。 它的语法如下所示 −
@RestController
public class ProductServiceController {
}
Request 映射
@RequestMapping 注解用于定义请求 URI 以访问 REST 端点。 我们可以定义 Request 方法来消费和生产对象。 默认请求方法是 GET。
@RequestMapping(value = "/products")
public ResponseEntity<Object> getProducts() { }
Request 请求正文
@RequestBody 注解用于定义请求正文内容类型。
public ResponseEntity<Object> createProduct(@RequestBody Product product) {
}
Path 路径变量
@PathVariable 注解用于定义自定义或动态请求 URI。 请求 URI 中的 Path 变量定义为花括号 {},如下所示 −
public ResponseEntity<Object> updateProduct(@PathVariable("id") String id) {
}
Request 请求参数
@RequestParam 注解用于从请求 URL 中读取请求参数。 默认情况下,它是必需参数。 我们还可以为请求参数设置默认值,如下所示 −
public ResponseEntity<Object> getProduct(
   @RequestParam(value = "name", required = false, defaultValue = "honey") String name) {
}
GET API
默认的 HTTP 请求方法是 GET。 此方法不需要任何请求正文。 您可以发送请求参数和路径变量来定义自定义或动态 URL。
定义 HTTP GET 请求方法的示例代码如下所示。 在本例中,我们使用 HashMap 来存储 Product。 请注意,我们使用 POJO 类作为要存储的产品。
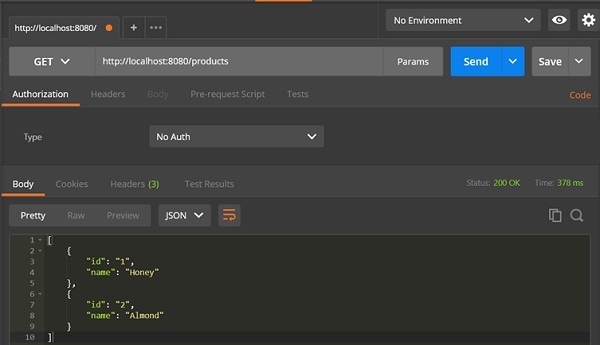
这里,请求 URI 是 /products,它将返回 HashMap 存储库中的产品列表。 下面给出了控制器类文件,其中包含 GET 方法 REST Endpoint。
package com.tutorialspoint.demo.controller;

import java.util.HashMap;
import java.util.Map;

import org.springframework.http.HttpStatus;
import org.springframework.http.ResponseEntity;
import org.springframework.web.bind.annotation.RequestMapping;
import org.springframework.web.bind.annotation.RestController;

import com.tutorialspoint.demo.model.Product;

@RestController
public class ProductServiceController {
   private static Map<String, Product> productRepo = new HashMap<>();
   static {
      Product honey = new Product();
      honey.setId("1");
      honey.setName("Honey");
      productRepo.put(honey.getId(), honey);

      Product almond = new Product();
      almond.setId("2");
      almond.setName("Almond");
      productRepo.put(almond.getId(), almond);
   }
   @RequestMapping(value = "/products")
   public ResponseEntity<Object> getProduct() {
      return new ResponseEntity<>(productRepo.values(), HttpStatus.OK);
   }
}
POST API
HTTP POST 请求用于创建资源。 此方法包含请求正文。 我们可以发送请求参数和路径变量来定义自定义或动态 URL。
以下示例显示了定义 HTTP POST 请求方法的示例代码。 在这个例子中,我们使用 HashMap 来存储 Product,其中 product 是一个 POJO 类。
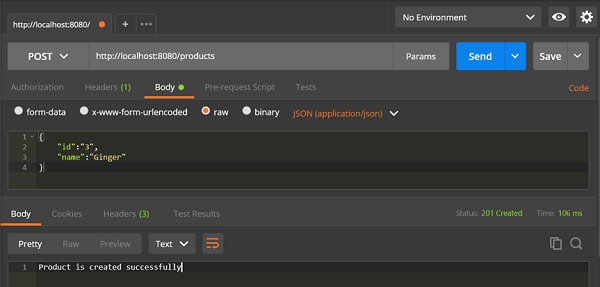
这里的请求 URI 是 /products,将产品存入 HashMap 仓库后会返回 String。
package com.tutorialspoint.demo.controller;

import java.util.HashMap;
import java.util.Map;

import org.springframework.http.HttpStatus;
import org.springframework.http.ResponseEntity;
import org.springframework.web.bind.annotation.RequestBody;
import org.springframework.web.bind.annotation.RequestMapping;
import org.springframework.web.bind.annotation.RequestMethod;
import org.springframework.web.bind.annotation.RestController;

import com.tutorialspoint.demo.model.Product;

@RestController
public class ProductServiceController {
   private static Map<String, Product> productRepo = new HashMap<>();

   @RequestMapping(value = "/products", method = RequestMethod.POST)
   public ResponseEntity<Object> createProduct(@RequestBody Product product) {
      productRepo.put(product.getId(), product);
      return new ResponseEntity<>("Product is created successfully", HttpStatus.CREATED);
   }
}
PUT API
HTTP PUT 请求用于更新现有资源。 此方法包含一个请求正文。 我们可以发送请求参数和路径变量来定义自定义或动态 URL。
下面给出的示例显示了如何定义 HTTP PUT 请求方法。 在这个例子中,我们使用 HashMap 来更新现有的 Product,其中 product 是一个 POJO 类。
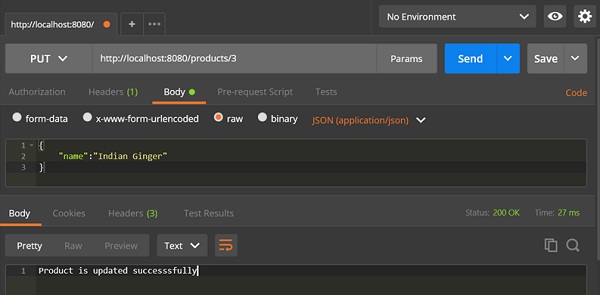
这里的请求 URI 是 /products/{id} ,它将在产品进入 HashMap 存储库之后返回字符串。 请注意,我们使用了 Path 变量 {id},它定义了需要更新的产品 ID。
package com.tutorialspoint.demo.controller;

import java.util.HashMap;
import java.util.Map;

import org.springframework.http.HttpStatus;
import org.springframework.http.ResponseEntity;
import org.springframework.web.bind.annotation.PathVariable;
import org.springframework.web.bind.annotation.RequestBody;
import org.springframework.web.bind.annotation.RequestMapping;
import org.springframework.web.bind.annotation.RequestMethod;
import org.springframework.web.bind.annotation.RestController;
import com.tutorialspoint.demo.model.Product;

@RestController
public class ProductServiceController {
   private static Map<String, Product> productRepo = new HashMap<>();

   @RequestMapping(value = "/products/{id}", method = RequestMethod.PUT)
   public ResponseEntity<Object> updateProduct(@PathVariable("id") String id, @RequestBody Product product) {
      productRepo.remove(id);
      product.setId(id);
      productRepo.put(id, product);
      return new ResponseEntity<>("Product is updated successsfully", HttpStatus.OK);
   }
}
DELETE API
HTTP Delete 请求用于删除现有资源。 此方法不包含任何请求正文。 我们可以发送请求参数和路径变量来定义自定义或动态 URL。
下面给出的示例显示了如何定义 HTTP DELETE 请求方法。 在本例中,我们使用 HashMap 来移除现有产品,即 POJO 类。
请求 URI 是 /products/{id} ,它会在从 HashMap 存储库中删除产品后返回字符串。 我们使用了 Path 变量 {id},它定义了需要删除的产品 ID。
package com.tutorialspoint.demo.controller;

import java.util.HashMap;
import java.util.Map;

import org.springframework.http.HttpStatus;
import org.springframework.http.ResponseEntity;
import org.springframework.web.bind.annotation.PathVariable;
import org.springframework.web.bind.annotation.RequestBody;
import org.springframework.web.bind.annotation.RequestMapping;
import org.springframework.web.bind.annotation.RequestMethod;
import org.springframework.web.bind.annotation.RestController;

import com.tutorialspoint.demo.model.Product;

@RestController
public class ProductServiceController {
   private static Map<String, Product> productRepo = new HashMap<>();

   @RequestMapping(value = "/products/{id}", method = RequestMethod.DELETE)
   public ResponseEntity<Object> delete(@PathVariable("id") String id) {
      productRepo.remove(id);
      return new ResponseEntity<>("Product is deleted successsfully", HttpStatus.OK);
   }
}
本节为您提供完整的源代码集。 请注意以下代码以了解其各自的功能 −
Spring Boot 主应用类 – DemoApplication.java
package com.tutorialspoint.demo;

import org.springframework.boot.SpringApplication;
import org.springframework.boot.autoconfigure.SpringBootApplication;

@SpringBootApplication
public class DemoApplication {
   public static void main(String[] args) {
      SpringApplication.run(DemoApplication.class, args);
   }
}
POJO 类 – Product.java
package com.tutorialspoint.demo.model;

public class Product {
   private String id;
   private String name;

   public String getId() {
      return id;
   }
   public void setId(String id) {
      this.id = id;
   }
   public String getName() {
      return name;
   }
   public void setName(String name) {
      this.name = name;
   }
}
Rest 控制器类 – ProductServiceController.java
package com.tutorialspoint.demo.controller;

import java.util.HashMap;
import java.util.Map;

import org.springframework.http.HttpStatus;
import org.springframework.http.ResponseEntity;
import org.springframework.web.bind.annotation.PathVariable;
import org.springframework.web.bind.annotation.RequestBody;
import org.springframework.web.bind.annotation.RequestMapping;
import org.springframework.web.bind.annotation.RequestMethod;
import org.springframework.web.bind.annotation.RestController;

import com.tutorialspoint.demo.model.Product;

@RestController
public class ProductServiceController {
   private static Map<String, Product> productRepo = new HashMap<>();
   static {
      Product honey = new Product();
      honey.setId("1");
      honey.setName("Honey");
      productRepo.put(honey.getId(), honey);

      Product almond = new Product();
      almond.setId("2");
      almond.setName("Almond");
      productRepo.put(almond.getId(), almond);
   }

   @RequestMapping(value = "/products/{id}", method = RequestMethod.DELETE)
   public ResponseEntity<Object> delete(@PathVariable("id") String id) {
      productRepo.remove(id);
      return new ResponseEntity<>("Product is deleted successsfully", HttpStatus.OK);
   }

   @RequestMapping(value = "/products/{id}", method = RequestMethod.PUT)
   public ResponseEntity<Object> updateProduct(@PathVariable("id") String id, @RequestBody Product product) {
      productRepo.remove(id);
      product.setId(id);
      productRepo.put(id, product);
      return new ResponseEntity<>("Product is updated successsfully", HttpStatus.OK);
   }

   @RequestMapping(value = "/products", method = RequestMethod.POST)
   public ResponseEntity<Object> createProduct(@RequestBody Product product) {
      productRepo.put(product.getId(), product);
      return new ResponseEntity<>("Product is created successfully", HttpStatus.CREATED);
   }

   @RequestMapping(value = "/products")
   public ResponseEntity<Object> getProduct() {
      return new ResponseEntity<>(productRepo.values(), HttpStatus.OK);
   }
}
您可以创建一个可执行的 JAR 文件,并使用以下 Maven 或 Gradle 命令运行 spring boot 应用程序,如图所示 −
对于 Maven,使用如下所示的命令 −
mvn clean install
在"BUILD SUCCESS"之后,您可以在目标目录下找到 JAR 文件。
对于 Gradle,使用如下所示的命令 −
gradle clean build
在"BUILD SUCCESSFUL"之后,您可以在 build/libs 目录下找到 JAR 文件。
您可以使用如下所示的命令运行 JAR 文件 −
java –jar <JARFILE>
这将在 Tomcat 端口 8080 上启动应用程序,如下所示 −

现在在 POSTMAN 应用程序中点击下面显示的 URL 并查看输出。
GET API URL 是: http://localhost:8080/products
POST API URL 是: http://localhost:8080/products
PUT API URL 是: http://localhost:8080/products/3
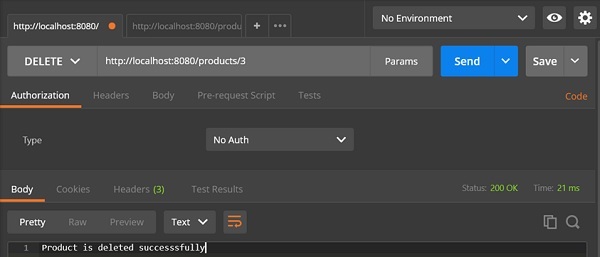
DELETE API URL 是: http://localhost:8080/products/3