Spring Boot - 异常处理
处理 API 中的异常和错误并向客户端发送正确的响应对于企业应用程序是有益的。 在本章中,我们将学习如何在 Spring Boot 中处理异常。
在进行异常处理之前,让我们了解以下注解。
控制器建议
@ControllerAdvice 是一个注解,用于全局处理异常。
异常处理程序
@ExceptionHandler 是一个注解,用于处理特定异常并将自定义响应发送给客户端。
您可以使用以下代码创建 @ControllerAdvice 类来全局处理异常 −
package com.tutorialspoint.demo.exception;

import org.springframework.web.bind.annotation.ControllerAdvice;

@ControllerAdvice
   public class ProductExceptionController {
}
定义一个扩展 RuntimeException 类的类。
package com.tutorialspoint.demo.exception;

public class ProductNotfoundException extends RuntimeException {
   private static final long serialVersionUID = 1L;
}
您可以定义@ExceptionHandler 方法来处理异常,如图所示。 此方法应用于编写 Controller Advice 类文件。
@ExceptionHandler(value = ProductNotfoundException.class)

public ResponseEntity<Object> exception(ProductNotfoundException exception) {
}
现在,使用下面给出的代码从 API 中抛出异常。
@RequestMapping(value = "/products/{id}", method = RequestMethod.PUT)
public ResponseEntity<Object> updateProduct() {
   throw new ProductNotfoundException();
}
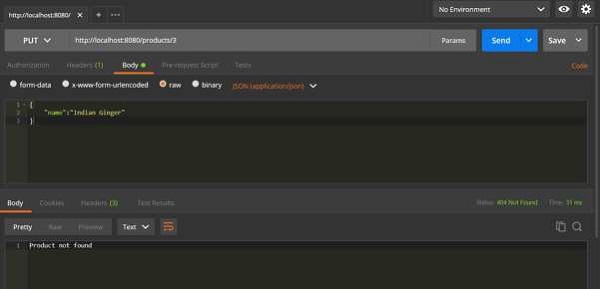
下面给出了处理异常的完整代码。 在此示例中,我们使用 PUT API 来更新产品。 这里,在更新产品时,如果没有找到该产品,则返回响应错误信息为 "Product not found"。 请注意,ProductNotFoundException 异常类应该扩展 RuntimeException。
package com.tutorialspoint.demo.exception;
public class ProductNotfoundException extends RuntimeException {
   private static final long serialVersionUID = 1L;
}
下面给出了全局处理异常的 Controller Advice 类。 我们可以在这个类文件中定义任何异常处理方法。
package com.tutorialspoint.demo.exception;

import org.springframework.http.HttpStatus;
import org.springframework.http.ResponseEntity;
import org.springframework.web.bind.annotation.ControllerAdvice;
import org.springframework.web.bind.annotation.ExceptionHandler;

@ControllerAdvice
public class ProductExceptionController {
   @ExceptionHandler(value = ProductNotfoundException.class)
   public ResponseEntity<Object> exception(ProductNotfoundException exception) {
      return new ResponseEntity<>("Product not found", HttpStatus.NOT_FOUND);
   }
}
下面给出了产品服务 API 控制器文件以更新产品。 如果未找到产品,则抛出 ProductNotFoundException 类。
package com.tutorialspoint.demo.controller;

import java.util.HashMap;
import java.util.Map;

import org.springframework.http.HttpStatus;
import org.springframework.http.ResponseEntity;
import org.springframework.web.bind.annotation.PathVariable;
import org.springframework.web.bind.annotation.RequestBody;
import org.springframework.web.bind.annotation.RequestMapping;
import org.springframework.web.bind.annotation.RequestMethod;
import org.springframework.web.bind.annotation.RestController;

import com.tutorialspoint.demo.exception.ProductNotfoundException;
import com.tutorialspoint.demo.model.Product;

@RestController
public class ProductServiceController {
   private static Map<String, Product> productRepo = new HashMap<>();
   static {
      Product honey = new Product();
      honey.setId("1");
      honey.setName("Honey");
      productRepo.put(honey.getId(), honey);

      Product almond = new Product();
      almond.setId("2");
      almond.setName("Almond");
      productRepo.put(almond.getId(), almond);
   }

   @RequestMapping(value = "/products/{id}", method = RequestMethod.PUT)
   public ResponseEntity<Object> updateProduct(@PathVariable("id") String id, @RequestBody Product product) {
      if(!productRepo.containsKey(id))throw new ProductNotfoundException();
      productRepo.remove(id);
      product.setId(id);
      productRepo.put(id, product);
      return new ResponseEntity<>("Product is updated successfully", HttpStatus.OK);
   }
}
主 Spring Boot 应用程序类文件的代码如下所示 −
package com.tutorialspoint.demo;

import org.springframework.boot.SpringApplication;
import org.springframework.boot.autoconfigure.SpringBootApplication;

@SpringBootApplication
public class DemoApplication {
   public static void main(String[] args) {
      SpringApplication.run(DemoApplication.class, args);
   }
}
Product POJO 类 的代码如下 −
package com.tutorialspoint.demo.model;
public class Product {
   private String id;
   private String name;

   public String getId() {
      return id;
   }
   public void setId(String id) {
      this.id = id;
   }
   public String getName() {
      return name;
   }
   public void setName(String name) {
      this.name = name;
   }
}
Maven build – pom.xml 的代码如下所示 −
<?xml version = "1.0" encoding = "UTF-8"?>
<project xmlns = "http://maven.apache.org/POM/4.0.0"
   xmlns:xsi = "http://www.w3.org/2001/XMLSchema-instance"
   xsi:schemaLocation = "http://maven.apache.org/POM/4.0.0
   http://maven.apache.org/xsd/maven-4.0.0.xsd">

   <modelVersion>4.0.0</modelVersion>
   <groupId>com.tutorialspoint</groupId>
   <artifactId>demo</artifactId>
   <version>0.0.1-SNAPSHOT</version>
   <packaging>jar</packaging>
   <name>demo</name>
   <description>Demo project for Spring Boot</description>

   <parent>
      <groupId>org.springframework.boot</groupId>
      <artifactId>spring-boot-starter-parent</artifactId>
      <version>1.5.8.RELEASE</version>
      <relativePath/>
   </parent>

   <properties>
      <project.build.sourceEncoding>UTF-8</project.build.sourceEncoding>
      <project.reporting.outputEncoding>UTF-8</project.reporting.outputEncoding>
      <java.version>1.8</java.version>
   </properties>

   <dependencies>
      <dependency>
         <groupId>org.springframework.boot</groupId>
         <artifactId>spring-boot-starter-web</artifactId>
      </dependency>
      <dependency>
         <groupId>org.springframework.boot</groupId>
         <artifactId>spring-boot-starter-test</artifactId>
         <scope>test</scope>
      </dependency>
   </dependencies>

   <build>
      <plugins>
         <plugin>
            <groupId>org.springframework.boot</groupId>
            <artifactId>spring-boot-maven-plugin</artifactId>
         </plugin>
      </plugins>
   </build>

</project>
Gradle Build – build.gradle 的代码如下 −
buildscript {
   ext {
      springBootVersion = '1.5.8.RELEASE'
   }
   repositories {
      mavenCentral()
   }
   dependencies {
      classpath("org.springframework.boot:spring-boot-gradle-plugin:${springBootVersion}")
   }
}
apply plugin: 'java'
apply plugin: 'eclipse'
apply plugin: 'org.springframework.boot'

group = 'com.tutorialspoint'
version = '0.0.1-SNAPSHOT'
sourceCompatibility = 1.8

repositories {
   mavenCentral()
}
dependencies {
   compile('org.springframework.boot:spring-boot-starter-web')
   testCompile('org.springframework.boot:spring-boot-starter-test')
}
您可以创建一个可执行的 JAR 文件,并使用 Maven 或 Gradle 命令运行 Spring Boot 应用程序 −
对于 Maven,您可以使用以下命令 −
mvn clean install
在"BUILD SUCCESS"之后,您可以在目标目录下找到 JAR 文件。
对于 Gradle,您可以使用以下命令 −
gradle clean build
在"BUILD SUCCESSFUL"之后,您可以在 build/libs 目录下找到 JAR 文件。
您可以使用以下命令运行 JAR 文件 −
java –jar <JARFILE>
这将在 Tomcat 端口 8080 上启动应用程序,如下所示 −

现在在 POSTMAN 应用程序中点击以下 URL,您可以看到如下所示的输出 −
更新 URL: http://localhost:8080/products/3