Spring Boot - Web 应用程序安全保护
如果在类路径上添加了 Spring Boot Security 依赖项,则 Spring Boot 应用程序会自动要求所有 HTTP 端点的基本身份验证。 端点"/"和"/home"不需要任何身份验证。 所有其他端点都需要身份验证。
为了向您的 Spring Boot 应用程序添加 Spring Boot Security,我们需要在我们的构建配置文件中添加 Spring Boot Starter Security 依赖项。
Maven 用户可以在 pom.xml 文件中添加以下依赖项。
<dependency>
   <groupId>org.springframework.boot</groupId>
   <artifactId>spring-boot-starter-security</artifactId>
</dependency>
Gradle 用户可以在 build.gradle 文件中添加以下依赖项。
compile("org.springframework.boot:spring-boot-starter-security")
保护 Web 应用程序
首先,使用 Thymeleaf 模板创建一个不安全的 Web 应用程序。
然后,在 src/main/resources/templates 目录下创建一个 home.html 文件。
<!DOCTYPE html>
<html xmlns = "http://www.w3.org/1999/xhtml"
   xmlns:th = "http://www.thymeleaf.org"
   xmlns:sec = "http://www.thymeleaf.org/thymeleaf-extras-springsecurity3">

   <head>
      <title>Spring Security Example</title>
   </head>
   <body>
      <h1>Welcome!</h1>
      <p>Click <a th:href = "@{/hello}">here</a> to see a greeting.</p>
   </body>

</html>
使用 Thymeleaf 模板在 HTML 文件中定义的简单视图 /hello。
现在,在 src/main/resources/templates 目录下创建一个 hello.html。
<!DOCTYPE html>
<html xmlns = "http://www.w3.org/1999/xhtml"
   xmlns:th = "http://www.thymeleaf.org"
   xmlns:sec = "http://www.thymeleaf.org/thymeleaf-extras-springsecurity3">

   <head>
      <title>Hello World!</title>
   </head>
   <body>
      <h1>Hello world!</h1>
   </body>

</html>
现在,我们需要设置 Spring MVC – 用于 home 和 hello 视图的视图控制器。
为此,创建一个扩展 WebMvcConfigurerAdapter 的 MVC 配置文件。
package com.tutorialspoint.websecuritydemo;

import org.springframework.context.annotation.Configuration;
import org.springframework.web.servlet.config.annotation.ViewControllerRegistry;
import org.springframework.web.servlet.config.annotation.WebMvcConfigurerAdapter;

@Configuration
public class MvcConfig extends WebMvcConfigurerAdapter {
   @Override
   public void addViewControllers(ViewControllerRegistry registry) {
      registry.addViewController("/home").setViewName("home");
      registry.addViewController("/").setViewName("home");
      registry.addViewController("/hello").setViewName("hello");
      registry.addViewController("/login").setViewName("login");
   }
}
现在,将 Spring Boot Starter 安全依赖项添加到构建配置文件中。
Maven 用户可以在您的 pom.xml 文件中添加以下依赖项。
<dependency>
   <groupId>org.springframework.boot</groupId>
   <artifactId>spring-boot-starter-security</artifactId>
</dependency>
Gradle 用户可以在 build.gradle 文件中添加以下依赖项。
compile("org.springframework.boot:spring-boot-starter-security")
现在,创建一个 Web 安全配置文件,用于保护您的应用程序使用基本身份验证访问 HTTP 端点。
package com.tutorialspoint.websecuritydemo;

import org.springframework.beans.factory.annotation.Autowired;
import org.springframework.context.annotation.Configuration;
import org.springframework.security.config.annotation.authentication.builders.AuthenticationManagerBuilder;
import org.springframework.security.config.annotation.web.builders.HttpSecurity;
import org.springframework.security.config.annotation.web.configuration.WebSecurityConfigurerAdapter;
import org.springframework.security.config.annotation.web.configuration.EnableWebSecurity;

@Configuration
@EnableWebSecurity
public class WebSecurityConfig extends WebSecurityConfigurerAdapter {
   @Override
   protected void configure(HttpSecurity http) throws Exception {
      http
         .authorizeRequests()
            .antMatchers("/", "/home").permitAll()
            .anyRequest().authenticated()
            .and()
         .formLogin()
            .loginPage("/login")
            .permitAll()
            .and()
            .logout()
            .permitAll();
   }
   @Autowired
   public void configureGlobal(AuthenticationManagerBuilder auth) throws Exception {
      auth
         .inMemoryAuthentication()
         .withUser("user").password("password").roles("USER");
   }
}
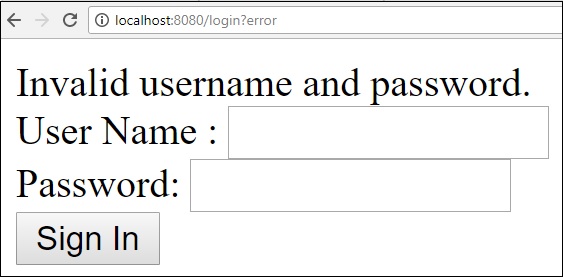
现在,在 src/main/resources 目录下创建一个 login.html 文件,以允许用户通过登录屏幕访问 HTTP 端点。
<!DOCTYPE html>
<html xmlns = "http://www.w3.org/1999/xhtml" xmlns:th = "http://www.thymeleaf.org"
   xmlns:sec = "http://www.thymeleaf.org/thymeleaf-extras-springsecurity3">

   <head>
      <title>Spring Security Example </title>
   </head>
   <body>
      <div th:if = "${param.error}">
         Invalid username and password.
      </div>
      <div th:if = "${param.logout}">
         You have been logged out.
      </div>

      <form th:action = "@{/login}" method = "post">
         <div>
            <label> User Name : <input type = "text" name = "username"/> </label>
         </div>
         <div>
            <label> Password: <input type = "password" name = "password"/> </label>
         </div>
         <div>
            <input type = "submit" value = "Sign In"/>
         </div>
      </form>

   </body>
</html>
最后,更新 hello.html 文件——允许用户退出应用程序并显示当前用户名,如下所示 −
<!DOCTYPE html>
<html xmlns = "http://www.w3.org/1999/xhtml" xmlns:th = "http://www.thymeleaf.org"
   xmlns:sec = "http://www.thymeleaf.org/thymeleaf-extras-springsecurity3">

   <head>
      <title>Hello World!</title>
   </head>
   <body>
      <h1 th:inline = "text">Hello [[${#httpServletRequest.remoteUser}]]!</h1>
      <form th:action = "@{/logout}" method = "post">
         <input type = "submit" value = "Sign Out"/>
      </form>
   </body>

</html>
主要 Spring Boot 应用程序的代码如下所示 −
package com.tutorialspoint.websecuritydemo;

import org.springframework.boot.SpringApplication;
import org.springframework.boot.autoconfigure.SpringBootApplication;

@SpringBootApplication
public class WebsecurityDemoApplication {
   public static void main(String[] args) {
      SpringApplication.run(WebsecurityDemoApplication.class, args);
   }
}
下面给出了构建配置文件的完整代码。
Maven – pom.xml
<?xml version  =  "1.0" encoding  =  "UTF-8"?>
<project xmlns = "http://maven.apache.org/POM/4.0.0"
   xmlns:xsi = "http://www.w3.org/2001/XMLSchema-instance"
   xsi:schemaLocation = "http://maven.apache.org/POM/4.0.0
   http://maven.apache.org/xsd/maven-4.0.0.xsd">

   <modelVersion>4.0.0</modelVersion>
   <groupId>com.tutorialspoint</groupId>
   <artifactId>websecurity-demo</artifactId>
   <version>0.0.1-SNAPSHOT</version>
   <packaging>jar</packaging>
   <name>websecurity-demo</name>
   <description>Demo project for Spring Boot</description>

   <parent>
      <groupId>org.springframework.boot</groupId>
      <artifactId>spring-boot-starter-parent</artifactId>
      <version>1.5.9.RELEASE</version>
      <relativePath/> <!-- lookup parent from repository -->
   </parent>

   <properties>
      <project.build.sourceEncoding>UTF-8</project.build.sourceEncoding>
      <project.reporting.outputEncoding>UTF-8</project.reporting.outputEncoding>
      <java.version>1.8</java.version>
   </properties>

   <dependencies>
      <dependency>
         <groupId>org.springframework.boot</groupId>
         <artifactId>spring-boot-starter-security</artifactId>
      </dependency>

      <dependency>
         <groupId>org.springframework.boot</groupId>
         <artifactId>spring-boot-starter-thymeleaf</artifactId>
      </dependency>

      <dependency>
         <groupId>org.springframework.boot</groupId>
         <artifactId>spring-boot-starter-web</artifactId>
      </dependency>

      <dependency>
         <groupId>org.springframework.boot</groupId>
         <artifactId>spring-boot-starter-test</artifactId>
         <scope>test</scope>
      </dependency>

      <dependency>
         <groupId>org.springframework.security</groupId>
         <artifactId>spring-security-test</artifactId>
         <scope>test</scope>
      </dependency>
   </dependencies>

   <build>
      <plugins>
         <plugin>
            <groupId>org.springframework.boot</groupId>
            <artifactId>spring-boot-maven-plugin</artifactId>
         </plugin>
      </plugins>
   </build>

</project>
Gradle – build.gradle
buildscript {
   ext {
      springBootVersion = '1.5.9.RELEASE'
   }
   repositories {
      mavenCentral()
   }
   dependencies {
      classpath("org.springframework.boot:spring-boot-gradle-plugin:${springBootVersion}")
   }
}

apply plugin: 'java'
apply plugin: 'eclipse'
apply plugin: 'org.springframework.boot'

group = 'com.tutorialspoint'
version = '0.0.1-SNAPSHOT'
sourceCompatibility = 1.8

repositories {
   mavenCentral()
}
dependencies {
   compile('org.springframework.boot:spring-boot-starter-security')
   compile('org.springframework.boot:spring-boot-starter-thymeleaf')
   compile('org.springframework.boot:spring-boot-starter-web')

   testCompile('org.springframework.boot:spring-boot-starter-test')
   testCompile('org.springframework.security:spring-security-test')
}
现在,创建一个可执行 JAR 文件,并使用以下 Maven 或 Gradle 命令运行 Spring Boot 应用程序。
Maven 用户可以使用下面给出的命令 −
mvn clean install
在"BUILD SUCCESS"之后,您可以在目标目录下找到 JAR 文件。
Gradle 用户可以使用如图所示的命令 −
gradle clean build
在“BUILD SUCCESSFUL”之后,您可以在 build/libs 目录下找到 JAR 文件。
现在,使用如下所示的命令运行 JAR 文件 −
java –jar <JARFILE>
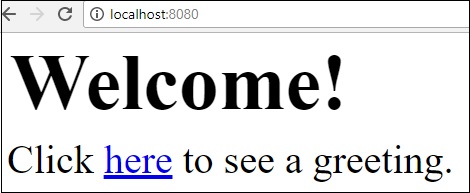
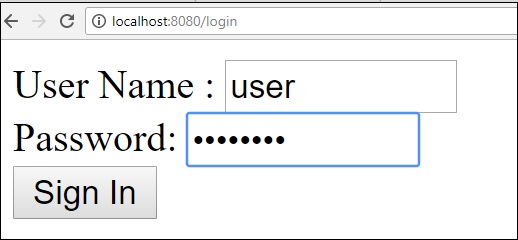
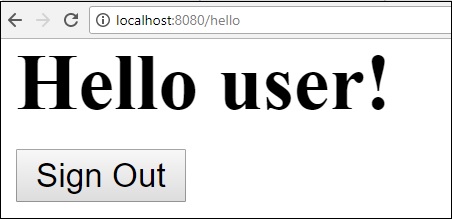
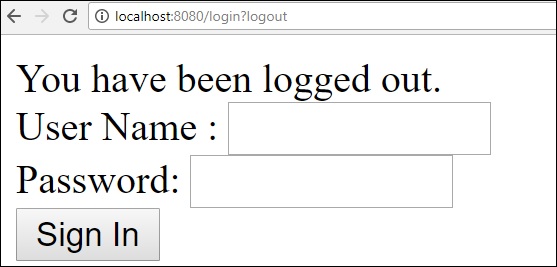
在您的网络浏览器中点击 URL http://localhost:8080/。 您可以看到如图所示的输出。