
Spring Boot - 数据库处理
Spring Boot 为创建数据库的 DataSource 提供了很好的支持。 我们不需要编写任何额外的代码来在 Spring Boot 中创建数据源。 只需添加依赖项并进行详细配置即可创建数据源并连接数据库。
在本章中,我们将使用 Spring Boot JDBC 驱动连接来连接数据库。
首先,我们需要在构建配置文件中添加 Spring Boot Starter JDBC 依赖项。
Maven 用户可以在 pom.xml 文件中添加以下依赖项。
<dependency>
   <groupId>org.springframework.boot</groupId>
   <artifactId>spring-boot-starter-jdbc</artifactId>
</dependency>
Gradle users can add the following dependencies in the build.gradle file.
compile('org.springframework.boot:spring-boot-starter-jdbc')
连接 H2 数据库
要连接 H2 数据库,我们需要在我们的构建配置文件中添加 H2 数据库依赖。
对于 Maven 用户,在 pom.xml 文件中添加以下依赖项。
<dependency>
   <groupId>com.h2database</groupId>
   <artifactId>h2</artifactId>
</dependency>
对于 Gradle 用户,在 build.gradle 文件中添加以下依赖项。
compile('com.h2database:h2')
我们需要在类路径 src/main/resources 目录下创建 schema.sql 文件和 data.sql 文件来连接 H2 数据库。
schema.sql 文件如下所示。
CREATE TABLE PRODUCT (ID INT PRIMARY KEY, PRODUCT_NAME VARCHAR(25));
data.sql 文件如下所示。
INSERT INTO PRODUCT (ID,PRODUCT_NAME) VALUES (1,'Honey');
INSERT INTO PRODUCT (ID,PRODUCT_NAME) VALUES (2,'Almond');
连接 MySQL
要连接 MySQL 数据库,我们需要将 MySQL 依赖项添加到我们的构建配置文件中。
对于 Maven 用户,在 pom.xml 文件中添加以下依赖项。
<dependency>
   <groupId>mysql</groupId>
   <artifactId>mysql-connector-java</artifactId>
</dependency>
对于 Gradle 用户,在 build.gradle 文件中添加以下依赖项。
compile('mysql:mysql-connector-java')
现在,在 MySQL 中创建数据库和表,如图所示 −
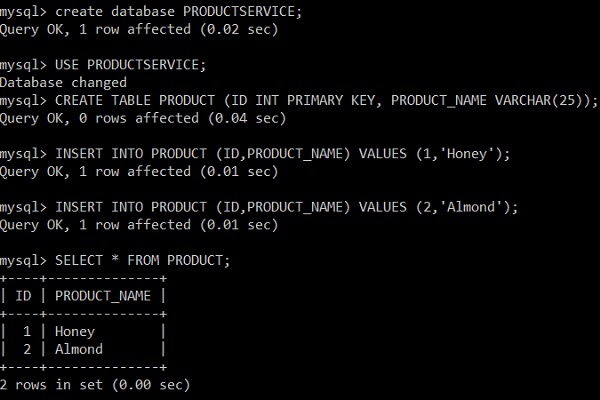
对于属性文件用户,在 application.properties 文件中添加以下属性。
spring.datasource.driverClassName = com.mysql.jdbc.Driver
spring.datasource.url = jdbc:mysql://localhost:3306/PRODUCTSERVICE?autoreconnect = true
spring.datasource.username = root
spring.datasource.password = root
spring.datasource.testOnBorrow = true
spring.datasource.testWhileIdle = true
spring.datasource.timeBetweenEvictionRunsMillis = 60000
spring.datasource.minEvictableIdleTimeMillis = 30000
spring.datasource.validationQuery = SELECT 1
spring.datasource.max-active = 15
spring.datasource.max-idle = 10
spring.datasource.max-wait = 8000
对于 YAML 用户,在 application.yml 文件中添加以下属性。
spring:
   datasource:
      driverClassName: com.mysql.jdbc.Driver
      url: "jdbc:mysql://localhost:3306/PRODUCTSERVICE?autoreconnect=true"
      username: "root"
      password: "root"
      testOnBorrow: true
      testWhileIdle: true
      timeBetweenEvictionRunsMillis: 60000
      minEvictableIdleTimeMillis: 30000
      validationQuery: SELECT 1
      max-active: 15
      max-idle: 10
      max-wait: 8000
连接 Redis
Redis 是一个开源数据库,用于存储内存中的数据结构。 要在 Spring Boot 应用程序中连接 Redis 数据库,我们需要在构建配置文件中添加 Redis 依赖项。
Maven 用户应在您的 pom.xml 文件中添加以下依赖项。
<dependency>
   <groupId>org.springframework.boot</groupId>
   <artifactId>spring-boot-starter-redis</artifactId>
</dependency>
Gradle 用户应在 build.gradle 文件中添加以下依赖项。
compile('org.springframework.boot:spring-boot-starter-data-redis')
对于 Redis 连接,我们需要使用 RedisTemplate。 对于 RedisTemplate,我们需要提供 JedisConnectionFactory 详细信息。
@Bean
JedisConnectionFactory jedisConnectionFactory() {
   JedisConnectionFactory jedisConFactory = new JedisConnectionFactory();
   jedisConFactory.setHostName("localhost");
   jedisConFactory.setPort(6000);
   jedisConFactory.setUsePool(true);
   return jedisConFactory;
}
@Bean
public RedisTemplate<String, Object> redisTemplate() {
   RedisTemplate<String, Object> template = new RedisTemplate<>();
   template.setConnectionFactory(jedisConnectionFactory());
   template.setKeySerializer(new StringRedisSerializer());
   template.setHashKeySerializer(new StringRedisSerializer());
   template.setHashValueSerializer(new StringRedisSerializer());
   template.setValueSerializer(new StringRedisSerializer());
   return template;
}
现在自动连接 RedisTemplate 类并访问 Redis 数据库中的数据。
@Autowired

RedisTemplate<String, Object> redis;
Map<Object,Object> datalist = redis.opsForHash().entries(“Redis_code_index_key”);
JDBCTemplate
要在 Spring Boot 应用程序中使用 JdbcTemplate 访问关系数据库,我们需要在构建配置文件中添加 Spring Boot Starter JDBC 依赖项。
然后,如果你@Autowired JdbcTemplate 类,Spring Boot 会自动连接数据库并为 JdbcTemplate 对象设置数据源。
@Autowired
JdbcTemplate jdbcTemplate;
Collection<Map<String, Object>> rows = jdbc.queryForList("SELECT QUERY");
@Repository 注解应该添加到类文件中。 @Repository 注解用于为 Spring Boot 应用程序创建数据库存储库。
@Repository
public class ProductServiceDAO {
}
多个数据源
我们可以在单个 Spring Boot 应用程序中保留"n"个数据源。 此处给出的示例展示了如何在 Spring Boot 应用程序中创建多个数据源。 现在,在应用程序属性文件中添加两个数据源配置详细信息。
对于属性文件用户,将以下属性添加到您的 application.properties 文件中。
spring.dbProductService.driverClassName = com.mysql.jdbc.Driver
spring.dbProductService.url = jdbc:mysql://localhost:3306/PRODUCTSERVICE?autoreconnect = true
spring.dbProductService.username = root
spring.dbProductService.password = root
spring.dbProductService.testOnBorrow = true
spring.dbProductService.testWhileIdle = true
spring.dbProductService.timeBetweenEvictionRunsMillis = 60000
spring.dbProductService.minEvictableIdleTimeMillis = 30000
spring.dbProductService.validationQuery = SELECT 1
spring.dbProductService.max-active = 15
spring.dbProductService.max-idle = 10
spring.dbProductService.max-wait = 8000

spring.dbUserService.driverClassName = com.mysql.jdbc.Driver
spring.dbUserService.url = jdbc:mysql://localhost:3306/USERSERVICE?autoreconnect = true
spring.dbUserService.username = root
spring.dbUserService.password = root
spring.dbUserService.testOnBorrow = true
spring.dbUserService.testWhileIdle = true
spring.dbUserService.timeBetweenEvictionRunsMillis = 60000
spring.dbUserService.minEvictableIdleTimeMillis = 30000
spring.dbUserService.validationQuery = SELECT 1
spring.dbUserService.max-active = 15
spring.dbUserService.max-idle = 10
spring.dbUserService.max-wait = 8000
Yaml 用户应在 application.yml 文件中添加以下属性。
spring:
   dbProductService:
      driverClassName: com.mysql.jdbc.Driver
      url: "jdbc:mysql://localhost:3306/PRODUCTSERVICE?autoreconnect=true"
      password: "root"
      username: "root"
      testOnBorrow: true
      testWhileIdle: true
      timeBetweenEvictionRunsMillis: 60000
      minEvictableIdleTimeMillis: 30000
      validationQuery: SELECT 1
      max-active: 15
      max-idle: 10
      max-wait: 8000
   dbUserService:
      driverClassName: com.mysql.jdbc.Driver
      url: "jdbc:mysql://localhost:3306/USERSERVICE?autoreconnect=true"
      password: "root"
      username: "root"
      testOnBorrow: true
      testWhileIdle: true
      timeBetweenEvictionRunsMillis: 60000
      minEvictableIdleTimeMillis: 30000
      validationQuery: SELECT 1
      max-active: 15
      max-idle: 10
      max-wait: 8000
现在,创建一个 Configuration 类来为多个数据源创建一个 DataSource 和 JdbcTemplate。
import javax.sql.DataSource;

import org.springframework.beans.factory.annotation.Autowired;
import org.springframework.beans.factory.annotation.Qualifier;
import org.springframework.boot.autoconfigure.jdbc.DataSourceBuilder;
import org.springframework.boot.context.properties.ConfigurationProperties;
import org.springframework.context.annotation.Bean;
import org.springframework.context.annotation.Configuration;
import org.springframework.context.annotation.Primary;
import org.springframework.jdbc.core.JdbcTemplate;

@Configuration
public class DatabaseConfig {
   @Bean(name = "dbProductService")
   @ConfigurationProperties(prefix = "spring.dbProductService")
   @Primary
   public DataSource createProductServiceDataSource() {
      return DataSourceBuilder.create().build();
   }
   @Bean(name = "dbUserService")
   @ConfigurationProperties(prefix = "spring.dbUserService")
   public DataSource createUserServiceDataSource() {
      return DataSourceBuilder.create().build();
   }
   @Bean(name = "jdbcProductService")
   @Autowired
   public JdbcTemplate createJdbcTemplate_ProductService(@Qualifier("dbProductService") DataSource productServiceDS) {
      return new JdbcTemplate(productServiceDS);
   }
   @Bean(name = "jdbcUserService")
   @Autowired
   public JdbcTemplate createJdbcTemplate_UserService(@Qualifier("dbUserService") DataSource userServiceDS) {
      return new JdbcTemplate(userServiceDS);
   }
}
然后,使用 @Qualifier 注解自动连接 JDBCTemplate 对象。
@Qualifier("jdbcProductService")
@Autowired
JdbcTemplate jdbcTemplate;

@Qualifier("jdbcUserService")
@Autowired
JdbcTemplate jdbcTemplate;

