
ReactJS - componentDidCatch() 方法
React 是一个用于创建用户界面的流行 JavaScript 库。在创建 React 应用程序时,我们可能会遇到代码中的错误。当这些错误发生在 React 组件中时,正确处理它们可能是一项艰巨的任务。这时可以使用 componentDidCatch 函数。因此,componentDidCatch 会捕获我们组件中的错误并防止整个应用程序崩溃。因此,我们将借助示例了解它的工作原理。
什么是 componentDidCatch?
componentDidCatch 是一个可以在 React 组件中定义的函数。它的主要功能是检测组件的任何子元素中的错误,无论该子元素位于组件树的深处。
当任何子组件中发生错误时,React 将调用 componentDidCatch。它让我们有机会对错误做出响应。
componentDidCatch 的一个常见用途是记录错误。在生产中,这可以发送到错误报告服务,使我们能够跟踪和修复问题。
语法
componentDidCatch(error, info)
参数
componentDidCatch 函数中使用了两个参数:error 和 info。
error − 这是抛出的错误。它通常是 Error 对象的实例,但也可能是字符串或 null。
info − 这是与错误相关的数据。它提供了一个堆栈跟踪,指示问题发生的位置以及涉及哪些组件。
返回值
componentDidCatch 函数不返回任何内容。它主要用于告诉错误不要产生结果。
如何使用它?
我们将创建一个应用程序并使用 componentDidCatch 来展示它的用法 −
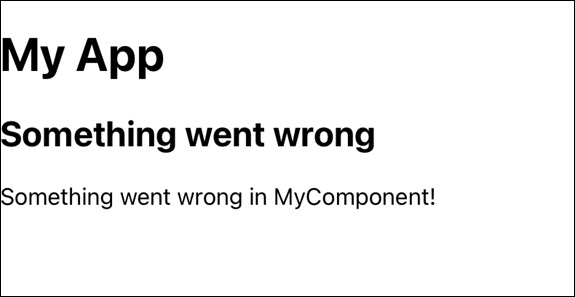
在这个应用程序中,我们有一个 MyComponent,它故意在其 componentDidMount 函数中抛出一个错误来获取错误。我们将在 ErrorBoundary 中使用 MyComponent,它将捕获和处理 MyComponent 中发生的任何错误。如果 MyComponent 中发生错误,ErrorBoundary 将显示带有错误消息的自定义回退 UI。
示例
import React from 'react';

class MyComponent extends React.Component {
   constructor(props) {
      super(props);
      this.state = { data: null };
   }
   componentDidMount() {
      // 尝试解析无效的 JSON 以引发错误。
      try {
         JSON.parse("This is not valid JSON");
      } catch (error) {
         throw new Error("Something went wrong in MyComponent!");
      }
   }
   render() {

      // 像往常一样渲染组件
      return <div>{this.state.data}</div>;
   }
}
class ErrorBoundary extends React.Component {
   constructor(props) {
      super(props);
      this.state = { hasError: false, error: null };
   }

   static getDerivedStateFromError(error) {

      // 更新状态以显示后备 UI 并存储错误
      return { hasError: true, error };
   }
   componentDidCatch(error, info) {
      console.error("Error caught by ErrorBoundary:", error);
      console.error("Component Stack:", info.componentStack);
   }
   render() {
   if (this.state.hasError) {

      // 使用错误消息渲染自定义回退 UI
      return (
         <div>
            <h2>Something went wrong</h2>
            <p>{this.state.error.message}</p>
         </div>
      );
   }

   // 如果没有发现错误,则渲染子组件
   return this.props.children;
   }
}
function App() {
   return (
      <div>
         <h1>My App</h1>
         <ErrorBoundary>
         <MyComponent />
         </ErrorBoundary>
      </div>
   );
}

export default App;
输出
示例 − 具有错误处理的动态表单
此应用显示一个动态表单,用户可以在其中将数据输入到字段中。如果在表单数据处理过程中出现错误,componentDidCatch 方法会记录该错误并通知用户有关问题。
import React, { Component } from 'react';

class DynamicForm extends Component {
   constructor(props) {
      super(props);
      this.state = {
         formData: {},
         hasError: false,
      };
   }
   handleInputChange = (field, value) => {
      try {
         // 处理动态表单数据的逻辑
         this.setState(prevState => ({
            formData: {
               ...prevState.formData,
               [field]: value,
            },
         }));
      } catch (error) {
         // Handle errors
         this.setState({ hasError: true });
      }
   };
   handleButtonClick = () => {

      // 发送表单数据到服务器
      try {

         // 向服务器发送数据的逻辑
         console.log('Sending form data:', this.state.formData);
      } catch (error) {

         // 处理发送数据时的错误
         console.error('Error sending form data:', error);
         this.setState({ hasError: true });
      }
   };
   componentDidCatch(error, info) {
      console.error('Form Error:', error, info);
      this.setState({ hasError: true });
   }
   render() {
      if (this.state.hasError) {
         return <div>Sorry, there was an issue with the form.</div>;
      }

      return (
         <div>
            <h1>Dynamic Form</h1>
            <input
               type="text"
               placeholder="Field 1"
               onChange={e => this.handleInputChange('field1', e.target.value)}
            />
            <input
               type="text"
               placeholder="Field 2"
               onChange={e => this.handleInputChange('field2', e.target.value)}
            />
            <button onClick={this.handleButtonClick}>Send Data</button>
         </div>
      );
   }
}

export default DynamicForm;
输出
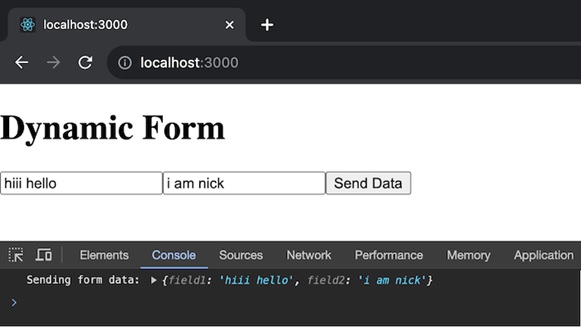
当用户点击"发送数据"按钮时,表单数据将记录到控制台。我们可以将 handleButtonClick 方法中的 console.log 语句替换为我们使用 fetch 将数据发送到服务器的实际逻辑。
注意事项
过去,开发人员使用 componentDidCatch 中的 setState 来更改用户界面并显示错误警告。这种方法现在被认为已经过时了。对于处理错误,最好使用静态 getDerivedStateFromError。
在开发和生产中,React 的行为有所不同。在开发中,componentDidCatch 将捕获错误并将其发送到浏览器的全局错误处理程序。它们不会在生产中冒泡,因此我们必须使用 componentDidCatch 明确捕获它们。
摘要
componentDidCatch 是一个有用的 React 功能,它允许我们正确管理组件中的错误。它就像有一个安全网,可以记录错误并允许我们记录它们或显示错误消息。请记住,它应该与 getDerivedStateFromError 结合使用,并且开发和生产设置之间存在变化。
 reactjs_reference_api.html
