
ReactJS - 渲染道具
由于 React 组件是通过组合(一个组件包含另一个组件)而不是通过继承相互连接的,因此 React 组件中使用的逻辑不会直接共享给另一个组件。React 提供了多个选项来在组件之间共享逻辑,其中一个选项是渲染道具。渲染道具基本上是通过其道具将具有必要渲染逻辑的函数传递给具有核心功能的组件。因此,它被称为渲染道具。
让我们在本章中学习如何使用渲染道具。
如何使用渲染道具
让我们逐步了解如何使用渲染道具并在两个组件之间共享逻辑。让我们考虑从外部 URL 获取和呈现数据的场景。
创建一个组件 FetcherComponent 来从外部 URL 获取数据,并创建一个 FetcherConsumerComponent 来使用数据并呈现它。
创建一个组件 FetcherComponent,它具有针对给定 URL(props.url)的数据获取逻辑。
componentDidMount() {
   fetch(this.props.url)
   .then((response) => response.json())
   .then((data) => {
      this.setState({
         data: data
      });
   });
}
现在,更新 FetcherComponent,以便将核心渲染逻辑委托给 props(this.props.render)。
render() {
   return (
      <div>
         <h2>Fetch react component</h2>
         {this.state.data && this.props.render(this.state.data)}
      </div>
   )
}
此处,
this.props.render 是具有渲染逻辑的函数,任何其他组件都会通过其 props 将其传递到 FetcherComponent 中。
创建一个组件 FetcherConsumerComponent,并通过传递获取的数据的渲染逻辑来渲染 FetcherComponent。
render() {
   return (<FetcherComponent url="users.json" render={(items) => (
      <ul>
         {items && items.length && items.map((item) =>
            <li key={item.id}>{item.name}</li>
         )}
      </ul>
   )} />)
}
这里,
items 是由 FetcherComponent 组件获取的数据。
它们循环并发出 HTML 无序列表。
我们可以按照本节中定义的步骤,并在下一节中创建一个工作示例。
应用渲染道具
首先,创建一个新的 React 应用程序并使用以下命令启动它。
create-react-app myapp
cd myapp
npm start
接下来,打开 App.css (src/App.css) 并删除所有 CSS 类。然后,创建一个组件 FetchRenderProps (src/Components/FetchRenderProps.js),其数据获取逻辑如下所示 −
import React from "react";
class FetchRenderProps extends React.Component {
   constructor(props) {
      super(props);
      this.state = {
         data: []
      }
   }
   componentDidMount() {
      fetch(this.props.url)
      .then((response) => response.json())
      .then((data) => {
         console.log(data)
         this.setState({
            data: data
         });
      });
   }
   render() {
      return (
         <div>
            <h2>Fetch react component</h2>
            {this.state.data && this.props.render(this.state.data)}
         </div>
      )
   }
}
export default FetchRenderProps;
这里我们有,
在 componentDidMount 事件中使用 fetch javascript 方法从外部 url 获取数据。
使用通过 props 传递的 render 方法渲染获取的数据。
接下来,在 public 文件夹中创建一个文件 users.json (public/users.json) 来存储用户信息。我们将尝试使用 FetchRenderProps 组件获取它并在我们的应用程序中显示它。
[{"id":1,"name":"Fowler","age":18},
{"id":2,"name":"Donnell","age":24},
{"id":3,"name":"Pall","age":26}]
接下来,在 public 文件夹中创建一个文件 todo_list.json (public/todo_list.json),用于存储待办事项列表信息。我们将尝试使用 FetchRenderProps 组件获取它并在我们的应用程序中显示它。
[{"id":1,"title":"Learn JavaScript","is_done":true},
{"id":2,"title":"Learn React","is_done":true},
{"id":3,"title":"Learn Typescript","is_done":false
接下来,创建一个组件 SimpleRenderProps (src/Components/SimpleRenderProps.js) 来使用 FetchRenderProps 组件,如下所示 −
import React from "react";
import FetchRenderProps from "./FetchRenderProps";
class SimpleRenderProps extends React.Component {
   render() {
      return (
         <>
            <FetchRenderProps url="users.json" render={(items) => (
               <ul>
                  {items && items.length && items.map((item) =>
                     <li key={item.id}>{item.name}</li>
                  )}
               </ul>
            )} />
            <FetchRenderProps url="todo_list.json" render={(items) => (
               <ul>
                  {items && items.length && items.map((item) =>
                     <li key={item.id}>{item.title} {item.is_done && <strong>Done</strong>}</li>
                  )}
               </ul>
            )} />
         </>
      )
   }
}
export default SimpleRenderProps;
这里我们有,
使用 FetchRenderProps 和 users.json 来获取和呈现用户列表
使用 FetchRenderProps 和 todo_list.json 来获取和呈现待办事项列表
获取用户和待办事项列表使用相同的 FetchRenderProps 组件。
接下来,打开 App.js 文件并呈现 SimpleRenderProps 组件,如下所示 −
import './App.css'
import React from 'react';
import SimpleRenderProps from './Components/SimpleRenderProps'
function App() {
   return (
      <div className="container">
         <div style={{ padding: "10px" }}>
            <div>
               <SimpleRenderProps />
            </div>
         </div>
      </div>
   );
}
export default App;
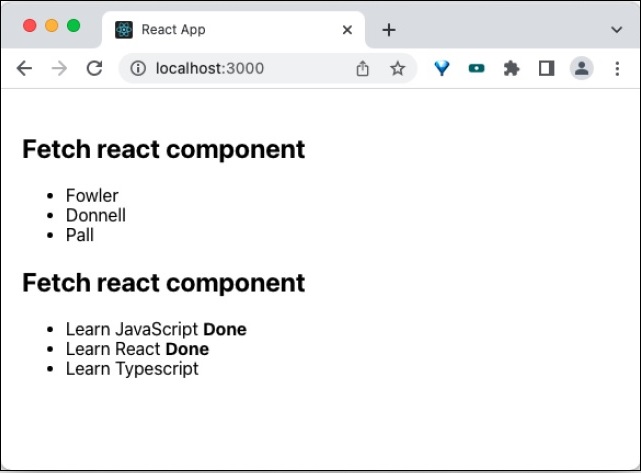
最后,在浏览器中打开应用程序并检查最终结果。应用程序将呈现如下图所示 −
摘要
渲染属性是一种在组件之间共享逻辑的有效方法。它在许多第三方组件中被广泛使用,成功率很高,并且是经过时间考验的在 React 域中共享逻辑的方法。

