ReactJS - Material UI
React 社区提供了大量高级 UI 组件框架。Material UI 是流行的 React UI 框架之一。让我们在本章中学习如何使用 Material UI 库。
安装
可以使用 npm 包安装 Material UI。
npm install @material-ui/core
Material UI 建议使用 roboto 字体作为 UI。要使用 Roboto 字体,请使用 Gooogleapi 链接将其包含在内。
<link rel="stylesheet" href="https://fonts.googleapis.com/css?family=Roboto:300,400,500,700&display=swap" />
要使用字体图标,请使用来自 googleapis 的图标链接 −
<link rel="stylesheet" href="https://fonts.googleapis.com/icon?family=Material+Icons" />
要使用 SVG 图标,请安装 @material-ui/icons 包 −
npm install @material-ui/icons
工作示例
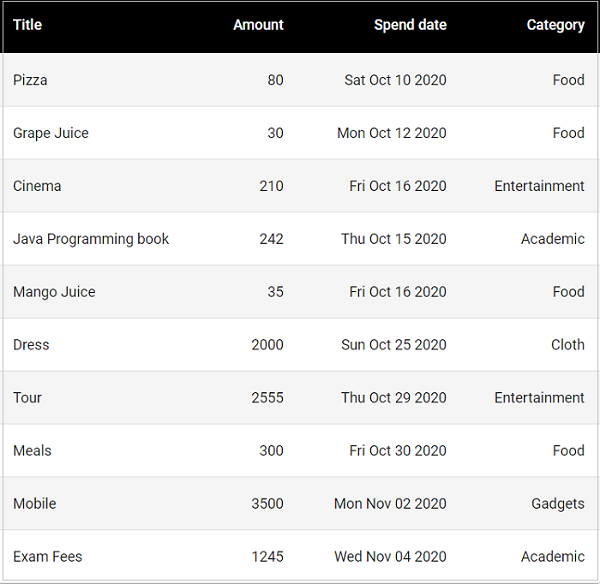
让我们重新创建费用列表应用程序并使用 Material UI 组件代替 html 表。
步骤 1 −首先,按照创建 React 应用程序一章中的说明,使用 Create React App 或 Rollup bundler 创建一个新的 React 应用程序 react-materialui-app。
步骤 2 −安装 React Transition 组库 −
cd /go/to/project npm install @material-ui/core @material-ui/icons --save
在您最喜欢的编辑器中打开应用程序。
在应用程序的根目录下创建 src 文件夹。
在 src 文件夹下创建 components 文件夹。
在 src/components 文件夹中创建一个文件 ExpenseEntryItemList.js 以创建 ExpenseEntryItemList 组件
导入 React 库和样式表。
import React from 'react';
步骤 2 − 接下来,导入 Material-UI 库。
import { withStyles } from '@material-ui/core/styles';
import Table from '@material-ui/core/Table';
import TableBody from '@material-ui/core/TableBody';
import TableCell from '@material-ui/core/TableCell';
import TableContainer from '@material-ui/core/TableContainer';
import TableHead from '@material-ui/core/TableHead';
import TableRow from '@material-ui/core/TableRow';
import Paper from '@material-ui/core/Paper';
创建 ExpenseEntryItemList 类并调用构造函数。
class ExpenseEntryItemList extends React.Component {
   constructor(props) {
      super(props);
   }
}
<link rel="stylesheet" href="https://fonts.googleapis.com/css?family=Roboto:300,400,500,700&display=swap" />
创建一个 render() 函数。
render() {
}
在 render 方法中为表格行和表格单元格应用样式。
const StyledTableCell = withStyles((theme) => ({
   head: {
      backgroundColor: theme.palette.common.black,
      color: theme.palette.common.white,
   },
   body: {
      fontSize: 14,
   },
}))(TableCell);
const StyledTableRow = withStyles((theme) => ({
   root: {
      '&:nth-of-type(odd)': {
         backgroundColor: theme.palette.action.hover,
      },
   },
}))(TableRow);
使用 map 方法生成 Material UI StyledTableRow 集合,每个集合代表列表中的单个费用条目。
const lists = this.props.items.map((item) =>
   <StyledTableRow key={item.id}>
      <StyledTableCell component="th" scope="row">
         {item.name}
      </StyledTableCell>
      <StyledTableCell align="right">{item.amount}</StyledTableCell>
      <StyledTableCell align="right">
         {new Date(item.spendDate).toDateString()}
      </StyledTableCell>
      <StyledTableCell align="right">{item.category}</StyledTableCell>
   </StyledTableRow>
);
此处,key 标识每一行,并且它在列表中必须是唯一的。
步骤 3 − 在 render() 方法中,创建一个 Material UI 表并在行部分中包含列表表达式并返回它。
return (
<TableContainer component={Paper}>
   <Table aria-label="customized table">
      <TableHead>
         <TableRow>
            <StyledTableCell>Title</StyledTableCell>
            <StyledTableCell align="right">Amount</StyledTableCell>
            <StyledTableCell align="right">Spend date</StyledTableCell>
            <StyledTableCell align="right">Category</StyledTableCell>
         </TableRow>
      </TableHead>
      <TableBody>
         {lists}
      </TableBody>
   </Table>
</TableContainer> );
最后,导出组件。
export default ExpenseEntryItemList;
现在,我们已经成功创建了使用material ui组件渲染费用项目的组件。
组件的完整源代码如下所示 −
import React from 'react';

import { withStyles } from '@material-ui/core/styles';
import Table from '@material-ui/core/Table';
import TableBody from '@material-ui/core/TableBody';
import TableCell from '@material-ui/core/TableCell';
import TableContainer from '@material-ui/core/TableContainer';
import TableHead from '@material-ui/core/TableHead';
import TableRow from '@material-ui/core/TableRow';
import Paper from '@material-ui/core/Paper';

class ExpenseEntryItemList extends React.Component {
   constructor(props) {
      super(props);
   }
   render() {
      const StyledTableCell = withStyles((theme) => ({
         head: {
            backgroundColor: theme.palette.common.black,
            color: theme.palette.common.white,
         },
         body: {
            fontSize: 14,
         },
      }))(TableCell);
      const StyledTableRow = withStyles((theme) => ({
         root: {
            '&:nth-of-type(odd)': {
               backgroundColor: theme.palette.action.hover,
            },
         },
      }))(TableRow);
      const lists = this.props.items.map((item) =>
         <StyledTableRow key={item.id}>
            <StyledTableCell component="th" scope="row">
               {item.name}
            </StyledTableCell>
            <StyledTableCell align="right">{item.amount}</StyledTableCell>
            <StyledTableCell align="right">{new Date(item.spendDate).toDateString()}</StyledTableCell>
            <StyledTableCell align="right">{item.category}</StyledTableCell>
         </StyledTableRow>
      );
      return (
      <TableContainer component={Paper}>
         <Table aria-label="customized table">
            <TableHead>
               <TableRow>
                  <StyledTableCell>Title</StyledTableCell>
                  <StyledTableCell align="right">Amount</StyledTableCell>
                  <StyledTableCell align="right">Spend date</StyledTableCell>
                  <StyledTableCell align="right">Category</StyledTableCell>
               </TableRow>
            </TableHead>
            <TableBody>
               {lists}
            </TableBody>
         </Table>
      </TableContainer> );
   }
}
export default ExpenseEntryItemList;
index.js:
打开 index.js 并导入 react 库和我们新创建的 ExpenseEntryItemList 组件。
import React from 'react';
import ReactDOM from 'react-dom';
import ExpenseEntryItemList from './components/ExpenseEntryItemList';
在 index.js 文件中声明一个列表(费用条目项目)并用一些随机值填充它。
const items = [
   { id: 1, name: "Pizza", amount: 80, spendDate: "2020-10-10", category: "Food" },
   { id: 1, name: "Grape Juice", amount: 30, spendDate: "2020-10-12", category: "Food" },
   { id: 1, name: "Cinema", amount: 210, spendDate: "2020-10-16", category: "Entertainment" },
   { id: 1, name: "Java Programming book", amount: 242, spendDate: "2020-10-15", category: "Academic" },
   { id: 1, name: "Mango Juice", amount: 35, spendDate: "2020-10-16", category: "Food" },
   { id: 1, name: "Dress", amount: 2000, spendDate: "2020-10-25", category: "Cloth" },
   { id: 1, name: "Tour", amount: 2555, spendDate: "2020-10-29", category: "Entertainment" },
   { id: 1, name: "Meals", amount: 300, spendDate: "2020-10-30", category: "Food" },
   { id: 1, name: "Mobile", amount: 3500, spendDate: "2020-11-02", category: "Gadgets" },
   { id: 1, name: "Exam Fees", amount: 1245, spendDate: "2020-11-04", category: "Academic" }
]
通过项目属性传递项目来使用 ExpenseEntryItemList 组件。
ReactDOM.render(
   <React.StrictMode>
      <ExpenseEntryItemList items={items} />
   </React.StrictMode>,
   document.getElementById('root')
);
index.js完整代码如下 −
import React from 'react';
import ReactDOM from 'react-dom';
import ExpenseEntryItemList from './components/ExpenseEntryItemList';

const items = [
   { id: 1, name: "Pizza", amount: 80, spendDate: "2020-10-10", category: "Food" },
   { id: 1, name: "Grape Juice", amount: 30, spendDate: "2020-10-12", category: "Food" },
   { id: 1, name: "Cinema", amount: 210, spendDate: "2020-10-16", category: "Entertainment" },
   { id: 1, name: "Java Programming book", amount: 242, spendDate: "2020-10-15", category: "Academic" },
   { id: 1, name: "Mango Juice", amount: 35, spendDate: "2020-10-16", category: "Food" },
   { id: 1, name: "Dress", amount: 2000, spendDate: "2020-10-25", category: "Cloth" },
   { id: 1, name: "Tour", amount: 2555, spendDate: "2020-10-29", category: "Entertainment" },
   { id: 1, name: "Meals", amount: 300, spendDate: "2020-10-30", category: "Food" },
   { id: 1, name: "Mobile", amount: 3500, spendDate: "2020-11-02", category: "Gadgets" },
   { id: 1, name: "Exam Fees", amount: 1245, spendDate: "2020-11-04", category: "Academic" }
]
ReactDOM.render(
   <React.StrictMode>
      <ExpenseEntryItemList items={items} />
   </React.StrictMode>,
   document.getElementById('root')
);
使用 npm 命令为应用程序提供服务。
npm start
index.html
在公共文件夹中打开 index.html 文件并包含 Material UI 字体和图标。
<!DOCTYPE html>
<html lang="en">
   <head>
      <meta charset="utf-8">
      <title>Material UI App</title>
      <link rel="stylesheet" href="https://fonts.googleapis.com/css?family=Roboto:300,400,500,700&display=swap" />
      <link rel="stylesheet" href="https://fonts.googleapis.com/icon?family=Material+Icons" />
   </head>
   <body>
      <div id="root"></div>
      <script type="text/JavaScript" src="./index.js"></script>
   </body>
</html>
打开浏览器,在地址栏中输入http://localhost:3000并按回车键。