
ReactJS - 使用属性创建组件
正如我们之前在本教程中了解到的,React 是一个非常灵活的库,有时具有可弯曲的规则,但它严格遵循一条规则:如果组件被定义为函数或类,则它必须像纯函数一样对待其属性。React 中的纯函数被定义为其输入不能更改的函数,因此它不会改变其结果。
简而言之,传递给组件的 Props 是只读的。但由于应用程序 UI 是动态的,并且会随时间改变其输入,我们使用"状态"概念来处理它。
状态概念允许 React 组件根据不断变化的用户操作、网络响应等改变其结果,而不会违反此规则。
如何使用属性创建组件?
在本章中,让我们看看使用属性创建组件的步骤 −
我们将首先修改我们的 ExpenseEntryItem 组件并尝试使用属性。
步骤 1 − 在您最喜欢的编辑器中打开我们的 expense-manager 应用程序。
在 src/components 文件夹中打开 ExpenseEntryItem 文件。
步骤 2 −引入带有参数 props 的构造函数。
constructor(props) {
    super(props);
}
接下来,更改渲染方法并从 props 中填充值。
render() {
   return (
      <div>
         <div><b>Item:</b> <em>{this.props.name}</em></div>
         <div><b>Amount:</b> <em>{this.props.amount}</em></div>
         <div><b>Spend date:</b>
            <em>{this.props.spenddate.tostring()}</em></div>
         <div><b>Category:</b> <em>{this.props.category}</em></div>
      </div>
   );
}
此处,
name 表示商品名称,类型为 String
amount 表示商品金额,类型为 number
spendDate 表示商品消费日期,类型为 date
category 表示商品类别,类型为 String
现在,我们已成功使用属性更新了组件。
import React from 'react'
import './ExpenseEntryItem.css';
import styles from './ExpenseEntryItem.module.css'

class ExpenseEntryItem extends React.Component {
   constructor(props) {
      super(props);
   }
   render() {
      return (
         <div>
            <div><b>Item:</b> <em>{this.props.name}</em></div>
            <div><b>Amount:</b> <em>{this.props.amount}</em></div>
            <div><b>Spend Date:</b>
               <em>{this.props.spendDate.toString()}</em></div>
            <div><b>Category:</b> <em>{this.props.category}</em></div>
         </div>
      );
   }
}
export default ExpenseEntryItem;
index.js
现在,我们可以通过 index.js 中的属性传递所有属性来使用该组件。
import React from 'react';
import ReactDOM from 'react-dom';
import ExpenseEntryItem from './components/ExpenseEntryItem'

const name = "Grape Juice"
const amount = 30.00
const spendDate = new Date("2020-10-10")
const category = "Food"

ReactDOM.render(
   <React.StrictMode>
      <ExpenseEntryItem
         name={name}
         amount={amount}
         spendDate={spendDate}
         category={category} />
   </React.StrictMode>,
   document.getElementById('root')
);
使用 npm 命令为应用程序提供服务。
npm start
打开浏览器,在地址栏中输入 http://localhost:3000,然后按回车键。
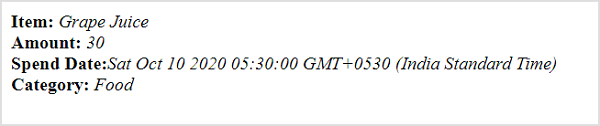
在网页中使用 CDN 的完整代码如下−
<!DOCTYPE html>
<html>
   <head>
      <meta charset="UTF-8" />
      <title>React based application</title>
   </head>
   <body>
      <div id="react-app"></div>

      <script src="https://unpkg.com/react@17/umd/react.development.js" crossorigin></script>
      <script src="https://unpkg.com/react-dom@17/umd/react-dom.development.js" crossorigin></script>
      <script src="https://unpkg.com/@babel/standalone/babel.min.js"></script>
      <script type="text/babel">
         class ExpenseEntryItem extends React.Component {
            constructor(props) {
               super(props);
            }
            render() {
               return (
                  <div>
                     <div><b>Item:</b> <em>{this.props.name}</em></div>
                     <div><b>Amount:</b> <em>{this.props.amount}</em></div>
                     <div><b>Spend Date:</b> <em>{this.props.spendDate.toString()}</em></div>
                     <div><b>Category:</b> <em>{this.props.category}</em></div>
                  </div>
               );
            }
         }
         const name = "Grape Juice"
         const amount = 30.00
         const spendDate = new Date("2020-10-10")
         const category = "Food"

         ReactDOM.render(
            <ExpenseEntryItem
               name={name}
               amount={amount}
               spendDate={spendDate}
               category={category} />,
            document.getElementById('react-app') );
      </script>
   </body>
</html>
对象作为属性
在本章中,让我们学习如何使用 JavaScript 对象作为属性。
步骤 1 − 在您最喜欢的编辑器中打开我们的 expense-manager 应用程序。
打开 ExpenseEntryItem.js 文件。
步骤 2 − 接下来,更改 render() 方法并通过 this.props.item 属性访问输入对象项。
render() {
   return (
      <div>
         <div><b>Item:</b> <em>{this.props.item.name}</em></div>
         <div><b>Amount:</b> <em>{this.props.item.amount}</em></div>
         <div><b>Spend Date:</b>
            <em>{this.props.item.spendDate.toString()}</em></div>
         <div><b>Category:</b> <em>{this.props.item.category}</em></div>
      </div>
   );
}
打开 index.js 并在 JavaScript 对象中表示费用条目。
const item = {
   id: 1,
   name : "Grape Juice",
   amount : 30.5,
   spendDate: new Date("2020-10-10"),
   category: "Food"
}
在组件属性中使用花括号 ({}) 语法将对象传递给组件。
<ExpenseEntryItem item={item} />
index.js
index.js 的完整代码如下 −
import React from 'react';
import ReactDOM from 'react-dom';
import ExpenseEntryItem from './components/ExpenseEntryItem'

const item = {
   id: 1,
   name : "Grape Juice",
   amount : 30.5,
   spendDate: new Date("2020-10-10"),
   category: "Food"
}
ReactDOM.render(
   <React.StrictMode>
   <ExpenseEntryItem item={item} />
   </React.StrictMode>,
   document.getElementById('root')
);
使用 npm 命令为应用程序提供服务。
npm start
打开浏览器,在地址栏中输入 http://localhost:3000,然后按回车键。
在网页中使用 CDN 的完整代码如下 −
<!DOCTYPE html>
<html>
   <head>
      <meta charset="UTF-8" />
      <title>React based application</title>
   </head>
   <body>
      <div id="react-app"></div>

      <script src="https://unpkg.com/react@17/umd/react.development.js" crossorigin></script>
      <script src="https://unpkg.com/react-dom@17/umd/react-dom.development.js" crossorigin></script>
      <script src="https://unpkg.com/@babel/standalone/babel.min.js"></script>
      <script type="text/babel">
         class ExpenseEntryItem extends React.Component {
            constructor(props) {
               super(props);
            }
            render() {
               return (
                  <div>
                     <div><b>Item:</b>
                        <em>{this.props.item.name}</em></div>
                     <div><b>Amount:</b>
                        <em>{this.props.item.amount}</em></div>
                     <div><b>Spend Date:</b>
                        <em>{this.props.item.spendDate.toString()}</em>
                     </div>
                     <div><b>Category:</b>
                        <em>{this.props.item.category}</em>
                     </div>
                  </div>
               );
            }
         }
         const item = {
            id: 1,
            name : "Grape Juice",
            amount : 30.5,
            spendDate: new Date("2020-10-10"),
            category: "Food"
         }
         ReactDOM.render(
            <ExpenseEntryItem item={item} />,
            document.getElementById('react-app')
         );
      </script>
   </body>
</html>

